
July 28, 2020
This article is the first of three in a deep dive into AWS Glue. This low-code/no-code platform is AWS’s simplest extract, transform, and load (ETL) service. The focus of this article will be AWS Glue Data Catalog. You’ll need to understand the data catalog before building Glue Jobs in the next article.
The information is presented in a way that should lay a foundation for newcomers to this service. I also expect that experienced users will find some new tricks to using Glue from this too. I've played around with many configurations of Glue Classifiers and Jobs so I wish to share my experience.
The articles in this series will be on the topics as follows:
- Starting with AWS Glue Data Catalog and querying S3 from Athena
- Making ETL jobs with AWS Glue Jobs
- Orchestrating ETL jobs and AWS Glue Data Catalog with AWS Glue Workflows
So you need to move and transform some data stored in AWS
There are many ways to perform ETL within the AWS ecosystem. A Python developer may prefer to create a simple Lambda function that reads a file stored in S3 into a Pandas data frame, then transforms it and uploads it to its target destination. A Big Data Engineer may spin up an Amazon EMR cluster to ingest terabytes of data into a Spark job to transform and write to its destination.
To make things even easier, AWS Glue lets you point to your source and target destinations and it takes care of the transformations for you. It’s completely serverless so AWS takes care of provisioning and configuration, and has the benefit of near-limitless scalability. It’s meant for structured or semi-structured data.
Some of AWS Glue’s key features are the data catalog and jobs. The data catalog works by crawling data stored in S3 and generates a metadata table that allows the data to be queried in Amazon Athena, another AWS service that acts as a query interface to data stored in S3. We’ll touch more later in the article.
The other key feature is ETL jobs. ETL jobs allow a user to point from source-to-target destinations and describe the transformation without needing to code. Glue takes care of the rest by generating the underlying code to perform the ETL. The underlying code can be edited if a user wishes to do something outside-of-the-box but it’s not required. This is what the next article will address.
Once the data catalog and ETL jobs are set up, Glue offers workflows to orchestrate and automate end-to-end ETL processes. I’ll finish up this article series by writing about this.
What is the Glue Data Catalog?
Glue Data Catalog is the starting point in AWS Glue and a prerequisite to creating Glue Jobs. Within Glue Data Catalog, you define Crawlers that create Tables.
Crawlers crawl a path in S3 (not an individual file!).
The tables are metadata tables that describe data sitting in an S3 repository, these are necessary to classify the schema of the S3 repository so that Glue Jobs have a frame of reference to perform transformations (this will make more sense in the second article)
Unfortunately, AWS Glue uses the names “tables” and “databases”. This may confuse new users since there isn’t any source data stored or transferred, only metadata. The databases in the Glue Data Catalog are used as ways to group tables. There’s no ODBC or servers involved in this.
With that out the way, I will build a crawler and show what it generates.
Glue Data Catalog Deep Dive
I’m going to store my data in an S3 directory with the path of s3://ippon-glue-blog/raw. This is what the raw data looks like. It’s 3 comma-separated files with data about video games. Every file in the directory needs to have the same schema. Otherwise, the crawler will not be able to classify the data’s schema.
Here’s a screenshot of one of the files.

Creating the Crawler
Once your data is in S3, move back into the Glue console and navigate to the “Crawlers” section. Click “Add crawler” and a screen will appear to allow you to specify the crawler details.
Let’s step through each page for configuration. I’ll highlight necessary configuration details for each step of the way
Crawler info
- Crawler name: a unique name for the crawler
- Tags [optional]: Key-value tags you can label crawlers with
- Description [optional]: a description for the crawler
- Security configuration [optional]: security configurations to enable things such as at-rest encrypted logs.
- Classifiers [optional] [recommended]: classifiers are prespecified schema classifications. They’re configured in the “Classifiers” tab below “Crawlers” in the Glue console. Users can define GROK patterns, XML, JSON, or CSV schemas. If you choose to leave this empty, Glue will default to its default schema discovery classifier to try and infer the schema.
Sidenote: Some classifier configuration options can be limited. For example, the CSV classifier will only let you skip a single line (the column names row) when reading in a file. This isn’t very useful if the CSV you’re processing has a block of comments at the top of the file.
I’m going to keep this article brief so I only specified the crawler name. But I recommend exploring custom classifiers if Glue’s default classifier doesn’t recognize your data’s schema accurately. I named the crawler “ippon_blog_crawler”.
Click “next” to continue.
Crawler source type
I’m going to choose “data stores” since my data is stored in S3.
Click “next” to continue.
Data store
- Choose a data store: The options here are S3, JDBC, and DynamoDB. JDBC would be a good choice for a more outside-of-the-box data store solution. I’m going with S3 since that’s where my data is stored.
- Connection [optional]: specification for a connection to a network where a data store is located
- Crawl data in: I’m going with “Specified path in my account”. A crawler could process data in another AWS account if it has the right permissions.
- Include path: This is where I’ll specify the S3 path I wrote above
- Exclude pattern [optional]: Specify patterns to exclude crawling from the include path
Click “next” to continue. On the next page, decline to add another data store.
IAM Role
I’m going to go with “Create an IAM role” and specify the name. This option automatically creates an IAM role with all the needed permissions based on previous input. I called it “ippon-glue-blog-role”. Click “next”.
Schedule
This section lets you choose how often to run the crawler. There are options for on-demand, weekly, CRON expressions, etc. I’m going to choose “Run on demand” and click “next”.
Output
- Database: Like mentioned above, these “databases” are logical groupings of tables. Not the traditional sense of database. I’m going to select the default database that Glue offers.
- Prefix added to the tables [optional]: This will add a specified prefix to all the tables created.
- Grouping behavior for S3 data [optional]: When enabled, this option stacks all tables with identical schema into the same table. I’ll elaborate on this shortly.
- Configuration options [optional]: these are advanced configuration options for the crawler that I won’t touch on here.
I’ll add “Ippon_blog” as a prefix to my table. Prefixes are useful if the S3 path being crawled has many subdirectories, each with data. By default, Glue defines a table as a directory with text files in S3. For example, if the S3 path to crawl has 2 subdirectories, each with a different format of data inside, then the crawler will create 2 unique tables each named after its respective subdirectory. In this example, the table prefix would simply be prepended to each of the table names.
Now, consider if these two subdirectories each had the same format of data in them. By default, 2 separate tables would be created. If the Grouping behavior option is enabled, their contents would be stacked into a single table.
Click “next” to continue.
Review
This is what I see.
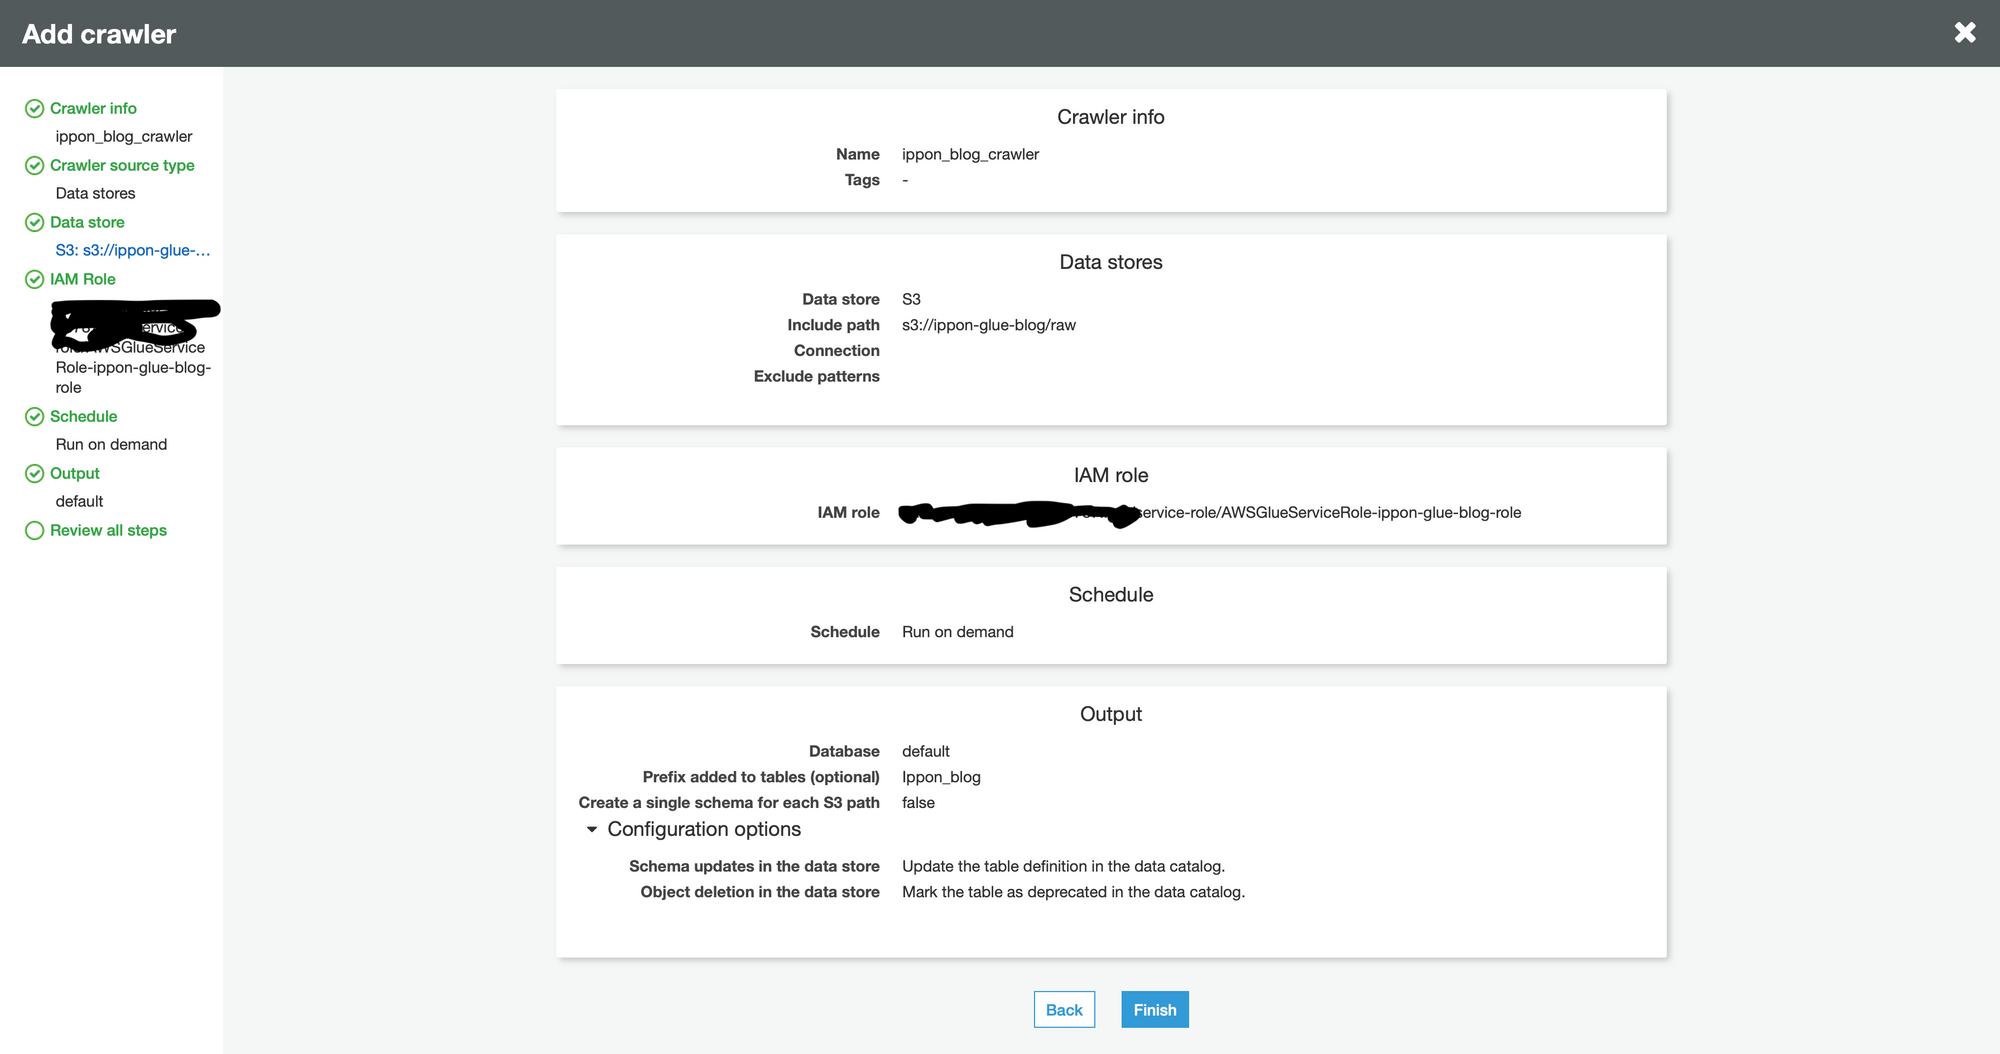
Review your information and ensure everything looks good. Then click “finish”.
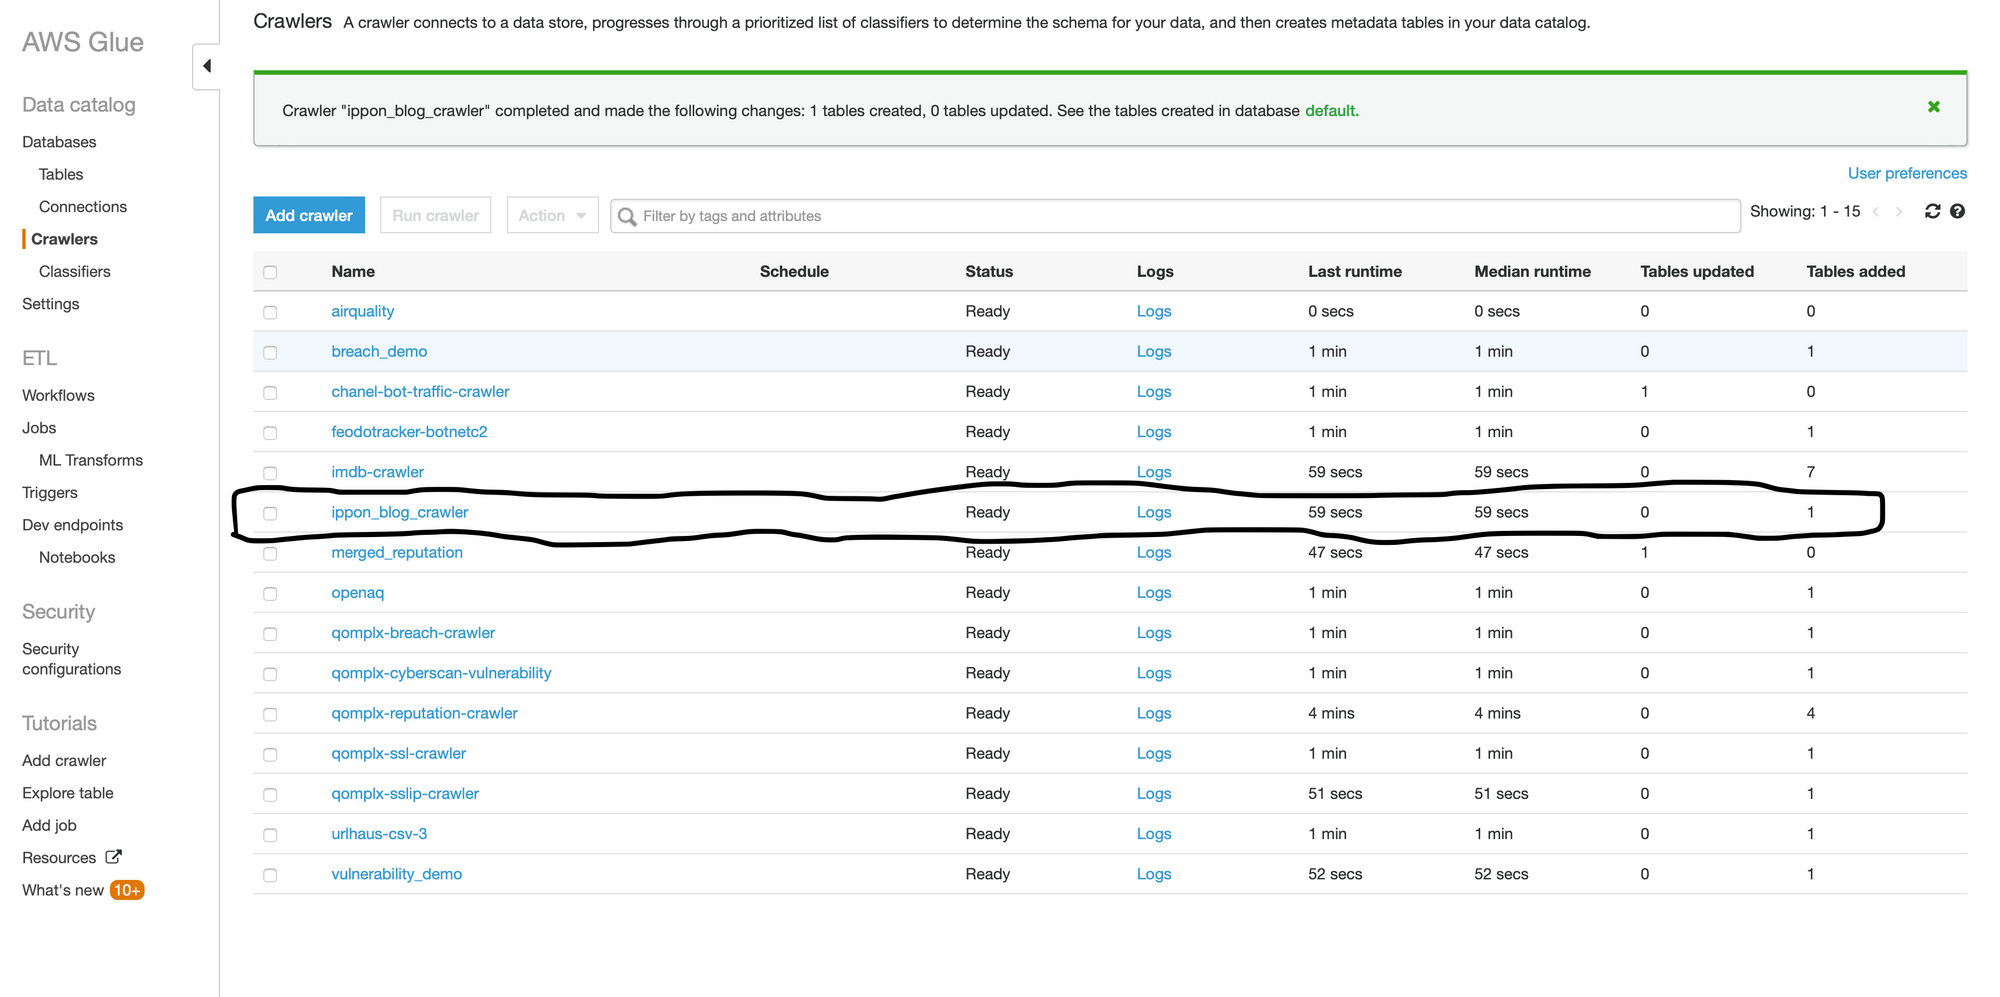
Running the crawler
You’ll be brought back to the Glue console now. Navigate to “Crawlers”, then find the crawler that was just created. Check the box next to it, then click “Run crawler”. It can take a few minutes for a crawler job to run.
Once it’s done running, take a look at the “tables added” column, it should have created the same number of tables as there are subdirectories in the S3 path. I was expecting one table and that’s what popped up. See the circled portion in my image below.
Now, let’s take a look at the table resource itself. Click on the “Tables” option under “Databases”. Navigate through the list of tables to find the one that was just created. Then click on it to see the details.
This is what I see.
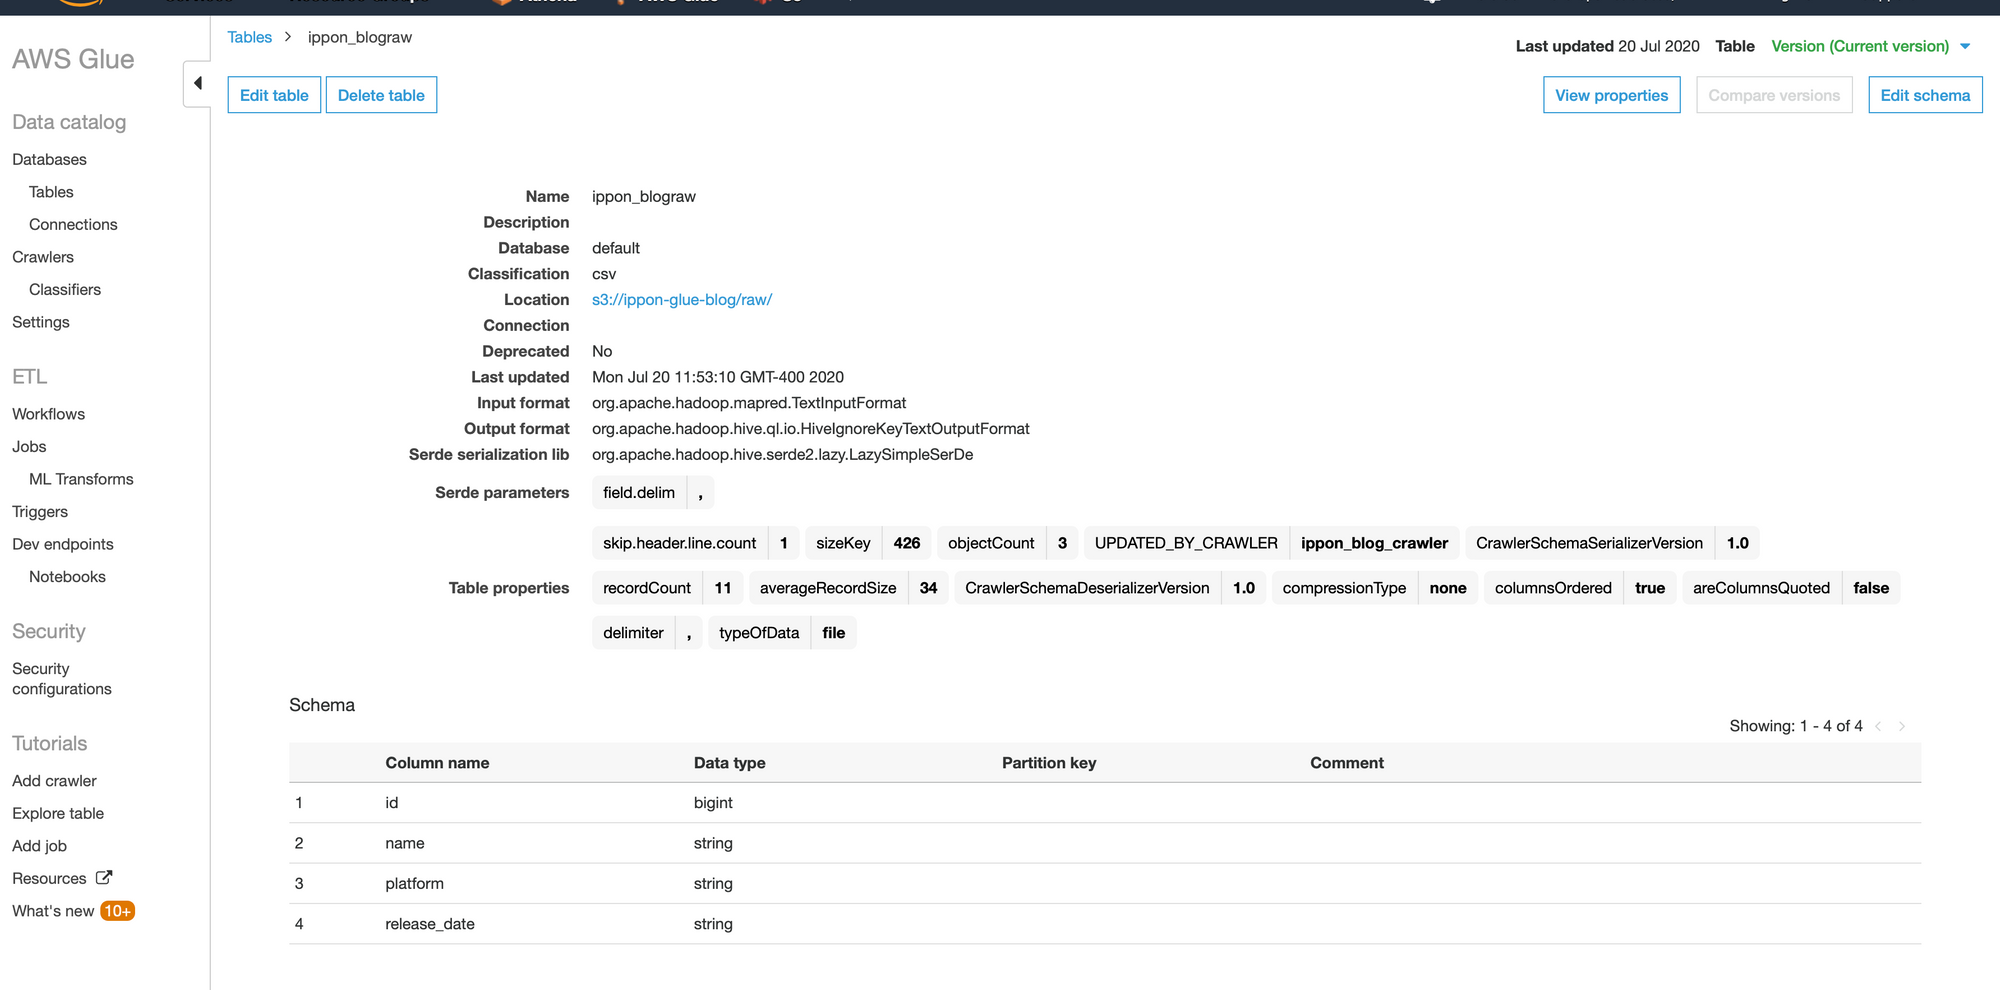
A few things to point out:
- Again, this is a metadata table. No source data is stored in here, this is simply information inferred about an S3 directory. Nor was there any data transfer along the way.
- This was entirely generated by Glue simply scanning the S3 directory.
- The Hadoop stuff is there because under the hood of Glue is Amazon EMR, which is a service that provisions managed Hadoop/big data clusters.
- The schema is spot on. I could cast the “release_date” column to a date data type but I don’t have any other complaints.
Querying the data from Athena
Now that I’ve confirmed my data is in the format I need it in. We can query it from Athena without any additional configuration.
From anywhere in the AWS console, select the “Services” dropdown from the top of the screen and type in “Athena”, then select the “Athena” service.
I would like to walk through the Athena console a bit more, but this is a Glue blog and it’s already very long.
So here’s the shortcut to query the data:
- From the “database” dropdown, select the “default” database or whatever database you saved your table in.
- Find the table from the “Tables” list
- Click the three dots to the right of the table
- Select “Preview table"
On the right side, a new query tab will appear and automatically execute. On the bottom right panel, the query results will appear and show you the data stored in S3.
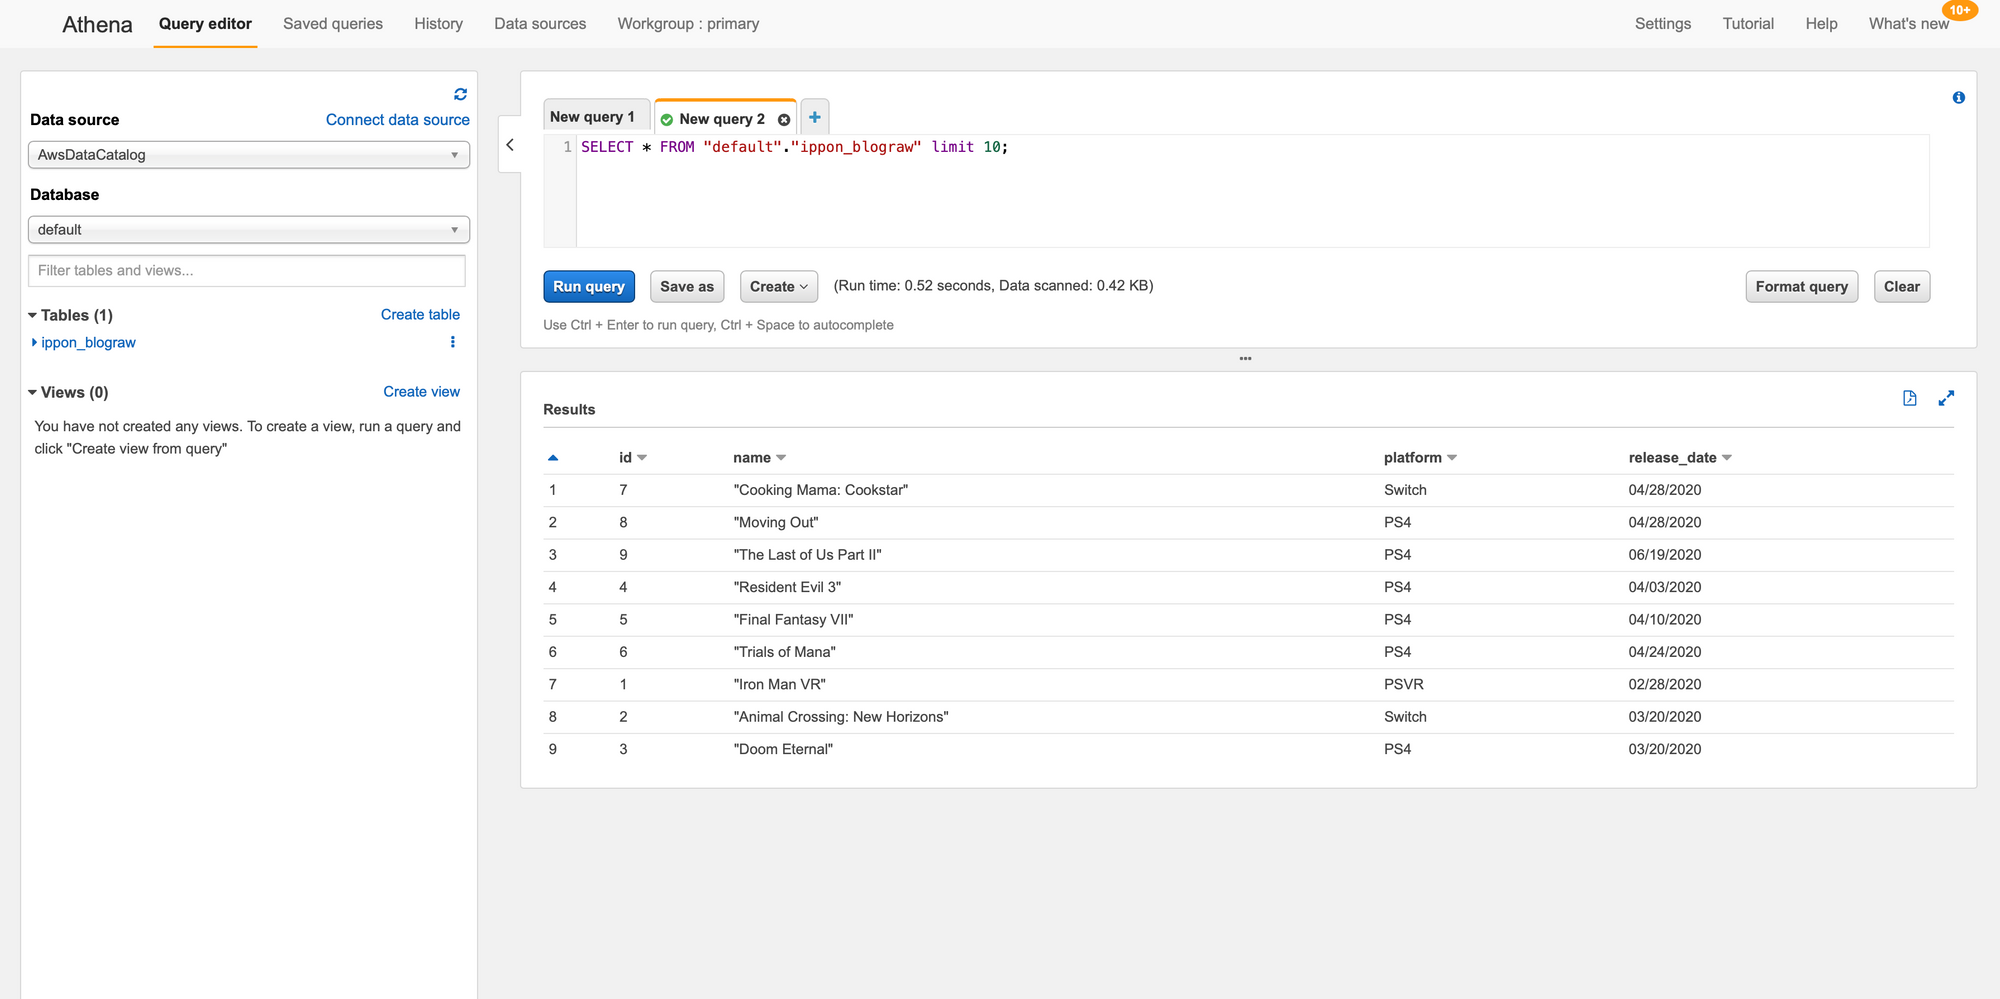
From here, you can begin to explore the data through Athena. Additionally, you can drop more data in the S3 bucket and as long as it has the same format it will be immediately available to query from Athena. No additional crawling necessary, unless there is a schema change.
This sums up how to classify data using the Glue Data Catalog. Next week, I’ll write about how to submit ETL jobs in Glue, and the following week I’ll write about overall ETL and Catalog orchestration.

Comments