
Maintaining a Kafka infrastructure requires very careful consideration and planning, especially if event ordering matters to your application. For organizations that cannot afford a messaging operations team to maintain their message bus, either financially or operationally, an event driven architecture can be more of a nightmare than synchronous API calls. This is where Solace shines.
Solace is a message bus that got its start in the finance industry. Originally, the product offering was restricted to hardware accelerated routers that would publish and subscribe small messages very quickly over a networks with varying performance in order. To achieve this, the engineers at Solace built routers containing specialized NICs with a custom TCP stack built on them designed for extremely low latency messaging. Because of the specialized nature of these routers, they were very expensive and only saw use in enterprise companies requiring ultra low-latency messaging like hedgefunds and banks. With the advent of virtualization technologies and the maturation of cloud providers, its easy and inexpensive to deploy Solace routers anywhere in the world!
Why is this so important? As development paradigms shift towards event-driven architecture, it is becoming more crucial now more than ever to have reliable, scalable, low-cost, and operationally efficient message backbones to facilitate your applications event footprint. But just how difficult is it to develop an event-driven application using Solace as a message bus? Let's try it out! In this post, I will show you how to integrate jHipster with Solace to develop an event-driven jHipster web application.
Provision a Solace Router
First, navigate & login to the Solace Cloud Console. Follow the prompts to create a "service," be sure to specify free tier and AWS as the cloud provider. Other cloud providers are offered, but being that AWS owns the majority of the market share and Ippon is an AWS Advanced Consulting Partner, we're going to use AWS for this demo. Select a region which supports the free tier of Solace in the Cloud (hint: US-East N.Virginia works). Then, give a good name to your service. Your screen should look like this: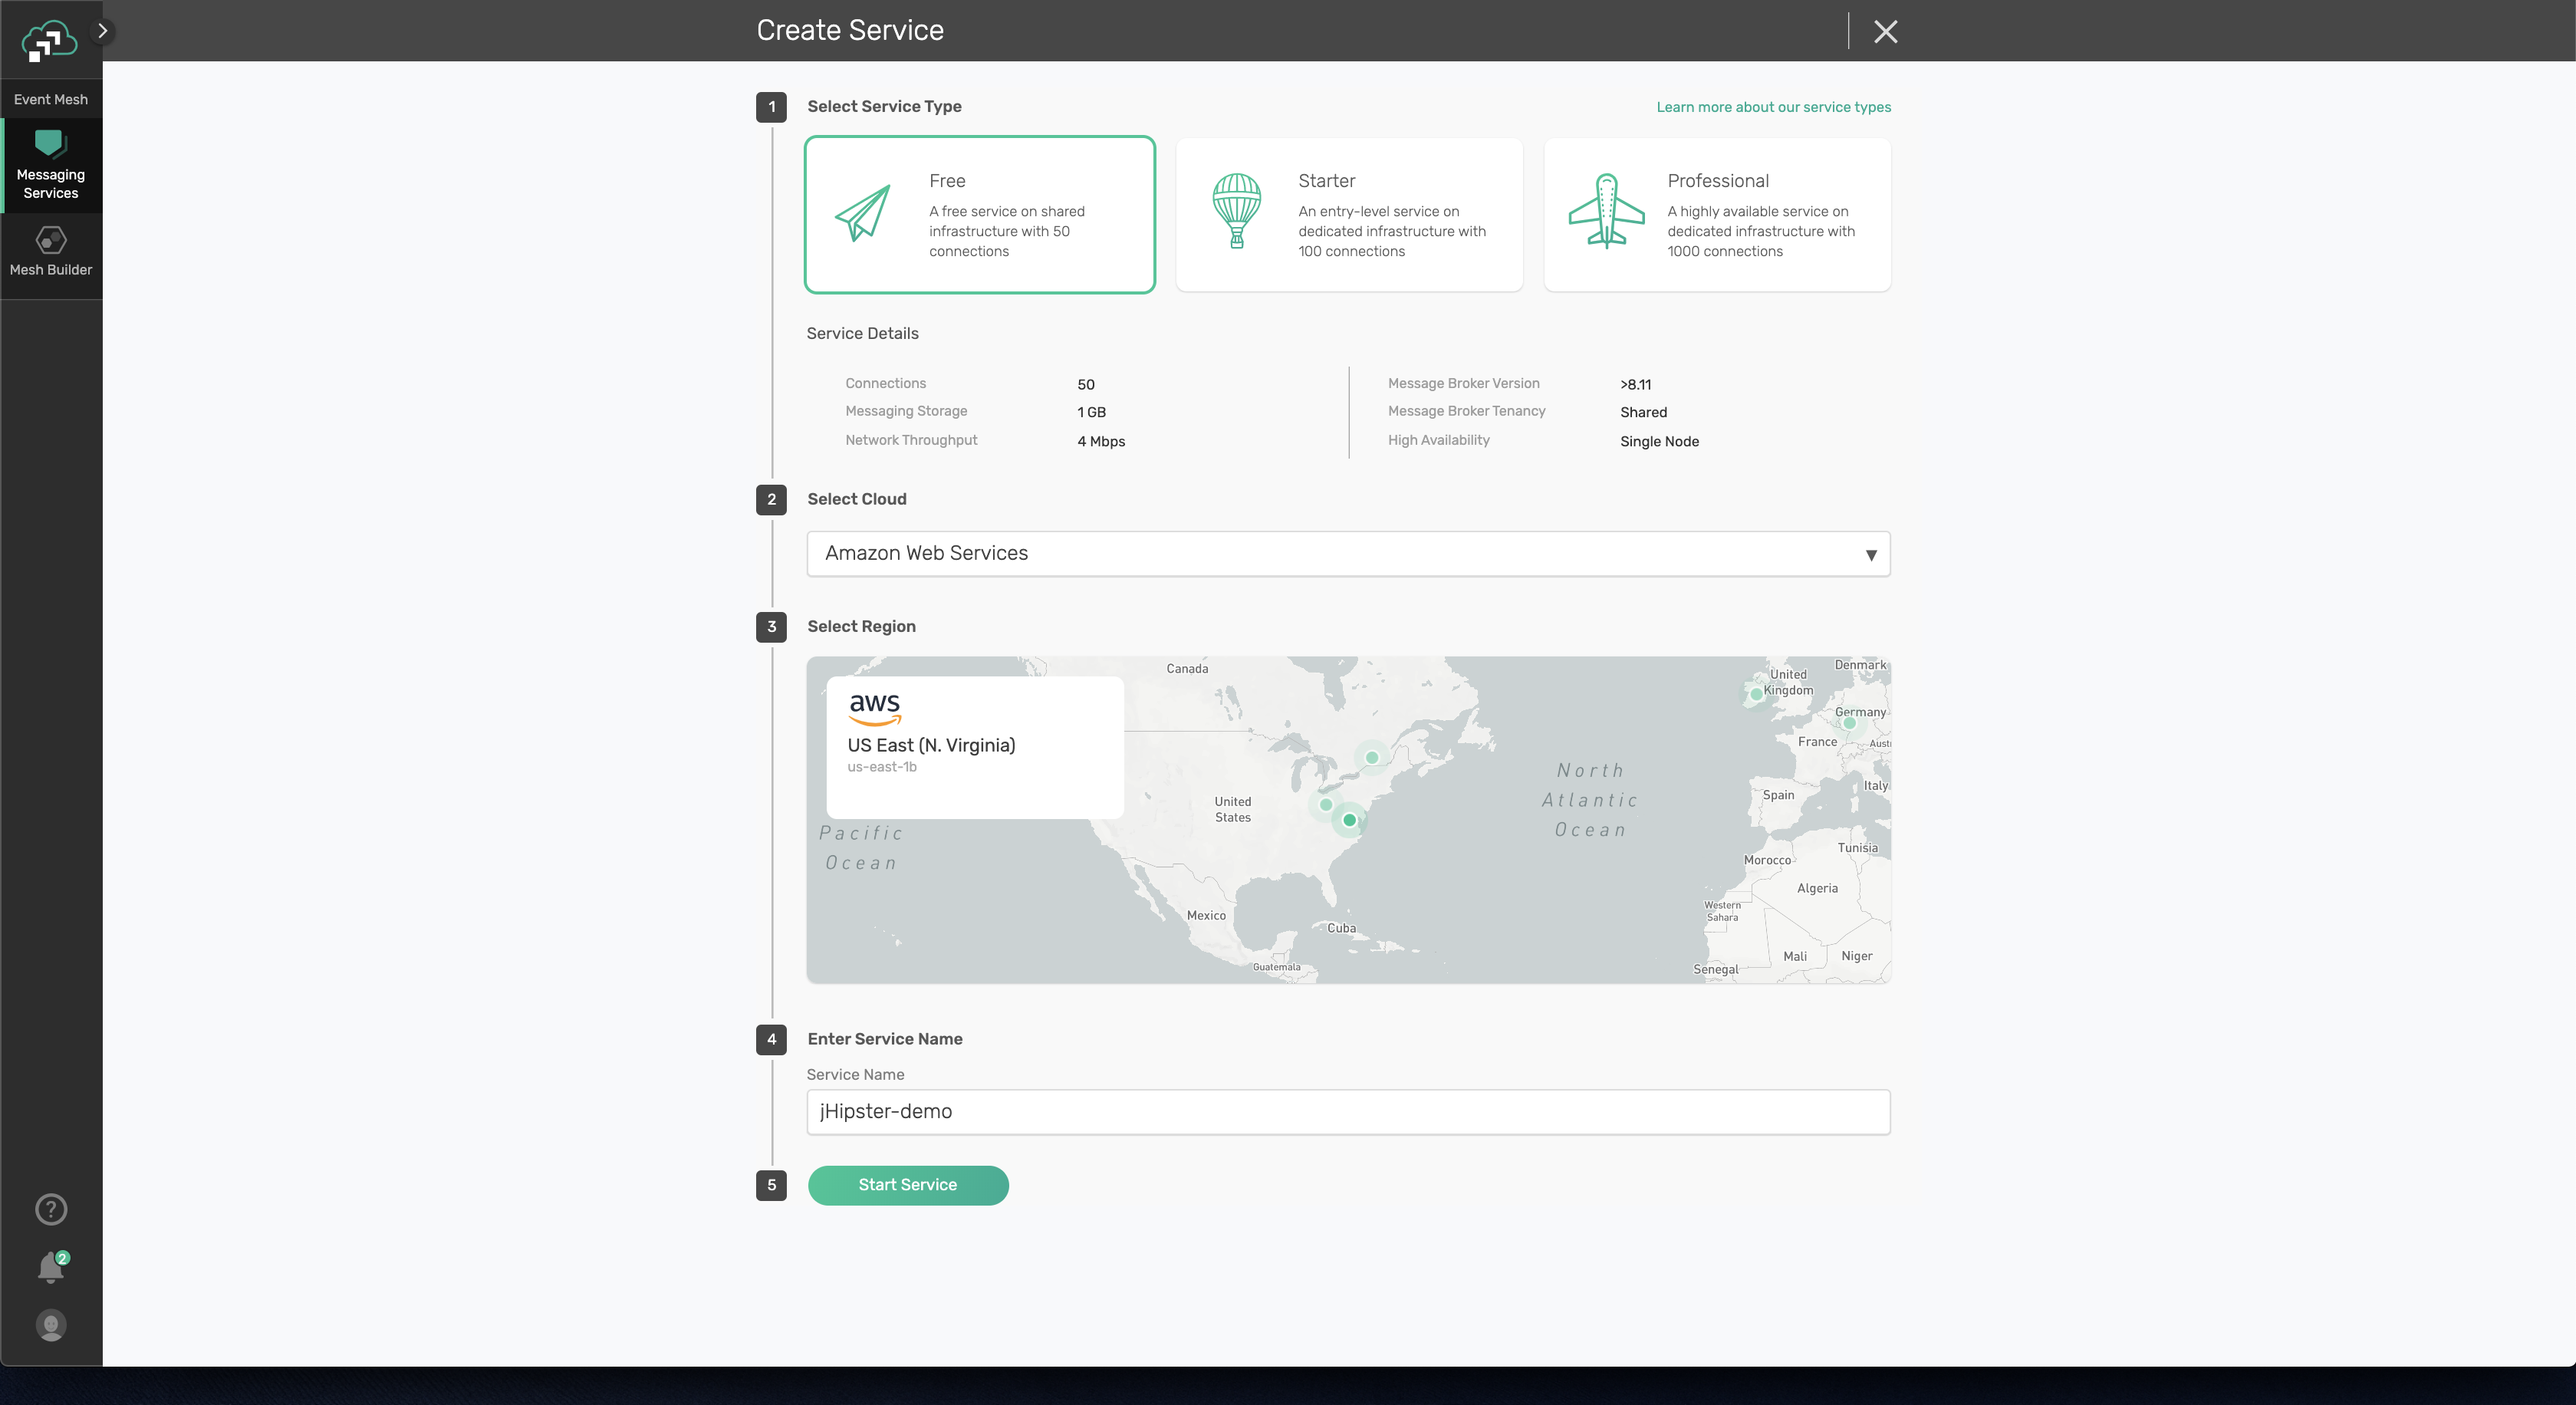 Click the "Start Service" button and wait until your service is provisioned.
Once your service is started, you should be redirected to a dashboard with tabs for "Status" and "Manage." I won't go into details regarding these tabs as that goes beyond the scope of this post. Instead, navigate to the "Try Me!" tab. Here you can see the publisher configuration is on the left side, while the subscriber configuration is on the right. By clicking "Connect" on both sides, you will connect to the broker twice: once as a publisher and once as a subscriber. Now you can follow the prompts to publish and subscribe to messages in this window. Experiment with the topic settings in the "Topic" input box. Notice how publishing a message on a topic you are not subscribing to will not show the message in the subscriber window.
Solace Connections FYI
Solace connections are just TCP connections. When you click the "Connect" button in the "Try Me" tab, you are creating a TCP connection using the SMF protocal. SMF is a proprietary message protocol developed by the engineers at Solace.
Solace Topics FYI
Topics are a well-established concept in messaging, and in the Solace world this is no different. However, Solace imparts more structure around their topics than exists in other open source messaging solutions like RabbitMQ or Kafka. In Solace, topics have levels seperated by the "/" character. This allows you to partition your topics bery precisely along the levels specified. For publishers, this is important as it allows the publisher to publish a very specific topic.
This is also very important for subscribers. Subscribers can subscribe to very specific events, or to a large set of wild-carded events. For example, if the publisher sends a message on the topic USER/CREATE/<ID> where the ID field is the ID of the user created, the subscriber can subscribe to messages on the topic USER/CREATE/>. This topic represents all "create user" events pertaining to any user. If we wanted all messages for all users, we could subscribe to USER/*/>, or more succinctly USER/>. The > character is a wildcard representing all unspecified levels of a topic beyond the specified level. The * character is a wildcard representing any string of characters at that level.
Build your App
The Solace Cloud Console may be interesting for a little while, but it's not hard to see how, by itself, this isn't very useful. How can you publish and subscribe programmatically within an application? In this demo, we'll start with a basic jHipster project. The details of your application are irrelevant, but I would recommend starting with a Monolithic style application for the purposes of this demo. While your jHipster project is being generated, navigate to the "Connect" tab in your Solace Cloud Console. Select the "Solace Java API" drop-down and copy the appropriate API import statement which will changed if you use Maven or Gradle.
After your project is generated, open the build.gradle file and paste the API reference into the appropriate location. At the time of this writing, the current API reference is compile("com.solacesystems:sol-jcsmp:10.2.0"). If you're using Maven, drop the XML formatted reference into the appropriate section of your pom.xml file. Be sure to run the ./gradlew command to download this library into your project. Once this is done, click "Next" in the Solace Cloud Console.
The full repository is here on Github (see bottom for full URL) for your personal enjoyment. However, for brevity's sake, I'll outline the major code changes below. Assuming you've modified the build.gradle file, create this service file:
package com.ippon.dferguson.service;

import com.solacesystems.jcsmp.*;
import org.springframework.stereotype.Service;
import org.springframework.transaction.annotation.Transactional;

@Service
@Transactional
public class SolacePublisherService {

    final JCSMPProperties properties = new JCSMPProperties();
    private JCSMPSession session = null;

    public SolacePublisherService() throws JCSMPException {
        properties.setProperty(JCSMPProperties.HOST, "");
        properties.setProperty(JCSMPProperties.USERNAME, "");
        properties.setProperty(JCSMPProperties.PASSWORD, "");
        properties.setProperty(JCSMPProperties.VPN_NAME, "");
    }

    public void connect() throws JCSMPException {
        session = JCSMPFactory.onlyInstance().createSession(properties);
        session.connect();
    }

    boolean isOpen(){
        return !session.isClosed();
    }

    public void disconnect() {
        if(session != null && !session.isClosed()) {
            session.closeSession();
            session = null;
        }
    }

    public void publish(String payload, String publish_topic) throws JCSMPException {
        XMLMessageProducer prod = session.getMessageProducer(new JCSMPStreamingPublishEventHandler() {
            @Override
            public void responseReceived(String messageID) {
                System.out.println("Producer received response for msg: " + messageID);
            }
            @Override
            public void handleError(String messageID, JCSMPException e, long timestamp) {
                System.out.printf("Producer received error for msg: %s@%s - %s%n",
                    messageID,timestamp,e);
            }
        });
        final Topic topic = JCSMPFactory.onlyInstance().createTopic(publish_topic);
        TextMessage msg = JCSMPFactory.onlyInstance().createMessage(TextMessage.class);
        msg.setText(payload);
        prod.send(msg,topic);
        prod.close();
    }
}
Most of the code here can be found in the publish/subscribe Solace tutorial. The SolacePublisherService properties have been redacted for security reasons, but the connection details are auto-generated by the Solace Cloud Console and populated by the connection code snippets.
This class file creates a Solace publisher service. We don't care about a subscriber at this time. In this simplistic event driven application, we can assume the user is creating events and does not care about events being created at all. In other words, the user is a publisher, publishing events via the application. The application does not need a subscriber component at this time. If it did though, the process for integrating a subscriber in your application would be very similar to integrating a publisher.
Now that we have the service built and wired into the spring context built by jHipster, we need to tell our application to publish an event. Open the UserService file and add this snippet to the bottom of the createUser method:
try {
    solacePublisherService.connect();
    solacePublisherService.publish("WELCOME TO THE PLATFORM", "USER/CREATE/" + userDTO.getId());
    solacePublisherService.disconnect();
} catch(JCSMPException e){
    log.error("Could not publish the User Create message!", e);
}
Modify the constructor of the UserService file accordingly:
private final SolacePublisherService solacePublisherService;

public UserService(UserRepository userRepository, PasswordEncoder passwordEncoder, AuthorityRepository authorityRepository, CacheManager cacheManager, SolacePublisherService solacePublisherService) {
    this.userRepository = userRepository;
    this.passwordEncoder = passwordEncoder;
    this.authorityRepository = authorityRepository;
    this.cacheManager = cacheManager;
    this.solacePublisherService = solacePublisherService;
}
Test It Out
Now that we have our application code modified, let's build and test our application using the Solace Cloud Console.
Start by returning to the "Try Me!" tab in the Solace Cloud Console. Connect to your Solace router as a subscriber and subscribe to the topic USER/CREATE/>.
Build the jHipster application as the Readme instructs: run ./gradlew and npm start. Once your jHipster application is built, log into the application as the admin (default username and password is admin/admin). Then, navigate to the User Administration tab in the top-right corner and select the "User Management" button. Select the "Create New User" button in the top-right corner, fill in the blanks, and click the button to create the user.
Once the user is created in your app, return to the Solace Cloud Console's "Try Me!" tab. You should see a message pop up in the Solace Cloud Console similar to the following: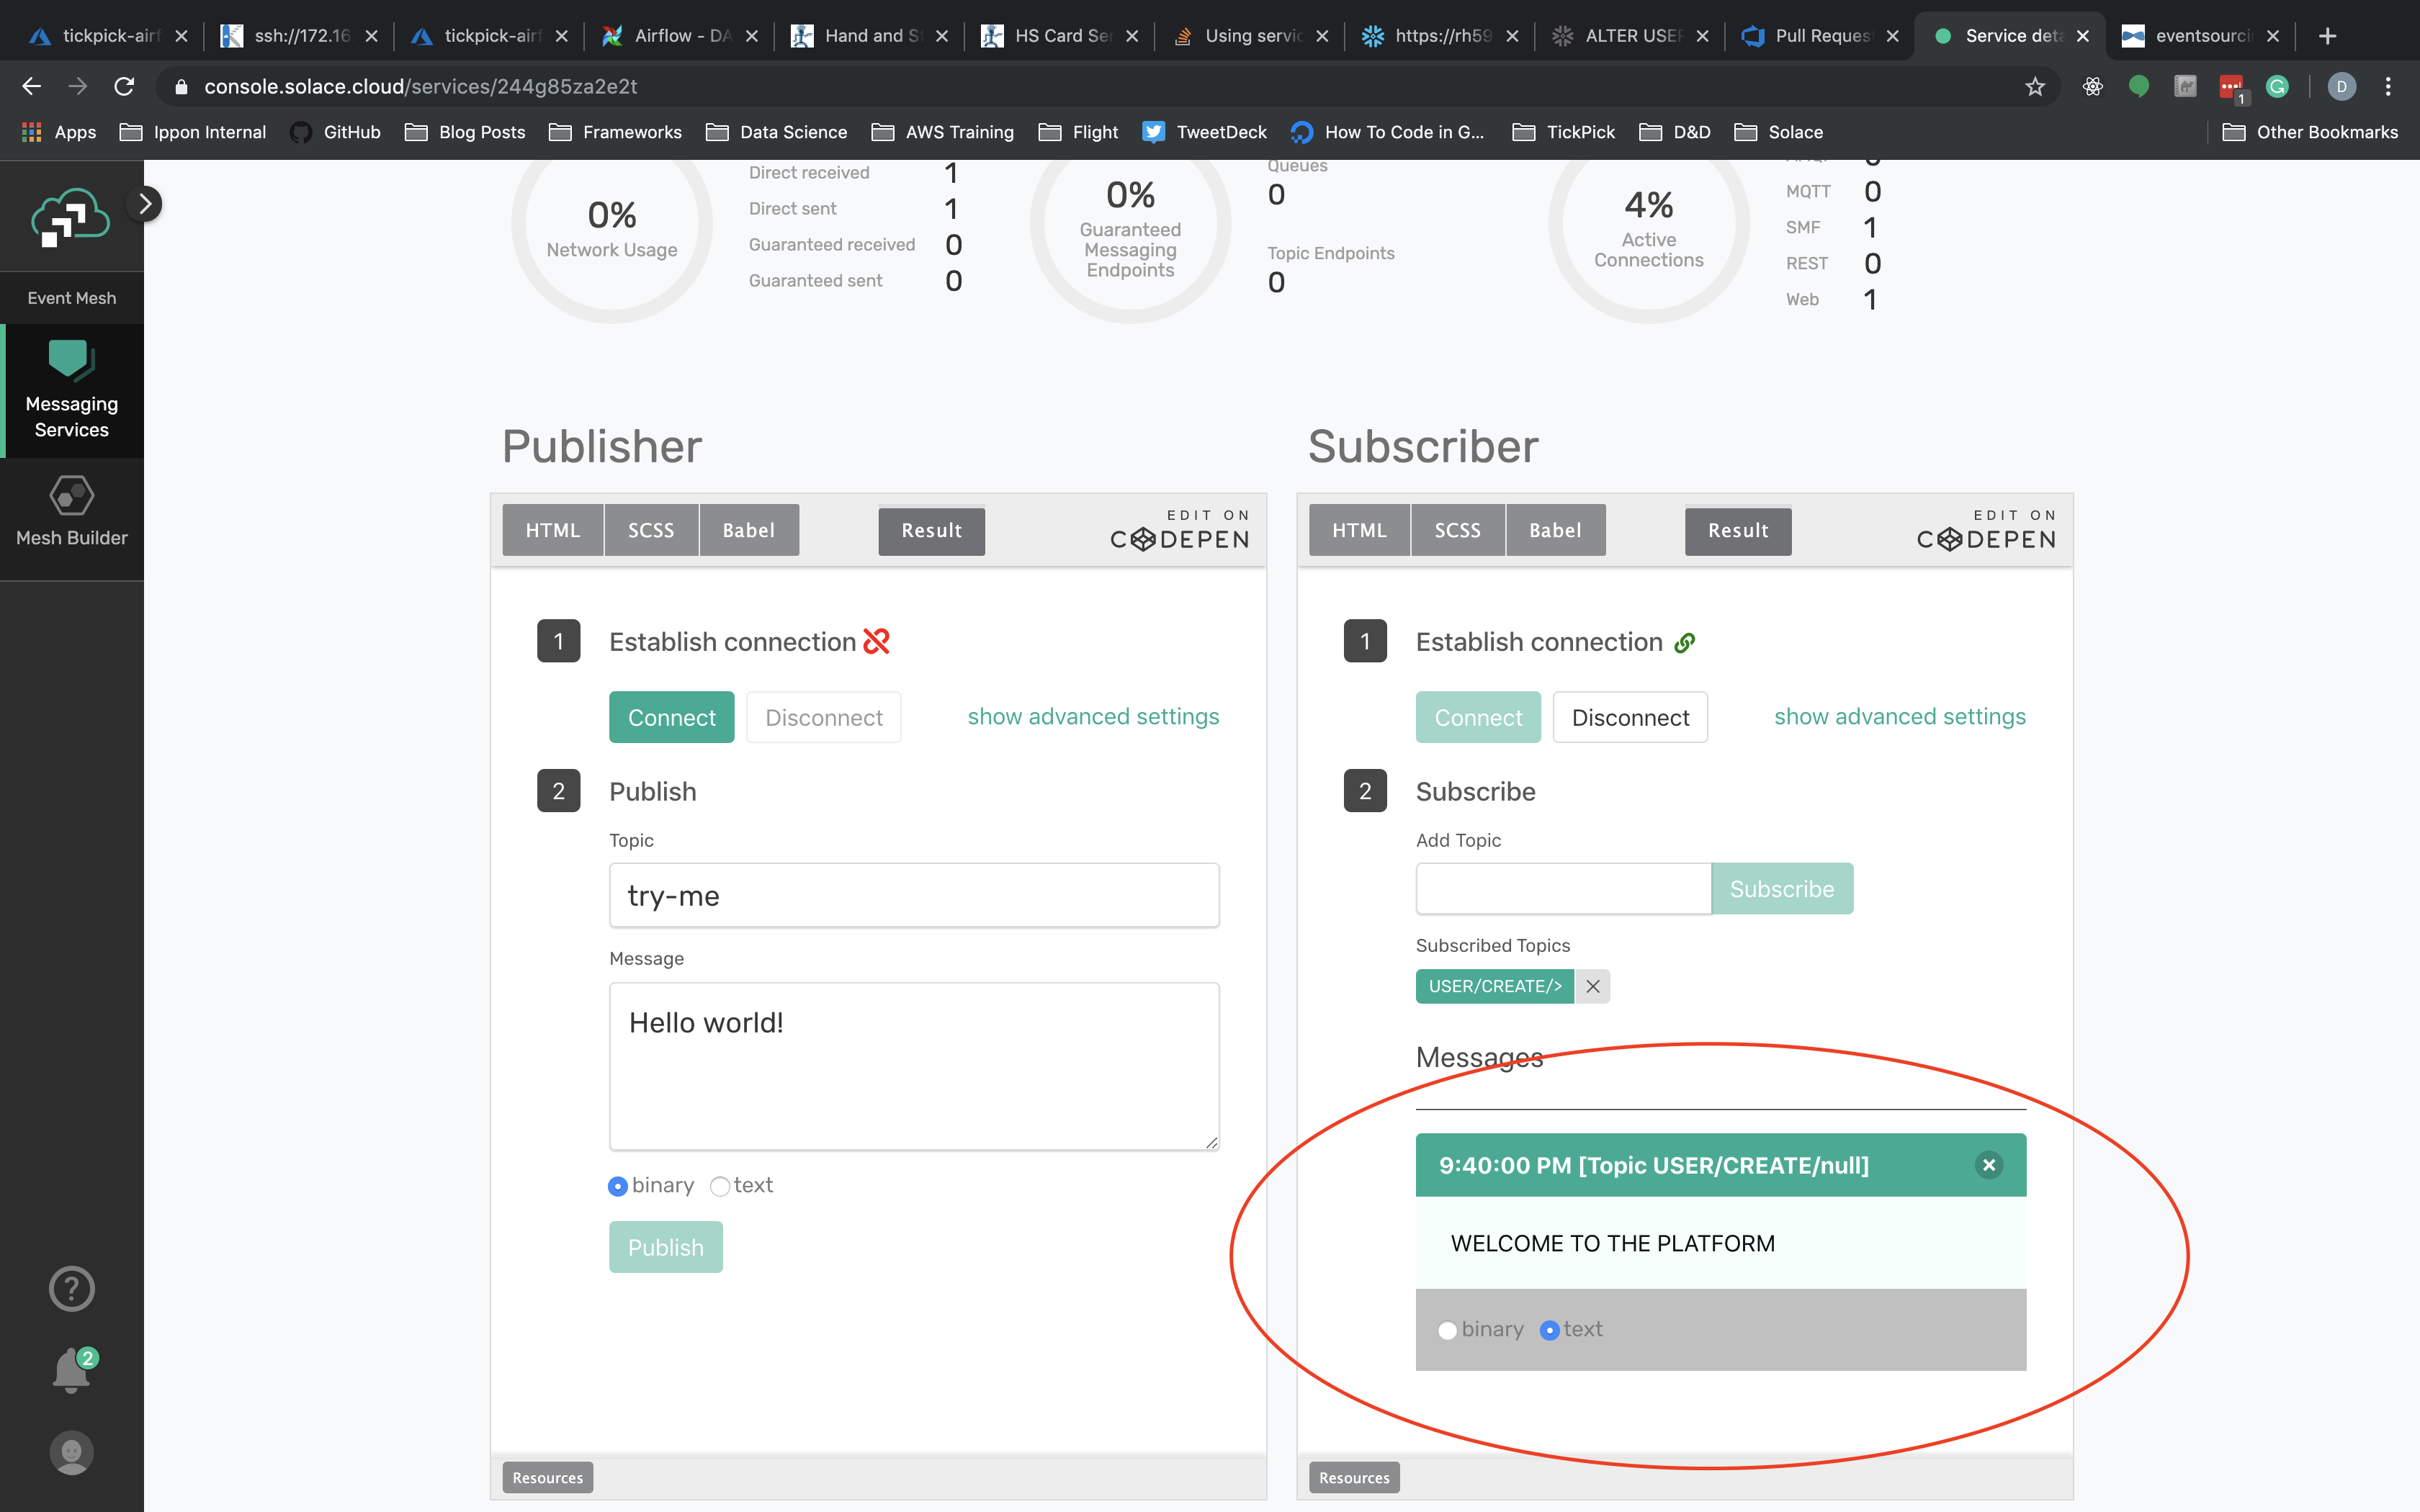 Congratulations! You've just sent an event over a message bus in response to an application event driven by a user's behavior!
This demo is a very simplistic example of developing an event-driven application. The published message is not very helpful and the application only publishes one type of message. To truly take advantage of an event-driven architecture, you could for example subscribe to a creation event and send a welcome e-mail to the new user. Or if your application has an e-commerce component, you could publish and subscribe page views to help your data science team determine which products pique consumer interest. The applications are virtually unlimited. The only important aspect of event-driven application design are having atomic, consistent, independent and durable events for application components which are important to your business.
External Links
Github Repo - https://github.com/dferguson992/solace-jhipster-demo


Comments