


This is an introduction on how to get started with a Truffle-based Solidity project. This article series will not only explain how to get started with Truffle as an Ethereum smart contract framework, but will also describe boilerplate code that will make your life a ton easier (think linting, local blockchain clients, and improved testing). The goal will to be as transparent as possible about all the tools and configurations that are used, because it usually takes a while to start really getting the whole blockchain thing.
If you would like to explore the source code as a simple boilerplate project, checkout the github (blog written as of commit 0x435f745).
Truffle Initialization
Assumptions
This tutorial will assume that you have experience with basic bash, node, and npm.
All of the dependencies we need should be OS agnostic, however you may need to change the commands to suite your specific shell/OS.
Dependencies
-
node, npm
We will be installing all of our necessary node modules into the local project. You may also install globally, however you may want to keep it local, because these languages and tools change very fast compared to most tech stacks. You can track the next ethereum/solidity updates are scheduled.
-
Create a new directory to contain your truffle project.
mkdir MyFirstTruffleProject && cd MyFirstTruffleProject -
Initialize your project with
package.jsonfile. You can use other versions of node, but we recommend you use the latest. This article is written with the versions specified below.{ "name": "my-first-truffle-project", "version": "0.0.1", "engines": { "node": "11.6.x", "npm": "6.5.x" } } -
Install the Truffle module
npm install truffle --save-dev- If you want to double check all of our dependencies, run
node_modules/.bin/truffle version
- If you want to double check all of our dependencies, run
-
Time to run Truffle's project init script
node_modules/.bin/truffle init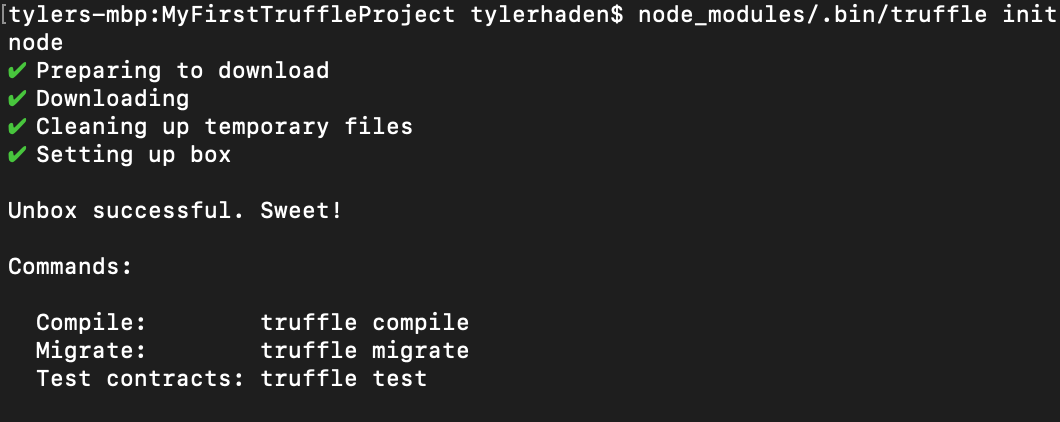
You now have a truffle project! It is pretty bare, but let's try to understand what that script did for us.
Truffle's generated files
When you run ls -l you should see:
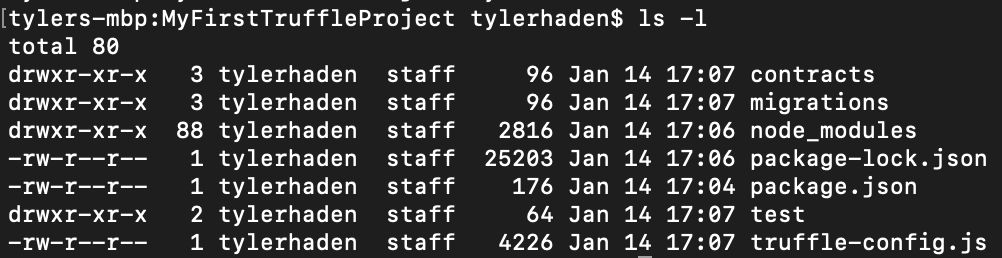
Truffle init was responsible for creating three directories (contracts/, migrations/, and test/) along with three files (Migrations.sol, 1_initial_migrations.js, and truffle-config.js). Here are their descriptions, but examples on how to add to them, and organize your project will continue below.
contracts/will store all your Solidity (.sol files). This is where you will add any smart contracts, libraries, or interfaces that you need at compile time.Migrations.solis a complete, fully working smart contract written in Solidity. It is used by truffle to ensure that your project's deployment to the blockchain is carried out in the proper sequence.pragma solidity >=0.4.21 <0.6.0; contract Migrations { address public owner; uint public lastCompletedMigration; constructor() public { owner = msg.sender; } modifier restricted() { if (msg.sender == owner) _; } function setCompleted(uint completed) public restricted { lastCompletedMigration = completed; } function upgrade(address newAddress) public restricted { Migrations upgraded = Migrations(newAddress); upgraded.setCompleted(lastCompletedMigration); } }
migrations/will store truffle "deployer" Javascript files. Every time you want to deploy a contract, you will need to tell truffle which one, and what constructor arguments you may need.1_initial_migration.jsis the script that deploys our Migration contract. It is the most basic type of deployment because it requires no library linking, or constructor arguments.var Migrations = artifacts.require("./Migrations.sol"); module.exports = function(deployer) { deployer.deploy(Migrations); };
test/is pretty self explanatory. It can contain.jsor.solfiles, depending on your choice of testing language. It starts off empty, but we will add a test later on.truffle-config.jsis the main configuration for your Truffle project. This is where we define what networks to use, gas usages, addresses to deploy with, and a few other variables.module.exports = { networks: {} }
Compiling your contracts
Truffle comes with many useful commands, such as:
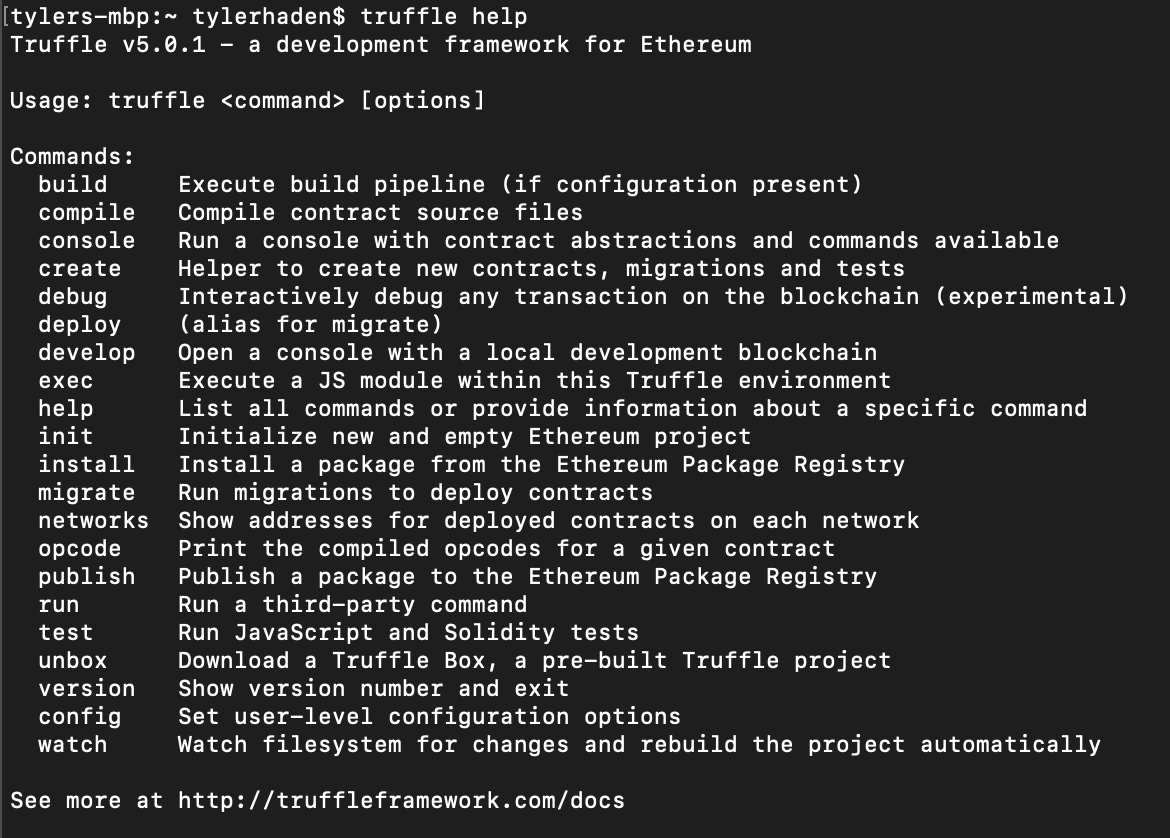
Check out the documentation of Truffle command line arguments. We will only be using init, compile, migrate, and test.
Let us see if we can compile the single contract that was generated for us. It is very easy to run truffle commands for now, but we will eventually build up the script library in our package.json.
node_modules/.bin/truffle compile

Truffle will create build/contracts/Migrations.json. This json file contains a lot of information about the compiled contract. It includes the whole compiled bytecode, along with function signatures, events, docs, and compiler information.
 {
     "contractName": "Migrations",
     "abi": [
         ...
     ],
     "bytecode": "0x...",
     "deployedBytecode": "0x...",
     "source": "pragma ...",
     "ast": {
         ...
     },
     ...
     "schemaVersion": "3.0.1",
     "updatedAt": "2019-01-10T15:34:39.612Z",
     "compiler": {
         ...
     }
     ...
 }
The two most important parts are the "abi" and "bytecode"/"deployedBytecode".
- Ethereum has specified a common way of interacting with contracts using the Application Binary Interface (ABI). It is what tells clients how to create transactions that will run on the contract, and what events you should expect. There is more in-depth information in the documentation, and we highly recommend reading it if you plan on developing smart contracts with Solidity.
- The bytecode is what gets run on the Ethereum Virtual Machine (EVM). In order for you to "deploy" a contract onto the Ethereum blockchain, you must submit the deployedBytecode as a transaction. Technically, the bytecode is what is stored as the contract, and when you call a function, it can only interact with that bytecode in the EVM.
Remember when we said Solidity makes many breaking changes? It is standard to use the specific commit hash as the compiler version, i.e.
{
    ...
    "compiler": {
        "name": "solc",
        "version": "0.5.0+commit.1d4f565a.Emscripten.clang"
    },
    ...
}
This becomes important when others want to prove that your source matches your bytecode. Etherscan's verification tool will allow users to interact with your public contract, but they will not let you upload your source by faith. They will try to compile your code, and the bytes must match exactly.
Truffle compile will search through your contracts/ directory, and compile any contracts, or libraries. If you have any import statements in those .sol files, truffle will attempt to find them.
There is also one config variable in truffle-config.js that will affect compilation. These are the solc defaults, but you can go ahead and add these to your config file.
module.exports = {
    ...
    solc: {
        optimizer: {
            enabled: true,
            runs: 200
        }
    }
}
The number of runs will affect the tradeoff between contract creation gas and subsequent function call gas. If you don't mind a large upfront cost, you should have more runs of the compiler. Here is the quote from the Soldity docs:
"By default, the optimizer will optimize the contract assuming it is called 200 times across its lifetime. If you want the initial contract deployment to be cheaper and the later function executions to be more expensive, set it to --runs=1. If you expect many transactions and do not care for higher deployment cost and output size, set --runs to a high number."
Starting your very own blockchain
To understand how to run your smart contracts, you must first understand what a blockchain is. Unfortunately, this is not the place to have "the talk" with you. We will only discuss the bare minimum needed to develop and deploy your first contract.
Definitions:
- blockchain: a data structure that looks like a linked list
- Ethereum: a "platform", or a set of protocols that are responsible for turning "transactions" into "blocks"
- transaction: a list of bytes that may contain bytecode, data, or anything technically (improperly formatted transactions just get reverted)
- block: one of the linked nodes in the above stated "blockchain"
- gas: some cash that is used to inventivize strangers to add your "transaction" to a "block"
- ether: a mapping from "address" to a uint256, every address as a balance
- address: a number that is 20 bytes long
- private key: a number that is 32 bytes long, every "private key" has exactly one "address" associated with it
- mnemonic: a list of 12 words that serve to generate your (private key, address) pair
- network: a unique number that tells the client which chain to use. Think of each network as a separate blockchain that have all forked form Mainnet
Ethereum's own description of itself ...
Ethereum in the narrow sense refers to a suite of protocols that define a platform for decentralised applications. At the heart of it is the Ethereum Virtual Machine (“EVM”), which can execute code of arbitrary algorithmic complexity. In computer science terms, Ethereum is “Turing complete”. Developers can create applications that run on the EVM using friendly programming languages modelled on existing languages like JavaScript and Python.
As a smart contract developer, you don't really need to care about the exchange rate between fiat and ether, or stock fluctuations. In fact, you can create your very own blockchain, where everything is free. The introduction of buying power is just necessary to ensure that the blockchain will live on, distributed across the world, with no grand organizer or power differential.
Using Ganache to create a local blockchain
Anyone who knows the protocols that Ethereum laid out can run the EVM, or connect to the main network. For now, we would like to run a local client that will act as our little EVM. The Truffle Suite has an easy to use client called Ganache. It comes in two flavors, console and cli. We will be using the cli for this project, because we will be running it programmatically, and we can run it with our own configuration. If you want to get a better feel for what Ganache is doing in the background, check out the console version.
-
First, let's install it into our project
npm install ganache-cli --save-dev -
To make our lives easier, let's add a script to our project to run our ganache. Add the following to
package.json:{ ... "scripts": { "ganache": "ganache-cli --networkId $npm_package_config_ganache_networkId --allowUnlimitedContractSize --gasLimit $npm_package_config_ganache_gasLimit --gasPrice $npm_package_config_ganache_gasPrice --mnemonic \"$MNEMONIC\"" }, "config": { "ganache": { "networkId": 3431, "gasPrice": 25000000000, "gasLimit": 6500000 } } }This let's us run the Ganache command line with a few config variables.
networkIdis arbitrary, as long as you are not using one of the public ids such as 1, 3, 4, or 42 (see the test network disambiguation). You can updategasPriceorgasLimit, but for now let's leave these defaults. -
Ganache will also take an optional mnemonic. This mnemonic serves to generate the private keys to be given starting balances of ether. Every Ethereum blockchain must start with some starting amount of ether, otherwise there is nothing to trade. Without a mnemonic, Ganache will randomly generate these private keys, but let's create one just so it is consistent between runs.
export MNEMONIC="cause dry tilt taste hamster document hen over acoustic explain game distance"Warning: This mnemonic should be secret! You should treat this like a password. This is why we will always be using environment variables to inject into our scripts.
You can randomly generate by running ganach-cli without one. For example
node_modules/.bin/ganache-cli | grep Mnemonicwill output the single line with it. Then you can just kill the process with ^C.
-
Run Ganache and see what is generated
npm run ganache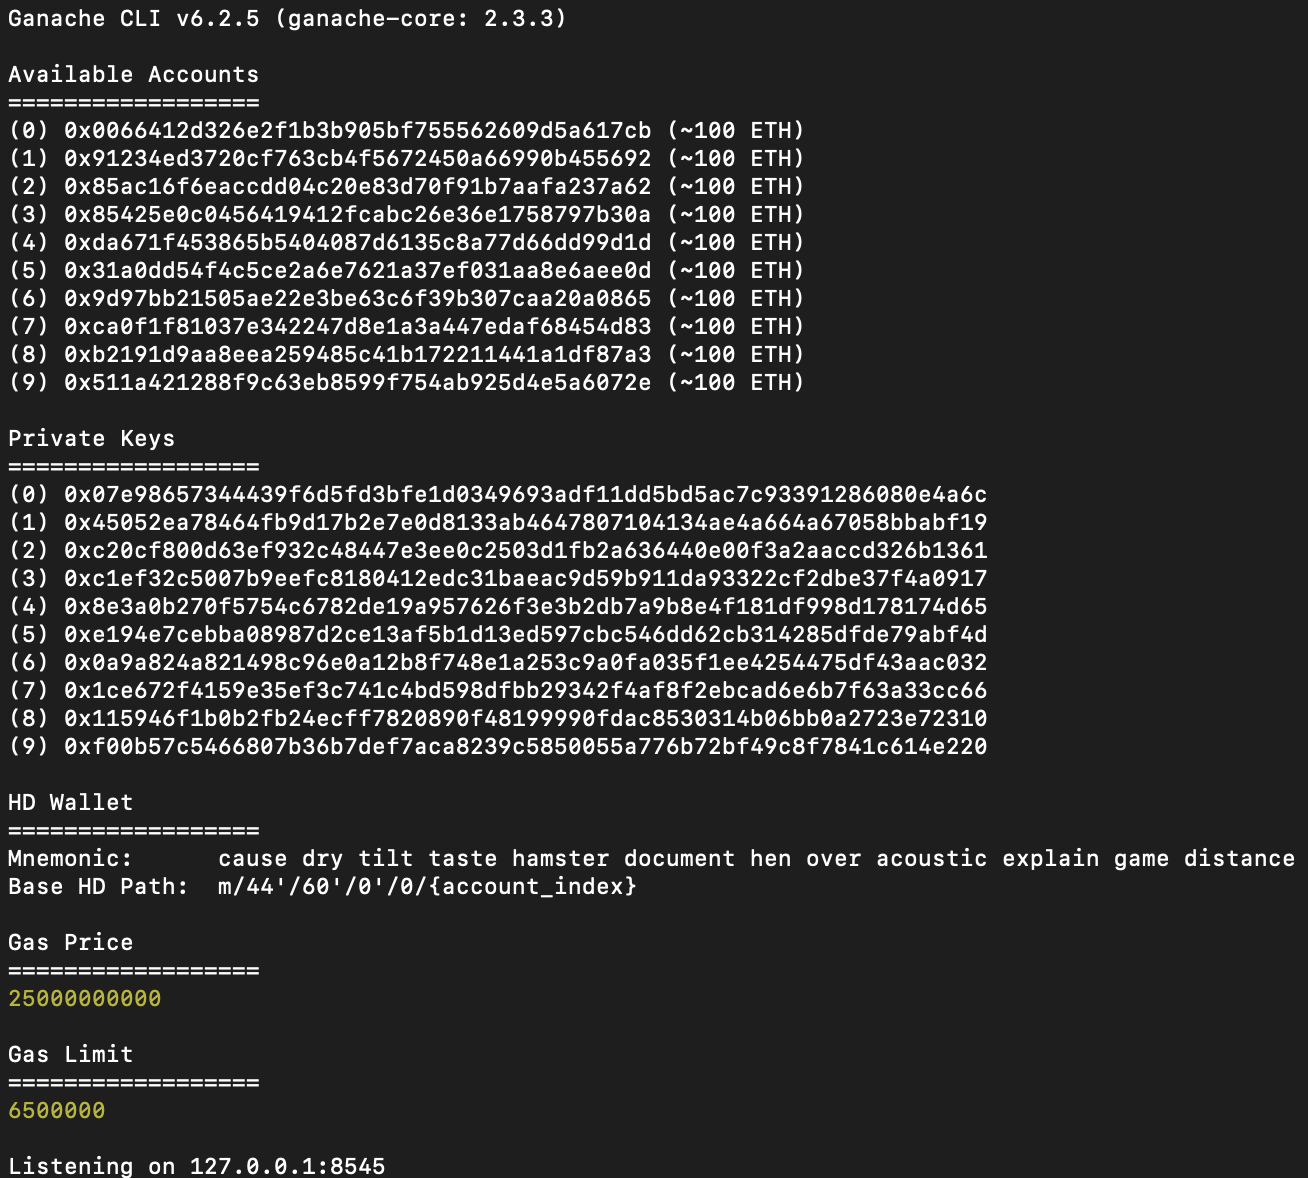
Ganache will generate accounts based on what parameters you run it with. The default is 10 with starting balances of 100 Ether. The cli will display the addresses, private keys, mnemonic, gas price, and gas limit. These addresses can technically be used on any Ethereum blockchain, not just you local one (but they probably have 0 real Ether).This Ganache client will sit around, waiting for someone to send it a transaction on port 8545 by default. When it receives that transaction, it will attempt to run it on the EVM (see if the bytecode is correct) and it will then immediately create a single block with that transaction (mine the block). On the main Ethereum blockchain, several transactions will be added to any given block, but we can be less efficient on our local version. All clients like this one should have a specific set of API calls that can read or write to the blockchain. This is why all transactions are public to everyone in the network.
-
Test the Ganache client by sending an API call from another terminal
curl http://127.0.0.1:8545 \
    -X POST \
    -H "Content-Type: application/json" \
    -d '{"jsonrpc": "2.0", "method": "web3_clientVersion"}'
Looking back at our ganache client, we see a
web3_clientVersioncall.
As you can see, our client responds with a client version, which tells us which protocol to use. Don't worry, you probably won't have to deal with different protocol versions if you are reading this article. This is just a way to test that your client is running properly.
These API calls (like
web3_clientVersion) are part of Ethereum's protocols. Most clients will support the majority of these methods. For an explanation of these methods see the JSON RPC docs.
Deploy to your local blockchain
Now that we have a blockchain client to store our transactions, let's deploy our contract from before to it. In Truffle lingo, we say that were going to migrate our project to our development network. Well need to add some more configurations and then it will be as simple as running a command.
-
Add configuration for our development network to
truffle-config.js:// environment variables set in the package config var networkId = process.env.npm_package_config_ganache_networkId; var gasPrice = process.env.npm_package_config_ganache_gasPrice; var gasLimit = process.env.npm_package_config_ganache_gasLimit; module.exports = { networks: { development: { host: '127.0.0.1', // ganache defaults port: 8545, // ganache defaults network_id: networkId, gas: gasLimit, gasPrice: gasPrice } }, ... }As you can see, we use the same configs that we used to run ganache. If we use arbitrary numbers, it will not necessarily fail, but these ensure all the numbers we see for gas usage are consistent.
-
Let's add some more scripts to
package.json:{ ... "scripts": { ... "start": "concurrently \"npm run ganache\" \"npm run migrate\"", "migrate": "rm -rf build && truffle migrate --reset --compile-all --network development" }, ... } -
We need to install concurrently so we can coordinate ganache and truffle together in the same command.
npm install concurrently --save-dev -
Run the script
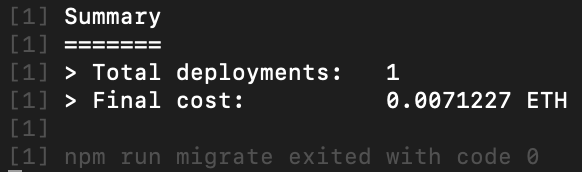
npm run startWhen we run this, truffle will first compile, and then run its migration steps using the development network. The development network simply points to our Ganache client.
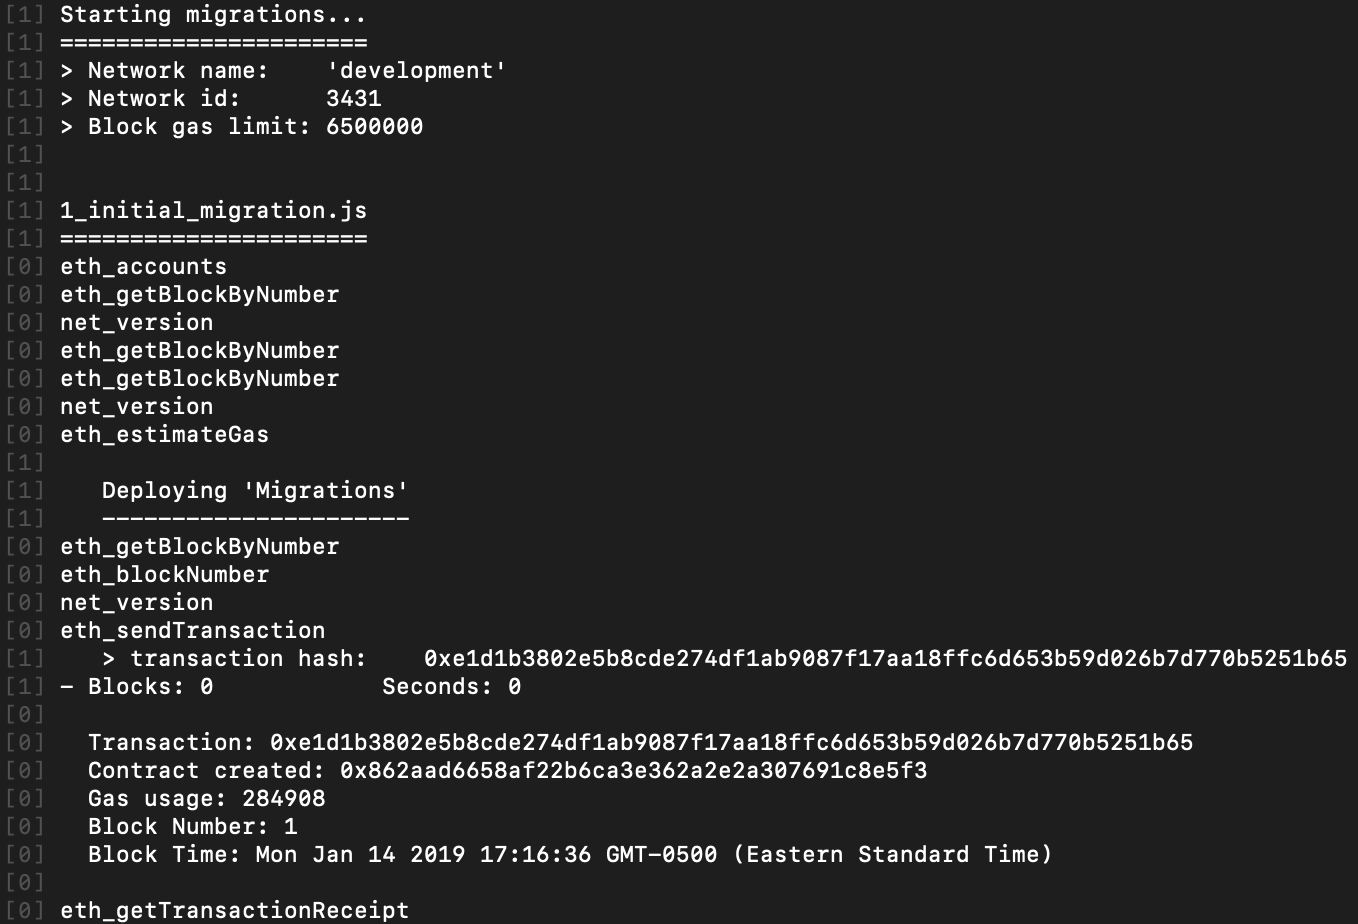
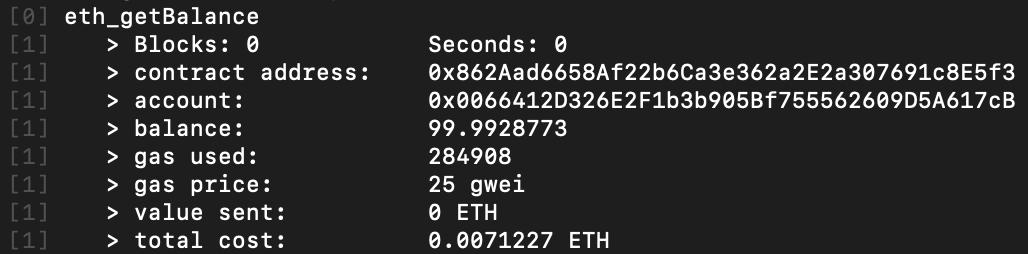
Ganache's output will contain a lot of good information about what was going on. You get back a list of all the API calls made to it, such as "eth_getBlockByNumber" or "eth_sendTransaction". When you send a transaction, it will display things like the transaction hash, gas usage, block number, and contract address (if the transaction created a contract).
As you can see, the client is still running. You can now send transactions to localhost:8545 from browser Javascript libraries (Web3js), Java libraries (Web3j) or even curl... although the syntax starts to become cumbersome.
If you deployed a contract, you could now send transactions that run specific functions on those contracts. You have to specify which address to send these to. In order to find out which address your contract was deployed on, you can either follow the Ganache logs, or look it up in build/contracts/Migrations.sol:
{
    ...
    "networks": {
        "3431": {
            "events": {},
            "links": {},
            "address": "0x2fAeC1D9fC41FC63976187cf912264a632BDc05D",
            "transactionHash": "0x4915f3413fc1b6b9e973d983de35f68d6874572b5d3093ea8ccae3eb618464f2"
        }
    },
    ...
}
Here, you can see the network is specified by a number, our local one we chose as 3431 (arbitrarily chosen). transactionHash is a unique identifier of that transaction. Anyone can look up that specific transaction based on it, and will be able to see all the events emitted, or other internal transactions that occurred during it. Even if it reverts because of some runtime error, it will still be present and forever recorded that you made a mistake!
So now we need to specify the address 0x2fAeC1D9fC41FC63976187cf912264a632BDc05D if we want to talk to the contract "Migrations". We can test it out by sending an RPC to our running ganache client. Let's get the bytecode deployed at that address...
curl -X POST --data '{"jsonrpc":"2.0","method":"eth_getCode","params":["0x2fAeC1D9fC41FC63976187cf912264a632BDc05D", "latest"],"id":1}' localhost:8545

You should see something like the above response. The address I used in the screenshot is different because this was forked at a different time. You can always get the code deployed at an address if it is a contract address. You can get the balance of any address including contracts.
Recap
By now, you have learned how to initialize a new Truffle project and run code on a local blockchain. This is enough to start developing Solidity contracts, but in order get that code tested and running on a distributed network.
- [x] Part 1: Truffle initialization and starting your very own blockchain
- [ ] Part 2: Using Infura to connect to public networks, linting, and testing
To see the latest version of the boilerplate code discussed in this article, check out our public source repository. Feel free to submit issues, or contribute.


Comments