

This a second post following from the part one of "Exploring AWS IoT Core and Greengrass Offerings". In part one I discussed the background and theoretical aspects of the AWS IoT offerings including AWS IoT Core, Greengrass and Amazon FreeRTOS. I also introduced a proof of concept, which will be further discussed in this blog post. More example code will be provided and the deployment options will be evaluated.
The Journey
It has always been a hobby of mine to explore low-powered/mobile computing devices and hack around. Whether it was revitalising old routers, increasing page limits for printers or customising the Android OS. I wanted to have some fun whilst learning about the software and the supporting OS. Each time I picked up one of these devices, I would ask myself the following questions:
Can we get a shell? maybe we can install a custom Linux distribution?
We have Linux... Are there ways in which we can give the device more capability?
Surprisingly a huge number of devices run embedded Linux/Unix. I am not talking about the standard devices I mentioned before. But devices you would never expect like music players, fridges, cars, coffee machines and drones. Many of these make use of open source software/drivers with additional proprietary components.
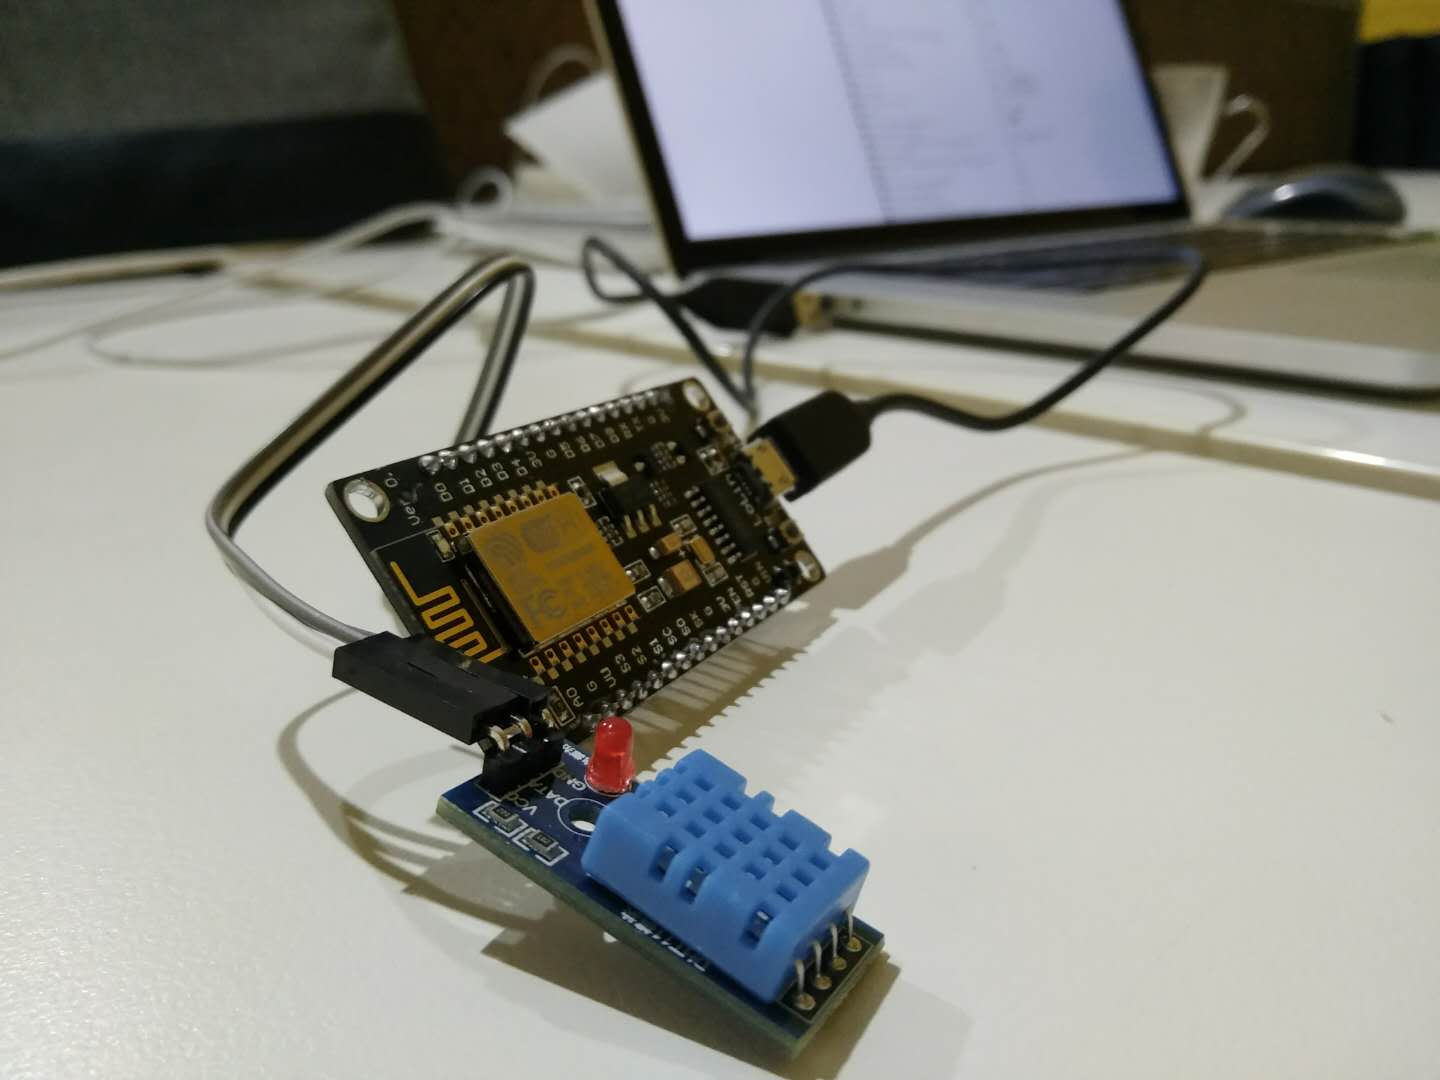
Over the last few months I purchased a selection of Espressif based IoT devices from the Amazon of China: Taobao.com for experimentation, research and potential use in education and coding Dojos. Below is an example of one of the ESP32 devices. Google translate might help a bit to purchase one of these but if you wish you can also use the well known Aliexpress.com but the selection is more limited and not up to date.
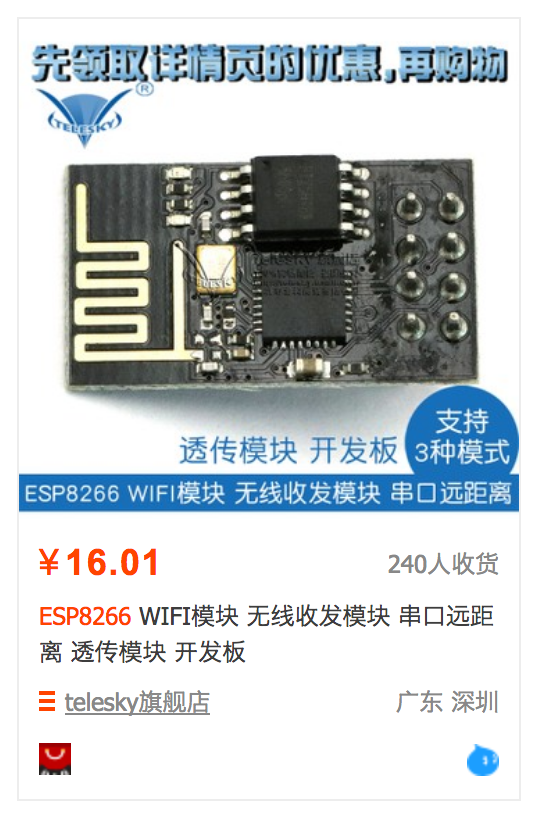
Yes you read that right. 16 Chinese Yuan! That is about $2 USD. A more powerful ESP32 board with OLED and onboard USB TTL ends up being about $8 USD. Espressif has huge support and there is no lack of software, blog posts and research. The perfect experimentation platform for IoT, so lets dig right in!
Generic IoT setup
Firstly, I needed to have some way of connecting to the device. This required the usual downloading of drivers, unloading/loading of kernel modules and debugging of serial access. Although this is not the focus of this post, I have a couple of resources in the final section if you need some tips.
From my experiments I have compiled a generic setup. It will differ slightly depending device but will typically be what you follow with any of the sample projects provided by AWS, MongooseOS or MicroPython.
Generic Steps:
- Download Software (RTOS, Greengrass, MongooseOS, MicroPython)
- Configure Toolchain/IDE for the device
- Configure project/code with AWS and WiFi settings for connectivity
- Configure IoT credentials/IAM roles (keys for TLS mutual authentication) on both the device and AWS
- Install the firmware on the device
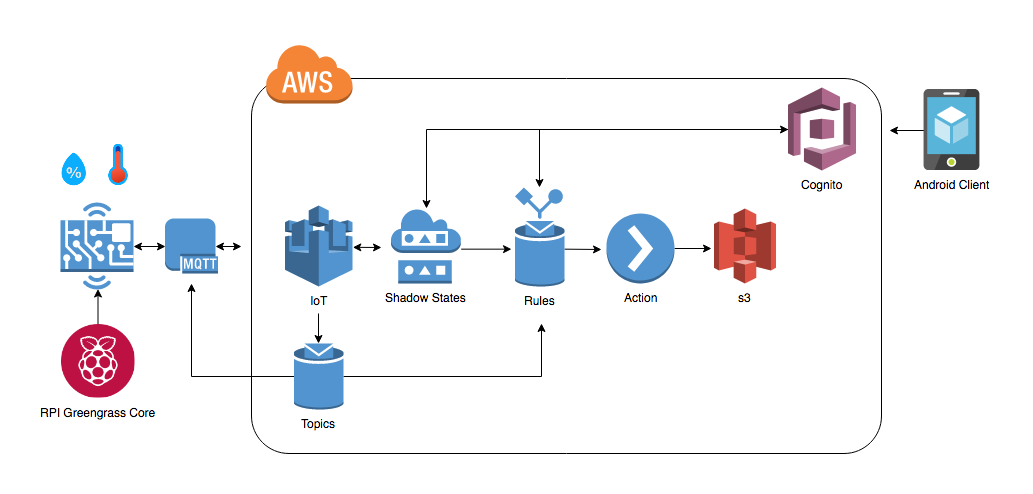
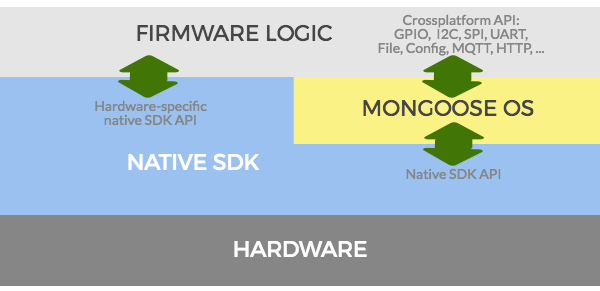
Our final goal will be similar to the diagram from part one:
Choices to make
In part one I discussed the potential software solutions for IoT devices. Lets recap; We have both AWS options and third party options including:
We need to come up with a suitable solution using these technologies. In the following sections I will be going through each option and discussing my findings.
Greengrass - The core
Initially, I decided to install the Greengrass software on the Raspberry Pi Zero (RPI). The following link is available on AWS providing the Greengrass documentation for the setup instruction on the RPI, EC2 instances, Nvidia Jetson and generic Unix.
Notes about Greengrass setup:
- Requires the specific
2017-03-02-raspbian-jessie.zipimage - A Kernel update is suggested (Might have something to do Greengrass Lambda and OTA features)
- Built in dependency checker
- Manual setup of a Greengrass group using "Easy Group creation" in the AWS console. This does a number of steps behind the scenes including creation of certificates/keys, roles, policies and definitions
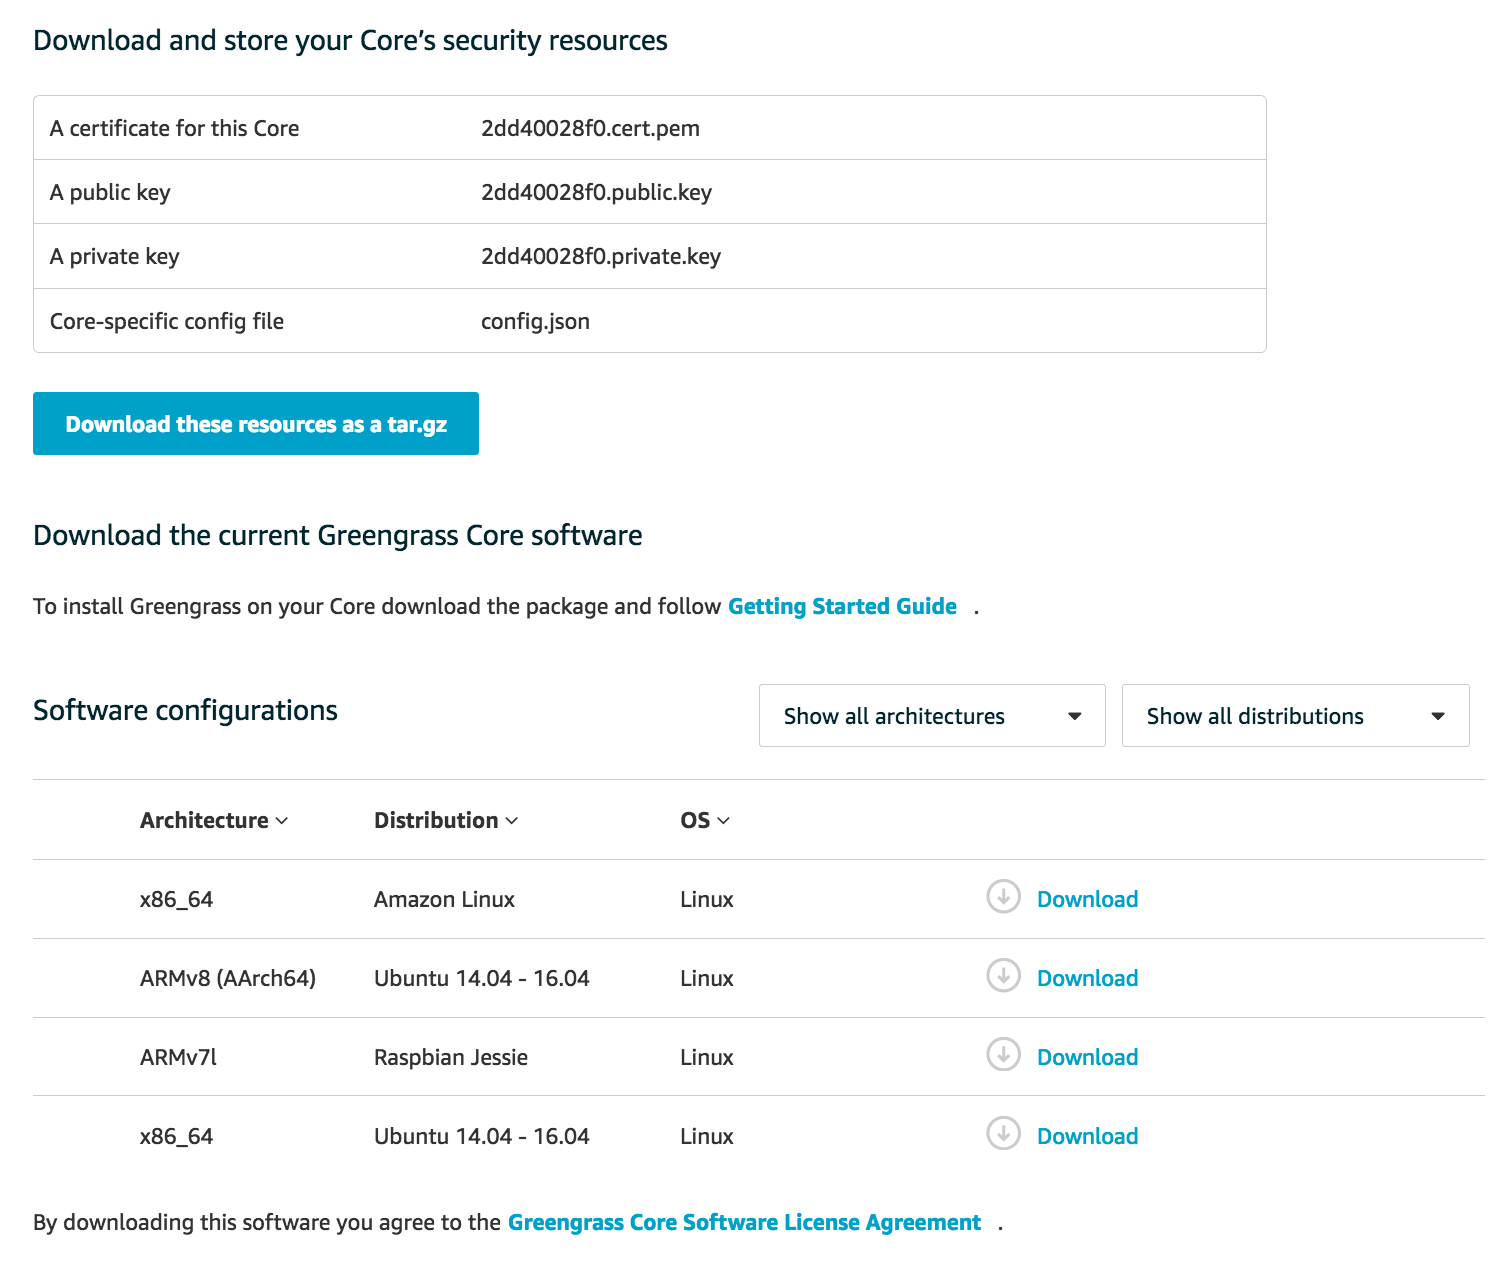
- Security resources including the cert, private key, public key and
config.jsonmust be downloaded after creation (they will not be available again).
- Security resources including the cert, private key, public key and
- The Security resources and the Greengrass software tar.gz files need to be manually transferred to the RPI using
scp, USB or another means - A Symantec CA cert should be downloaded to the device and is required to connect to AWS IoT with TLS
Download and store the security resources as below:
Even though I failed to run the greengrassd daemon on the RPI I decided I would setup Greengrass on EC2 instead. Once this was complete, I should be able to run the greengrassd daemon and start experimenting with the array of Greengrass features including device discovery and Lambda functions.
The grass is not always green:
The setup for Greengrass is quite long winded and I would have expected a slightly easier setup overall. To get a running device, it is quite simple but to produce the whole end-end setup including Lambda functions there are over 6 modules in the AWS documentation for a number of intricacies.
Ideally AWS should provide a packaged version or even a custom image to be downloaded and flashed based on the setup. Potentially this could be generated and stored in an S3 bucket with a temporary link. It is important to note that the public key, Greengrass software and config.json are not required to be secure so do not necessarily need to be securely loaded to the device by hand with scp.
I have decided to leave the Greengrass setup out of the proof of concept due to it's complexity in setup, similarity to standard IoT device setup and the current density of this blog post. Greengrass is full of features and deserves a blog post on it's own!
AWS FreeRTOS - Getting Low-level
There was not actually much information provided about AWS FreeRTOS but I wanted to understand what I could do with it. Starting from the AWS FreeRTOS prerequisites I worked through the example with an ESP32 device. The [ESP32-DevKitC] (https://docs.aws.amazon.com/freertos/latest/userguide/getting_started_espressif.html) has a more streamlined setup compared to other devices but does not support OTA, lightweight IP, SMP and BLE.
Just as we setup Greengrass before, AWS FreeRTOS follows a very similar "generic setup" that I outlined at the start of this post. The device's IoT "Thing" representation is not so different from a Greengrass device.
Once flashing RTOS and installing it we should get an output similar to the following if we run the MQTT echo example.
354 8667 [MQTT] Received message 0 from queue.
355 8668 [MQTTEcho] Command sent to MQTT task passed.
356 8668 [MQTTEcho] MQTT echo demo finished.
Interesting points to note with setup:
- Like Greengrass; Amazon FreeRTOS needs to be downloaded from AWS and you have a choice of integrated development environments or standalone software
- The required config is in:
<BASE_FOLDER>/demos/common/tools/aws_config_quick_start/configure.jsonand this is where you configure the IoT endpoints and WiFi connectivity - Just as the certificate and private keys were transferred onto Greengrass we must also provide them to the FreeRTOS setup and update the file in
<BASE_FOLDER>\demos\common\include\aws_clientcredential_keys.h
AWS FreeRTOS documentation provides good setup guides but does not provide many answers about development aspects. There is an assumption that you know what you are doing when programming FreeRTOS. A few pointers in this direction would be nice.
AWS FreeRTOS sounds like fun! I could do something with it but I would be spending most of my time making sure my code is correct rather than exploring the rapid development opportunities that other frameworks might provide. As I mentioned in part one I will not be delving too deeply into specifics of FreeRTOS.
MicroPython - REPL at your fingertips!
The MicroPython setup for the ESP8266 consisted of downloading the MicroPython software, erasing the flash and uploading the new firmware using esptool. Lucky enough the ESP8266 and ESP32 boards I purchased had a USB to serial converter built in, so all that was required was running screen /dev/ttyUSB -baud 115200 to connect to the REPL!
If your board does not have a converter or you do not have USB. MicroPython has also been automatically configured to set up a WiFi AP at MicroPython-xxxx with the password micropythoN. This will give you access to a Web REPL as below:
>>> print('hello esp8266!')
hello esp8266!
Now that is seriously cool, I was impressed it worked out of the box with very little configuration unlike most of the other IoT experimentations.
Now, how do I use this with AWS?
The first search for MicroPython AWS libraries brings up an interesting hackster post by Tom Manning. It looks like we need to freeze the additional Python packages in the firmware and re-flash the device.
This led me down the path of trying to figure out if it was possible to use the AWS Python SDK on MicroPython instead. I had a feeling that MicroPython was somewhat limited when it came to larger libraries and would not have enough storage. boto3 is large and would likely suffocate the memory on the device.
Due to ESP8266 RAM limitations, the python modules for this project need to be included in the flashed firmware in frozen bytecode
There also appears to be issues with TLS. It looks like MicroPython is useful but it is probably not suitable for this AWS proof of concept. Perhaps there is something better for AWS integration.
MongooseOS - The King
After leaving MicroPython, I came across MongooseOS mentioned in a AWS blog post. This post and others provided useful information that the AWS documentation does not necessarily mention. I thought I would explore it more.
It appears MongooseOS and the ESP devices work very nicely together. Mongoose provides a browser IDE with Cloud building, logging and automatic configuration setup. There is also no need for repackaging or modification of source for TLS connectivity. MongooseOS also provides a abstract implementation of IoT for AWS, Azure and GCP.
I thought I would give it a go, so I downloaded the MongooseOS tool called mos and started the IDE to see if it really lived up to the name.
Once MongooseOS was installed all I needed to do was start the mos browser IDE, download the sample project through the web interface then flash it to the device. Once flashed, I had the option of setting up WiFi access by loading the credentials onto the device filesystem.
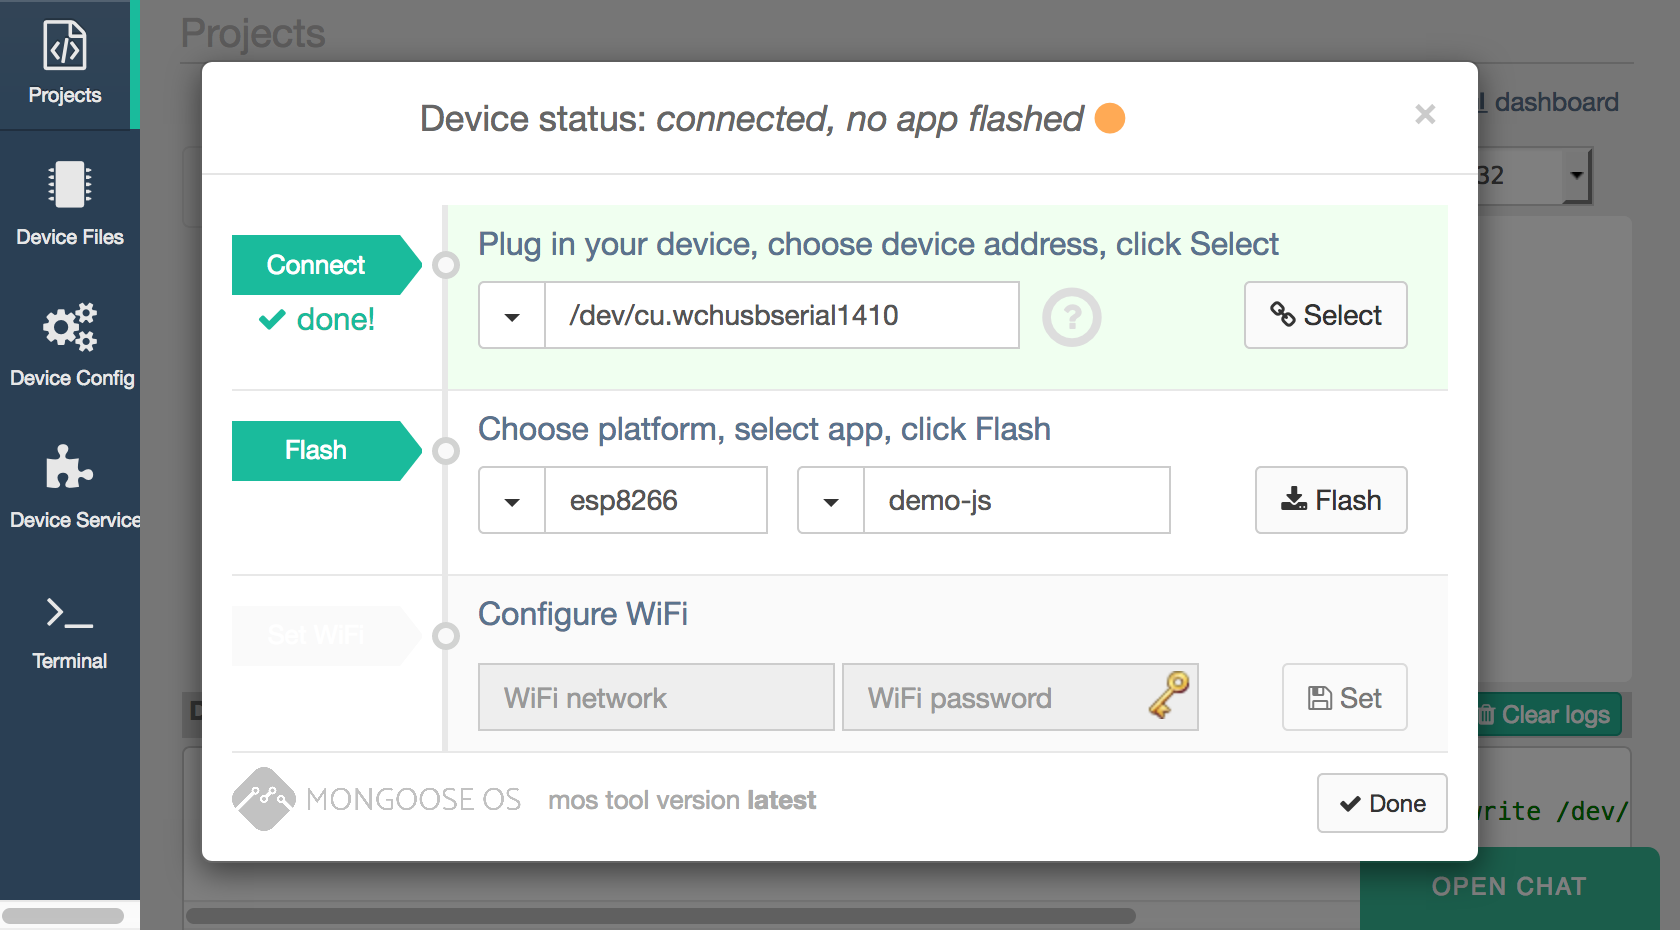
Once the initial setup was finished the device rebooted and console output was routed directly to the web logging output. MongooseOS provides a unified cloud library and specialised AWS libraries to interact with the AWS device shadows. We can subscribe to messages and shadow updates if needed.
To communicate with our IoT devices I have decided to use the standard MQTT over HTTPS, this allows us to access the default MQTT topics for Shadow updates and any custom topics created. We will create two extra topics for publishing sensor data and device settings to AWS as follows: devices/<deviceId>/data and devices/<deviceId>/settings
We will be logging humidity and temperature at selected intervals using MQTT. Then Setting up actions on AWS IoT to save this data to a S3 bucket.
MongooseOS Architecture:
MongooseOS is based on mjs, a strict subset of JavaScript ES6 with C/C++ RPC calls. Once MongooseOS is installed on the device we have access to virtual file system on the device which is relatively small but stores a number of items including the init.js (entrypoint for the program). The config.json files, for configuration settings related to MongooseOS internals, WiFi and Cloud configurations. Certificates, private keys and public keys are also stored in this file system.
The typical layout of the filesystem according to MongooseOS documentation:
conf0.json      - default app configuration, must NOT be edited manually
conf9.json      - user-specific overrides, changed by "mos config-set" command
index.html      - many apps define this file, which is served by a web server
ca.pem          - added by the ca-bundle library, contains ca root certs
init.js         - main file for the JavaScript-enabled apps
api_*.js        - JavaScript API files
api_*.jsc       - compiled JavaScript files
There are number of functions we will be using from mJS:
load()takes the name of a Mongoose API and loads it into the file system upon compilationprint()simplified print statementDHTgives us access to the DHT sensor library imported withload('api_dht.js');GPIOgives us access to device GPIO configuration imported withload('api_gpio.js');- As above
AWSandMQTTare also loaded as additional libraries for AWS and MQTT functions
Device Settings, API and State:
In the following code we are loading the required APIs with load() more APIs can be found here and added to your mos.yml build file if required. Documentation is available on the MongooseOS website for core libraries.
Once APIs have been loaded the DHT library helps set up the DHT11 temperature and humidity sensor. Additionally we need to use GPIO to set the mode of ledPin to output.
The state variable is key here for managing our settings on the local device. This object will be updated depending on what messages we receive over MQTT.
// Load Mongoose OS APIs
load('api_dht.js');
load('api_config.js');
load('api_timer.js');
load('api_aws.js');
load('api_mqtt.js');
load('api_sys.js');
load('api_gpio.js');

let dhtPin = 13;
let ledPin = 2;

// Setting up sensor and LED pins
let dht = DHT.create(dhtPin, DHT.DHT11);
GPIO.set_mode(ledPin, GPIO.MODE_OUTPUT);

let deviceId = Cfg.get('device.id');

// Timer delays
let msToSendSensorData = 1000 * 30;

// Topics
let sensorTopic = 'devices/' + deviceId + '/data';
let settingsUpdateTopic  = 'devices/' + deviceId + '/settings';

//Device state by default led on and sending data
let state = {
  sendData: true,
  ledOn: true
};
Subscription handler for subscribing to our settings topic:
The MQTT library allows us to subscribe and post MQTT messages. In the below function we are subscribing to updates for the settingsUpdateTopic. When a messages is received we will parse the data into JSON and check the sendData attribute to enable or disable the upload of sensor data.
MQTT.sub(settingsUpdateTopic, function(conn, settingsUpdateTopic, msg) {
  print('Topic: ', settingsUpdateTopic, 'message:', msg);
  let obj = JSON.parse(msg);

  if(obj.sendData === false){
    print('Disabling Sensor data upload');
  }
}, null);
AWS Shadow State handling:
AWS.Shadow gives us the ability to manage Shadows states for our AWS integration. This function will set a handler for receiving events from AWS. It will then update the Shadow state according to reported and desired objects.
AWS.Shadow.setStateHandler(function(ud, ev, reported, desired) {
  print('Event:', ev, '('+AWS.Shadow.eventName(ev)+')');

  if (ev === AWS.Shadow.CONNECTED) {
    AWS.Shadow.update(0, state);
    return;
  }

  updateState(reported);
  updateState(desired);

  if (ev === AWS.Shadow.UPDATE_DELTA) {
    AWS.Shadow.update(0, state);
  }
}, null);
An example AWS Shadow state on AWS IoT Core:
{
  "reported": {
    "ledOn": true,
    "sendData": true,
    "ota": {
      "device_id": "esp8266_94AB1C"
      // Left out some extra attributes here added by MongooseOS
    }
  }
}
Example settings message posted to devices/<deviceId>/settings:
// To disable data being sent to AWS we can post this message to the topic "devices/esp8266_94AB1C/settings"
{
  "sendData": false,
  "ledOn": false
}
The IoT setup can be found in the mos IDE or created using the mos cli tool with the command: mos aws-iot-setup --aws-region <Region> --aws-iot-policy mos-default. This will run AWS cli in the background and create the required certs, output them and transfer them onto the device. The resulting certs are also bound to the device on AWS IoT Core.
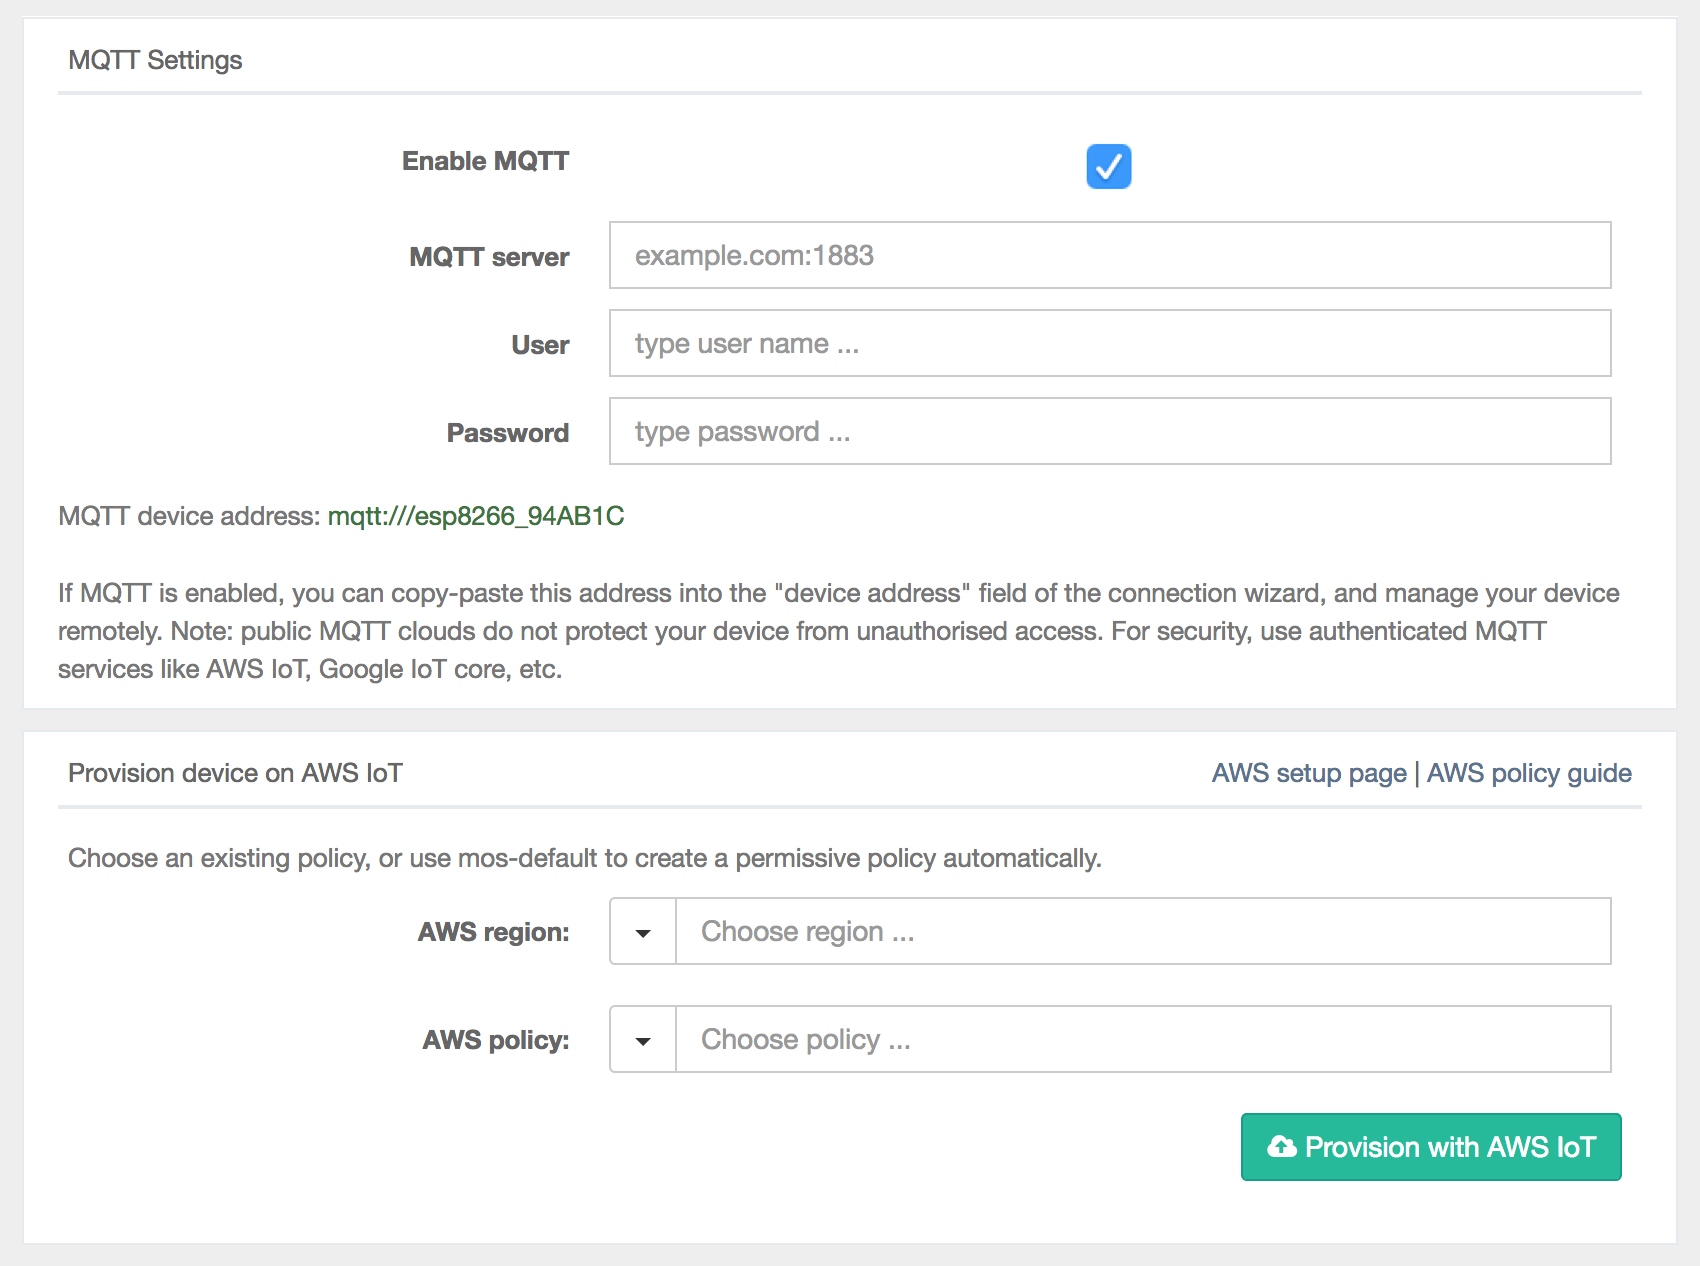
Once the AWS provisioning is complete and the correct permissions are setup in AWS for IoT core we should see output in the console telling us that data is being sent to AWS.
An example disabling sensor upload by publishing to the settings topic:
[Aug  1 12:10:08.401] Published: yes topic: devices/esp8266_94AB1C/data message: {"humidity":"80","temp":"20","device":"esp8266_94AB1C"}
[Aug  1 12:10:30.320] Topic:  devices/esp8266_94AB1C/settings message: {"sendData": false,"ledOn": false}
[Aug  1 12:10:30.335] Disabling Sensor data upload
[Aug  1 12:10:30.354] mgos_aws_shadow_ev   Update: {"state": {"reported": {"ledOn":false,"sendData":false}}, "clientToken": "c1e0b2d0"}
[Aug  1 12:10:30.449] mgos_aws_shadow_ev   Version: 0 -> 94 (5)
[Aug  1 12:10:30.455] mgos_aws_shadow_ev   Version: 93 -> 94 (5)
[Aug  1 12:10:30.496] Event: 3 (UPDATE_ACCEPTED)
[Aug  1 12:10:30.496] Reported state: {"sendData":false,"ledOn":false}
[Aug  1 12:10:30.506] Desired state: {}
[Aug  1 12:10:38.381] Publishing disabled, please enable sendData flag in shadow
Deployment and AWS IAM setup
We now have a device setup on AWS but we do not actually have the additional infrastructure setup including S3, Cognito and IAM. We also need to have a means of repeatable deployment. What happens if we have a 100 devices? We want to deploy this infrastructure in a more manageable way rather than dealing with the AWS console all the time.
This is where some options in AWS fall short. CloudFormation is not up to speed. There are a few other options on GitHub but I have yet to test these; they might be worth checking out:
I have decided to use Terraform as it supports most IoT Core features in CloudFormation and is used heavily at Ippon Australia. A Terraform deployment in combination with a custom initialisation script or MongooseOS command should not be difficult once setup.
Giving IoT access to Amazon for storing data:
resource "aws_iam_role" "role_iot" {
    name = "role_iot"
    assume_role_policy = <<EOF
{
  "Version": "2012-10-17",
  "Statement": [
    {
      "Effect": "Allow",
      "Principal": {
        "Service": "iot.amazonaws.com"
      },
      "Action": "sts:AssumeRole"
    }
  ]
}
EOF
}

resource "aws_iam_role_policy_attachment" "s3_policy_attachment" {
    role = "${aws_iam_role.role_iot.name}"
    policy_arn = "arn:aws:iam::aws:policy/AmazonS3FullAccess"
}
Setting up our identity pool giving access to S3 and AWS IoT:
resource "aws_cognito_identity_pool" "cognito_pool" {
  identity_pool_name = "identity pool"
  allow_unauthenticated_identities = true
}

resource "aws_iam_role_policy" "unauthenticated" {
  name = "unauthenticated_policy"
  role = "${aws_iam_role.cognito_unauthenticated.id}"

  policy = <<EOF
{
  "Version": "2012-10-17",
  "Statement": [
    {
      "Effect": "Allow",
      "Action": [
        "mobileanalytics:PutEvents",
        "cognito-sync:*",
        "cognito-identity:*",
        "iot:*",
        "s3:*"
      ],
      "Resource": [
        "*"
      ]
    }
  ]
}
EOF
}
Setting up a S3 bucket and topic rules for our data:
resource "aws_iot_topic_rule" "topic_rule_write_to_s3" {
  name = "rule_write_to_s3"
  enabled = true
  sql = "SELECT * FROM 'devices/${aws_iot_thing.thing1.name}/data'"
  sql_version = "2016-03-23"
  s3 {
    bucket_name = "${aws_s3_bucket.s3_bucket.bucket}"
    key = "$${topic()}/data_$${timestamp()}.json"
    role_arn = "${aws_iam_role.role_iot.arn}"
  }
}

resource "aws_s3_bucket" "s3_bucket" {
  bucket_prefix = "iot-data-"
  force_destroy = true
}
We have roles but we do not have mutual TLS setup for the device:
We have a few options, we can manually set up certs like before and link these certs to our device, upload the certs to the device and AWS IoT core. Then TLS mutual authentication will be working.
Or we can deploy our full infrastructure using terraform then simply use the magic mos tool to set things up as we did before. Since we are using MongooseOS we will use the mos tool to setup AWS IoT MQTT authentication and do some magic.
mos aws-iot-setup --aws-region <Region> --aws-iot-policy mos-default
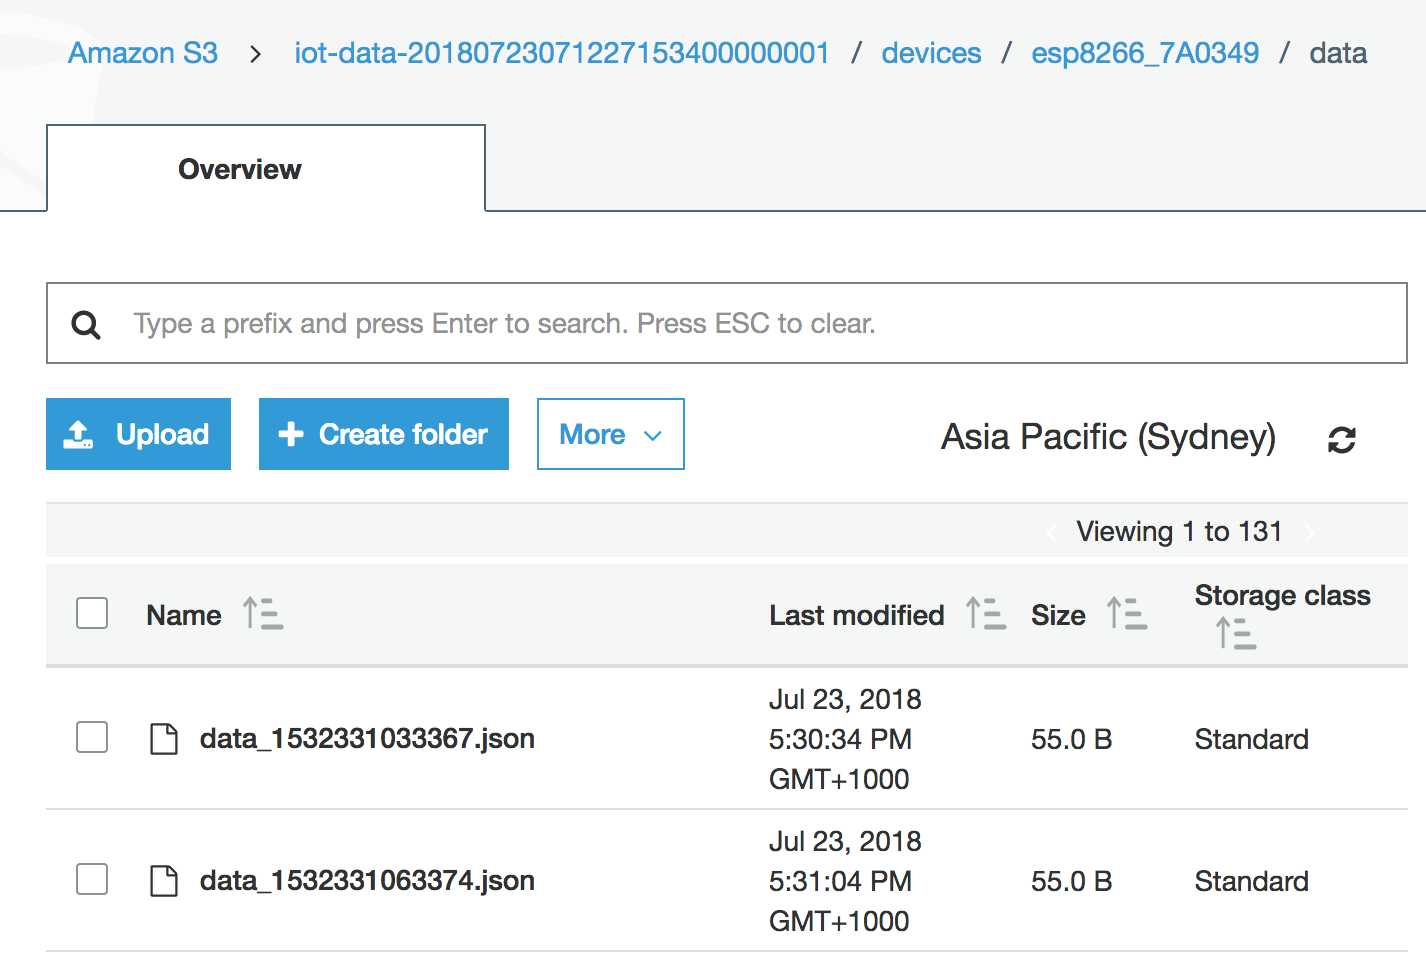
Once this has been setup and we have run terraform apply we should be able to browse our S3 buckets and see the following output to S3 in json format:
MongooseOS needs an Android friend
We now have a deployment for this experiment. But what use are these IoT devices if the data cannot be visualised, seen or controlled in some manner? Currently the data will be output to S3 by default but there are many other options available including: Kinesis, DynamoDB and Lambda functions. The IoT rules can be modified to do this if needed.
I wanted to create an application to utilise and interact with this data. I had two choices; a web application or a mobile application. I chose and Android App due to ability to emulate the device using Android Studio and the solid Android SDK provided by AWS.
I started off with a simple controller application that utilised AWS Cognito to connect to the AWS IoT core infrastructure. It listed the current devices and read Shadow documents. I can potentially set my own options for the mobile application. For example I could set notifications/emails or do something when a new message comes in.
The Android code below pulls down our Thing list using the iotClient and returns a list of Things that can be queried in the UI. This will display the list of things from AWS IoT core. Please note that the current setup uses unauthenticated Cognito. You should be using authenticated Cognito and a fine grained permissions model in a production environment. This could allow sign in from Facebook, Google or Amazon.
Getting a list of all IoT core devices in AWS IoT:
@Override
protected AsyncTaskResult<List<ThingAttribute>> doInBackground(Void... voids {
    // Getting all in IoT core as a list
    ListThingsRequest listThingsRequest = new ListThingsRequest();
    ListThingsResult listThingsResult = iotClient.listThings(listThingsRequest);
    attributeList = listThingsResult.getThings();
    return new AsyncTaskResult<>(attributeList);
}
@Override
protected void onPostExecute(AsyncTaskResult<List<ThingAttribute>> result) {
    // Updating our table of things in the UI
    ((MainActivity) context).updateThingUI(result.getResult());
}
Getting device state of the selected device:
@Override
protected AsyncTaskResult<String> doInBackground(Void... voids) {
    // Setting up our request for shadow state
    GetThingShadowRequest getThingShadowRequest = new GetThingShadowRequest();
    getThingShadowRequest.setThingName(name);

    // Getting our shadow and parsing into string
    GetThingShadowResult getThingShadowResult = dataClient.getThingShadow(getThingShadowRequest);
    byte[] bytes = new byte[getThingShadowResult.getPayload().remaining()];
    getThingShadowResult.getPayload().get(bytes);
    result = new AsyncTaskResult<>(new String(bytes));
    return result;
}

@Override
protected void onPostExecute(AsyncTaskResult<String> result) {
    // Updating our ThingDetails UI with Shadow Information
    JSONObject parsedJson = new JSONObject(result.getResult());
    String parsedToString = parsedJson.toString(spacesToIndentEachLevel);
    ((ThingDetailsActivity) context).updateJson(parsedToString);
}
Android activity displaying Shadow state for an IoT device:
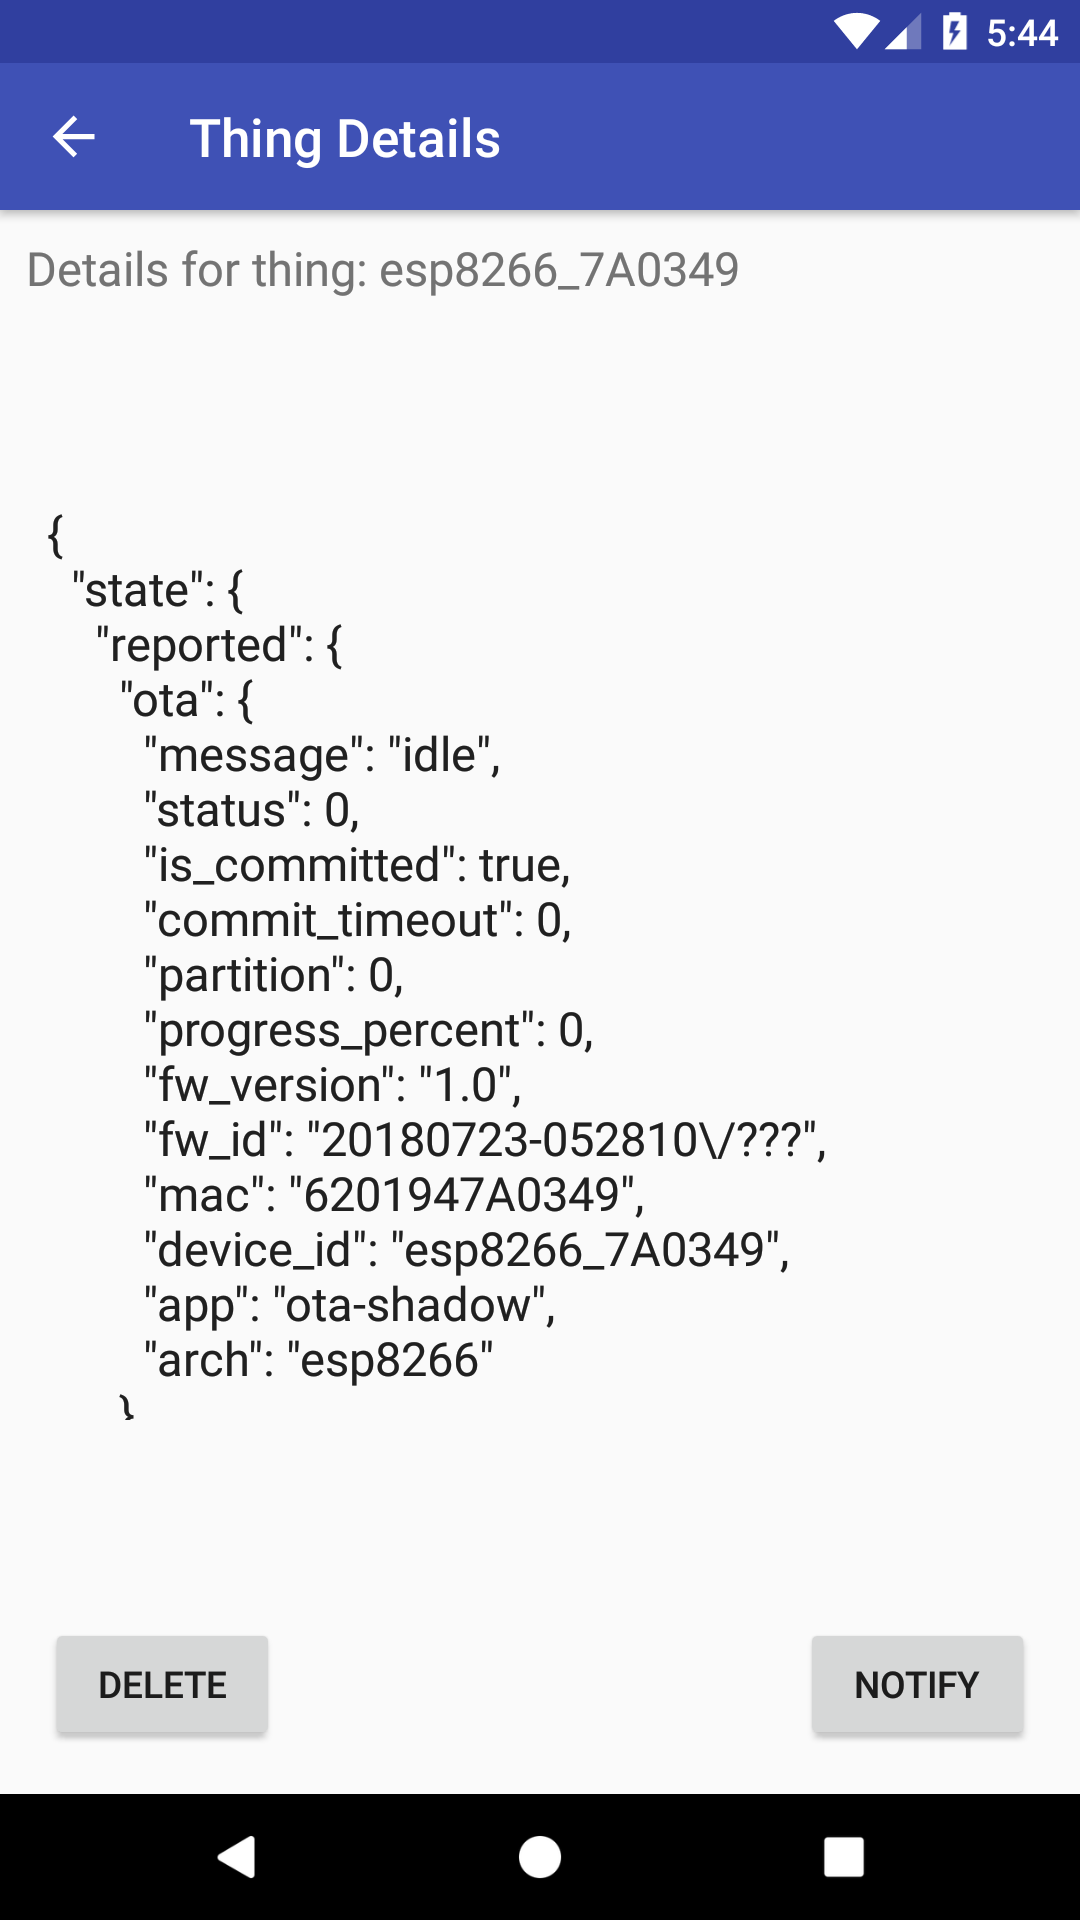
You can can see we are retrieving the attributes associated with the device including the id, mac, temperature and humidity. This is retrieved from the device shadow state.
Show me the Code
For the full code examples you can see the repositories hosted on my GitHub account:
- MongooseOS Project on ESP with the required Terraform files and docs.
- Android application for interacting with our AWS IoT devices once the initial ESP project is created.
What next?
AWS has some solid IoT infrastructure but also lacks in certain areas around initial setup and device documentation. There is complexity in setup especially with Greengrass and AWS FreeRTOS. Ideally this will be streamlined in the future creating an easier setup with new ways to initialise TLS mutual authentication and perhaps some other authentication methods.
CloudFormation and deployment options for Greengrass are particularly limited. AWS IoT Core support is not as bad but still lacks a number of features. Hopefully in the future we see more support by AWS CloudFormation and Terraform. Right now any complex setup relies on the CLI, AWS Console or one of the supported SDK libraries. This means for a complicated stack you need to create your own way of managing state and deployment.
Potential extensions or modifications of the applications:
- Custom alerts when changes are occur Eg. If temperature > 30 send email/SMS
- Toggle device settings from the mobile app
- Setup more devices grouping them and allowing management of groups through the app
- Setup a Greengrass core and use this manage the devices instead
- Experiment with ML inference using results or pass them into Lambda function
Stand on the shoulders of giants
MongooseOS on GitHub
Great blog post about MongooseOS
MicroPython setup on the ESP8266
Confused about ESP8266 boards versions?
Large AWS Connected vehicle solution
AWS IoT Troubleshooting
Greengrass Troubleshooting
AWS FreeRTOS Demos
Apple USB Driver Setup


Comments