

From development to production with Vagrant and Packer
Have you heard of Vagrant? Vagrant is a tool that allows to create virtual machines with a given configuration. It’s a great way to set up and deploy working environments in a reproducible manner. Vagrant therefore eliminates the ‘’works on my machine’’ syndrome.
Several useful cases are possible. The most common is to ramp up a new developer from scratch. Put a Vagrant file at their disposal, let them enter vagrant up and in a few seconds or minutes, they will have a development environment with all the tools that you defined: Maven, Elasticsearch, NodeJS, etc…
Another use case is reproducing a complex production environment with, for instance, a load-balancer and multiple back-ends. This is what makes the multi-machine mode possible.
Creating a Vagrant base box
In most cases, Vagrant is used from a base box such as those that can be found on http://www.vagrantbox.es. One of the mechanisms for Vagrant provisioning (Shell, Chef Solo, Puppet, etc…) is then used to set up the base box.
It may be interesting to create your own base box, for instance:
– if you want to control the content of your VM (it is sometimes a security measure, …);
– if there is no existing base box matching your needs;
– if the provisioning of your box is time-consuming (package compilation, large downloads, …)
– if you want to freeze an exact version of your environment (not to depend on an apt-get update, for example).
Operations for creating a base box are documented: you must follow the basic guide and apply specific rules to the provider (here for Virtual Box). The procedure is not very complex, but it is tedious and error-prone. This is where Packer comes in…
Creating a Vagrant base box with Packer
Packer fully automates the creation of a Vagrant base box. And this tool is not just for Vagrant: it can be used to prepare Docker containers, AMI for Amazon AWS, etc..
Note that for Vagrant, base boxes are usually created with Veewee (Packer’s precursor) and there is a large repository of definitions. A tool to convert Veewee definitions to Parker definitions exists: Veewee-to-packer.
A Packer setting is defined with a JSON file with “Builders” and “Provisioners”:
– The builders are used to control the virtual machines. There are builders for Virtual Box, VMware, Amazon AWS, Google Cloud Platform, etc.
– The Provisioners are used to prepare the software settings from shell scripts or Chef, Puppet, etc.
In practice
In this example, we will prepare the same setup (Ubuntu 13.04 with Node.JS 10.x) for two runtime environments: VirtualBox and AWS. We will then have two Vagrant boxes.
First note that the identification method will be different depending on the environment:
– Locally (VirtualBox), we will use the traditional method of Vagrant, namely a vagrant user set up with a non-secure SSH key.
– On AWS, the mechanism of “key pairs” will be used; our key pair is already set up in the AWS management interface.
Preparing the VirtualBox box
The VirtualBox will be set up from an Ubuntu ISO that we specify by its URL on the website of the publisher. We will give a “preseed” file which allows you to set up the system (more information on the preseeding: https://help.ubuntu.com/13.04/installation-guide/amd64/apb.html).
The fastest way is to start from an existing Veewee configuration. Let’s download a Veewee template for Ubuntu from https://github.com/jedi4ever/veewee/tree/master/templates/ubuntu-13.04-server-amd64.
This template consists of a definition (“definition.rb”), a preseed file (“preseed.cfg”) and shell scripts:
$ cd ubuntu-13.04-server-amd64
>$ find ..
./apt.sh
./build_time.sh
./chef.sh
./cleanup.sh
./definition.rb
./preseed.cfg
./puppet.sh
./ruby.sh
./sudo.sh
./vagrant.sh
./vbox.sh
Let’s launch the conversion from Veewee to Packer:
$ veewee-to-packer definition.rb
Success! Your Veewee definition was converted to a Packer template!
The template can be found in the `template.json` file in the output
directory: output
Please be sure to run `packer validate` against the new template
to verify settings are correct.
We get a Packer definition file (“template.json”). The other files are preserved:
$ cd output
$ find ..
./http
./http/preseed.cfg
./scripts
./scripts/apt.sh
./scripts/build_time.sh
./scripts/chef.sh
./scripts/cleanup.sh
./scripts/puppet.sh
./scripts/ruby.sh
./scripts/sudo.sh
./scripts/vagrant.sh
./scripts/vbox.sh
./template.json
The configuration should be slightly modified (because of minor converter bug): virtualbox must be replaced by virtualbox-iso, and most commands should be deleted. The builder’s configuration is then:
{
    "type": "virtualbox-iso",
    "boot_command": [
    "<esc><esc><enter><wait>",
    "/install/vmlinuz noapic preseed/url=http://:/preseed.cfg ",
    "debian-installer=en_US auto locale=en_US kbd-chooser/method=us ",
    "hostname= ",
    "fb=false debconf/frontend=noninteractive ",
    "keyboard-configuration/modelcode=SKIP keyboard-configuration/layout=USA keyboard-configuration/variant=USA console-        setup/ask_detect=false ",
    "initrd=/install/initrd.gz -- <enter>"
],
    "boot_wait": "4s",
    "disk_size": 65536,
    "guest_os_type": "Ubuntu_64",
    "http_directory": "http",
    "iso_checksum": "7d335ca541fc4945b674459cde7bffb9",
    "iso_checksum_type": "md5",
    "iso_url": "http://releases.ubuntu.com/13.04/ubuntu-13.04-server-amd64.iso",
    "ssh_username": "vagrant",
    "ssh_password": "vagrant",
    "ssh_port": 22,
    "ssh_wait_timeout": "10000s",
    "shutdown_command": "echo 'shutdown -P now' > shutdown.sh; echo 'vagrant'|sudo -S sh 'shutdown.sh'",
    "guest_additions_path": "VBoxGuestAdditions_.iso",
    "virtualbox_version_file": ".vbox_version"
}
Preparing the Amazon AWS box
Now, let’s prepare the builder for Amazon AWS. In this case, we cannot use an ISO installer. We start from an AMI (Amazon Machine Image) prepared by the editor and which we will select on http://cloud-images.ubuntu.com/locator/ec2/.
Our builder will be configured as follows:
{
    "type": "amazon-ebs",
    "access_key": "",
    "secret_key": "",
    "region": "eu-west-1",
    "source_ami": "ami-dea653a9",
    "instance_type": "t1.micro",
    "ssh_username": "ubuntu",
    "ami_name": "ubuntu-13.04__Node.JS"
}
Finishing the preparation of the Packer template
We still have to modify the provisioners:
– We can remove the installation of Ruby, Chef and Puppet which are of no use to us.
– The “Guest Additions” should only be installed for VirtualBox.
– The vagrant user should not be created for AWS.
– We add a script to install Node.js.
The Provisioner’s configuration becomes:
"provisioners": [
{
    "type": "shell",
    "execute_command": "echo 'vagrant'|sudo -S sh ''",
    "scripts": [
    "scripts/build_time.sh",
    "scripts/apt.sh"
]
},
{
    "type": "shell",
    "only": ["virtualbox-iso"],
    "execute_command": "echo 'vagrant'|sudo -S sh ''",
    "scripts": [
    "scripts/vbox.sh",
    "scripts/vagrant.sh"
]
},
{
    "type": "shell",
    "execute_command": "echo 'vagrant'|sudo -S sh ''",
    "scripts": [
    "scripts/sudo.sh",
    "scripts/nodejs.sh",
    "scripts/cleanup.sh"
]
}
]
And our nodejs.sh script is defined as follows:
apt-get -y install software-properties-common
add-apt-repository -y ppa:chris-lea/node.js
apt-get -y update
apt-get -y install nodejs
Finally, we add a post-processor that creates the Vagrant box from the AWS AMI and VirtualBox VM:
"post-processors": [
    {
        "type": "vagrant",
        "keep_input_artifact": true
    }
]
Note that, without the setting keep_input_artifact to true, the post-processor will remove the AMI which will make the box unusable…
Creating the VirtualBox box
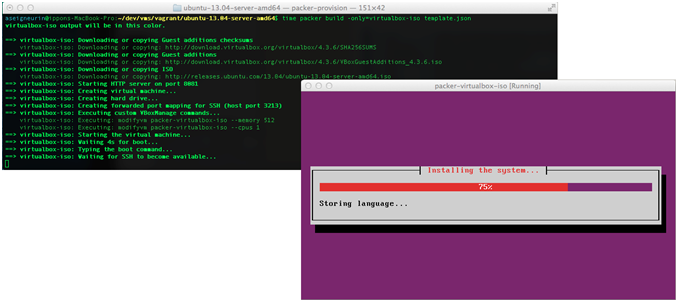
We can now start preparing boxes. By default, Packer starts by creating all the boxes in parallel. However, to begin, we will only build the VirtualBox image through the flag -only = virtualbox-iso.
Packer will download the Ubuntu ISO and the “Guest Additions”. The VM will be created in VirtualBox. This will boot the ISO and when SSH is ready, the provisioning will be made (for shell scripts, in our case). Finally, a Vagrant box will be created.
$ packer build -only=virtualbox-iso template.json
virtualbox-iso output will be in this color.<br></br>
==> virtualbox-iso: Downloading or copying Guest additions checksums
virtualbox-iso: Downloading or copying: http://download.virtualbox.org/virtualbox/4.3.6/SHA256SUMS
==> virtualbox-iso: Downloading or copying Guest additions
virtualbox-iso: Downloading or copying: http://download.virtualbox.org/virtualbox/4.3.6/VBoxGuestAdditions_4.3.6.iso
==> virtualbox-iso: Downloading or copying ISO
virtualbox-iso: Downloading or copying: http://releases.ubuntu.com/13.04/ubuntu-13.04-server-amd64.iso
==> virtualbox-iso: Starting HTTP server on port 8081
==> virtualbox-iso: Creating virtual machine...
==> virtualbox-iso: Creating hard drive...
==> virtualbox-iso: Creating forwarded port mapping for SSH (host port 3213)
==> virtualbox-iso: Executing custom VBoxManage commands...
virtualbox-iso: Executing: modifyvm packer-virtualbox-iso --memory 512
virtualbox-iso: Executing: modifyvm packer-virtualbox-iso --cpus 1
==> virtualbox-iso: Starting the virtual machine...
==> virtualbox-iso: Waiting 4s for boot...
==> virtualbox-iso: Typing the boot command...
==> virtualbox-iso: Waiting for SSH to become available...
==> virtualbox-iso: Connected to SSH!
==> virtualbox-iso: Uploading VirtualBox version info (4.3.6)
==> virtualbox-iso: Uploading VirtualBox guest additions ISO...
==> virtualbox-iso: Provisioning with shell script: scripts/build_time.sh
virtualbox-iso: [sudo] password for vagrant:
==> virtualbox-iso: Provisioning with shell script: scripts/apt.sh...
==> virtualbox-iso: Provisioning with shell script: scripts/sudo.sh...
==> virtualbox-iso: Provisioning with shell script: scripts/nodejs.sh...
==> virtualbox-iso: Provisioning with shell script: scripts/vagrant.sh...
==> virtualbox-iso: Provisioning with shell script: scripts/cleanup.sh...
==> virtualbox-iso: Gracefully halting virtual machine...
virtualbox-iso: [sudo] password for vagrant:
virtualbox-iso: Broadcast message from root@packer-virtualbox-iso
virtualbox-iso: (unknown) at 14:23 ...
virtualbox-iso:
virtualbox-iso: The system is going down for power off NOW!
==> virtualbox-iso: Preparing to export machine...
virtualbox-iso: Deleting forwarded port mapping for SSH (host port 3213)
==> virtualbox-iso: Exporting virtual machine...
==> virtualbox-iso: Unregistering and deleting virtual machine...
==> virtualbox-iso: Running post-processor: vagrant
==> virtualbox-iso (vagrant): Creating Vagrant box for 'virtualbox' provider
virtualbox-iso (vagrant): Copying from artifact: output-virtualbox-iso/packer-virtualbox-iso-disk1.vmdk
virtualbox-iso (vagrant): Copying from artifact: output-virtualbox-iso/packer-virtualbox-iso.ovf
virtualbox-iso (vagrant): Renaming the OVF to box.ovf...
virtualbox-iso (vagrant): Compressing: Vagrantfile
virtualbox-iso (vagrant): Compressing: box.ovf
virtualbox-iso (vagrant): Compressing: metadata.json
virtualbox-iso (vagrant): Compressing: packer-virtualbox-iso-disk1.vmdk
Build 'virtualbox-iso' finished.
==> Builds finished. The artifacts of successful builds are:
--> virtualbox-iso: 'virtualbox' provider box: packer_virtualbox-iso_virtualbox.box
The “packer_virtualbox-iso_virtualbox.box” file was created. It is a TAR file. Let’s inspect it:
$ tar xvf ../packer_virtualbox-iso_virtualbox.box
x Vagrantfile
x box.ovf
x metadata.json
x packer-virtualbox-iso-disk1.vmdk
$ cat Vagrantfile
# The contents below were provided by the Packer Vagrant post-processor
Vagrant.configure("2") do |config|
config.vm.base_mac = "08002751E780"end
# The contents below (if any) are custom contents provided by the
# Packer template during image build.
$ cat metadata.json
{"provider":"virtualbox"}
The box contains a disk image for VirtualBox and configuration files for Vagrant.
Creating the AWS box
Then run the build image with the AWS option -only= amazon-ebs. The AWS access keys will be specified on the command line.
Packer will start an EC2 instance and then, when SSH is ready, will launch the provisioning. The instance will then be stopped to allow the creation of an AMI. Finally, a Vagrant box will be created.
$ packer build -only=amazon-ebs -var "aws_access_key=<...>" -var "aws_secret_key=<...>" template.json
amazon-ebs output will be in this color.
==> amazon-ebs: Creating temporary keypair: packer 52e8e83f-d8bf-1a2e-45d0-62141afa9d85
==> amazon-ebs: Creating temporary security group for this instance...
==> amazon-ebs: Authorizing SSH access on the temporary security group...
==> amazon-ebs: Launching a source AWS instance...
amazon-ebs: Instance ID: i-8d587ac3
==> amazon-ebs: Waiting for instance (i-8d587ac3) to become ready...
==> amazon-ebs: Waiting for SSH to become available...
==> amazon-ebs: Connected to SSH!
==> amazon-ebs: Provisioning with shell script: scripts/build_time.sh
==> amazon-ebs: Provisioning with shell script: scripts/apt.sh...
==> amazon-ebs: Provisioning with shell script: scripts/sudo.sh...
==> amazon-ebs: Provisioning with shell script: scripts/nodejs.sh...
==> amazon-ebs: Provisioning with shell script: scripts/vagrant.sh...
==> amazon-ebs: Provisioning with shell script: scripts/cleanup.sh...
==> amazon-ebs: Stopping the source instance...
==> amazon-ebs: Waiting for the instance to stop...
==> amazon-ebs: Creating the AMI: ubuntu-13.04__Node.JS
amazon-ebs: AMI: ami-9a07f0ed
==> amazon-ebs: Waiting for AMI to become ready...
==> amazon-ebs: Terminating the source AWS instance...
==> amazon-ebs: Deleting temporary security group...
==> amazon-ebs: Deleting temporary keypair...
==> amazon-ebs: Running post-processor: vagrant
==> amazon-ebs (vagrant): Creating Vagrant box for 'aws' provider
amazon-ebs (vagrant): Compressing: Vagrantfile
amazon-ebs (vagrant): Compressing: metadata.json
Build 'amazon-ebs' finished.
==> Builds finished. The artifacts of successful builds are:
--> amazon-ebs: AMIs were created:
eu-west-1: ami-9a07f0ed
--> amazon-ebs: 'aws' provider box: packer_amazon-ebs_aws.box
Let’s inspect the “packer_amazon-ebs_aws.box” file:
$ tar xvf packer_amazon-ebs_aws.box<br></br>
x Vagrantfile
x metadata.json
$ cat Vagrantfile
# The contents below were provided by the Packer Vagrant post-processor
Vagrant.configure("2") do |config|
    config.vm.provider "aws" do |aws|
        aws.region_config "eu-west-1", ami: "ami-9a07f0ed"
    end
end
# The contents below (if any) are custom contents provided by the
# Packer template during image build.
$ cat metadata.json
{"provider":"aws"}
Unlike the VirtualBox box, this box does not contain a disk image. However, we do have a reference to the AMI that was created.
Adding the Vagrant base boxes
Build operations have created two box files: packer_virtualbox iso_virtualbox.box and packer_amazon ebs_aws.box. We can add them to Vagrant:
$ vagrant box add ubuntu-13.04-amd64-nodejs packer_virtualbox-iso_virtualbox.box
Downloading box from URL: file:/Users/aseigneurin/dev/vms/vagrant/ubuntu-13.04-server-amd64/packer_virtualbox-iso_virtualbox.box
Extracting box...te: 16.0M/s, Estimated time remaining: 0:00:01)
Successfully added box 'ubuntu-13.04-amd64-nodejs' with provider 'virtualbox'!
$ vagrant box add ubuntu-13.04-amd64-nodejs packer_amazon-ebs_aws.box
Downloading box from URL: file:/Users/aseigneurin/dev/vms/vagrant/ubuntu-13.04-server-amd64/packer_amazon-ebs_aws.box
Extracting box...e: 0/s, Estimated time remaining: --:--:--)
Successfully added box 'ubuntu-13.04-amd64-nodejs' with provider 'aws'!
$ vagrant box list
ubuntu-13.04-amd64-nodejs (aws)
ubuntu-13.04-amd64-nodejs (virtualbox)
Note that several base boxes can have the same basic name if their providers are different. It is the case here.
We can then create a Vagrant box based on our base box:
$ vagrant init ubuntu-13.04-amd64-nodejs
A `Vagrantfile` has been placed in this directory. You are now
ready to `vagrant up` your first virtual environment! Please read
the comments in the Vagrantfile as well as documentation on
vagrantup.com for more information on using Vagrant.
We did not specify the provider (VirtualBox or AWS). This is defined with the “–provider” settings of the “up” command.
To start the VM locally, in VirtualBox, we then launch:
$ vagrant up --provider=virtualbox
Bringing machine 'default' up with 'virtualbox' provider...
[default] Importing base box 'ubuntu-13.04-amd64-nodejs'......
And to launch on Amazon:
$ vagrant up --provider=aws
Bringing machine 'default' up with 'aws' provider......
There are errors in the configuration of this machine. Please fix
the following errors and try again:
AWS Provider:
* A secret access key is required via "secret_access_key"
* An AMI must be configured via "ami"
Several problems arise:
– AWS access key is not configured, (actually reassuring). To remedy this, the AWS-Vagrant plugin automatically reads the environment and AWS_ACCESS_KEY AWS_SECRET_KEY variables. We can therefore run the following command:$ AWS_ACCESS_KEY=<...> AWS_SECRET_KEY=<...> vagrant up --provider=aws<br></br>
– The ID of the AMI is missing. This is probably a bug in the plugin since Vagrant file in our base box did contain such information as well as the name of the region. It is possible to work around this problem by adding only the region to the local configuration:
config.vm.provider :aws do |aws, override|
aws.region = "eu-west-1"
end
– We must also specify the instance type, or the security groups, the key pair, as well as SSH access information:
aws.instance_type = "t1.micro"
aws.security_groups = "default"
aws.keypair_name = "..."
override.ssh.username = "ubuntu"
override.ssh.private_key_path = "..."
Once these changes are done, we can re-execute the vagrant up command:
$ AWS_ACCESS_KEY=<...> AWS_SECRET_KEY=<...> vagrant up --provider=aws
Bringing machine 'default' up with 'aws' provider...
[default]  -- Type: m1.small
[default]  -- AMI: ami-040ff873
[default]  -- Region: eu-west-1...
[default] Waiting for instance to become "ready"...
[default] Waiting for SSH to become available…
[default] Machine is booted and ready for use!
And on AWS as with VirtualBox, it is possible to connect to the VM and use Node.js.
On VirtualBox, we will see:
$ vagrant ssh
Welcome to Ubuntu 13.04 (GNU/Linux 3.8.0-19-generic x86_64)...
vagrant@packer-virtualbox-iso:~$ node –v<br></br>
v0.10.25
And in AWS, only the prompt differs:
$ vagrant ssh
Welcome to Ubuntu 13.04 (GNU/Linux 3.8.0-35-generic x86_64)...
ubuntu@ip-172-31-30-2:~$ node -v<br></br>
v0.10.25
Conclusion
Vagrant is a handy tool to unify environments for development and production. Packer really makes this possible by allowing the assembly of identical base boxes in different environments.
Then, of course, these tools are not perfect:
– Our boxes are not perfectly identical; we used two similar sources (an ISO for VirtualBox, an AMI for AWS) that we provisioned the same way. The ideal would be to convert a box into another format, e.g. to convert a VirtualBox image into an AMI.
– Creating a box from an ISO is far from trivial: the boot sequence and preseed mechanism have little or no documentation. It is better in this case to start with an OVF image as those that can be found on http://cloud-images.ubuntu.com/releases/raring/release/ (the downloads are at the bottom of the page).
– The AWS plugin for Vagrant is still relatively young and not stable yet.
In spite of this, we reached our goal and that’s the most important: developers can use Vagrant with VirtualBox while ops use a cloud provider.
Resources
The code used in this post is available on GitHub: https://github.com/aseigneurin/vms
Vagrant : http://www.vagrantup.com/
Packer : http://www.packer.io/
AMIs Ubuntu : http://cloud-images.ubuntu.com/locator/ec2/

Comments