

This article describes an application that takes advantage of AWS serverless services to provide a static website and anonymously-access-controlled resources. To satisfy the static website hosting, we will use Route53, ACM, CloudFront, and S3. Https should be the standard so we will skip "S3 only" hosting.
Our application will also have some super secret resources that will require our user to supply some form of identity. Civic is a third party secure identity ecosystem, that we can integrate for seamless anonymous (or non-anonymous) user management. We can use this identity to uniquely control resource access, and customize the user's experience. Civic uses "Blockchain attestation-based access" instead of relying on username and password, allowing decentralized authorization.
Lambda is a great option to run Civic's server-side Javascript SDK, and will also satisfy our serverless fascination. We can employ the Serverless framework to spin up an API Gateway and Lambda function for us. It will also include a tool for specifying the same SSL certificate we used to secure our static site for our API.
Disclaimer: You may incur some small charges to your AWS account depending on how you use the tech stack described in this article. Route53 may charge per Hosted Zone, for example. AWS has explicit billing details and documentation that you can use to estimate the cost. Generally, serverless is the cheapest way to integrate compute and storage for small applications like this.
Project Architecture
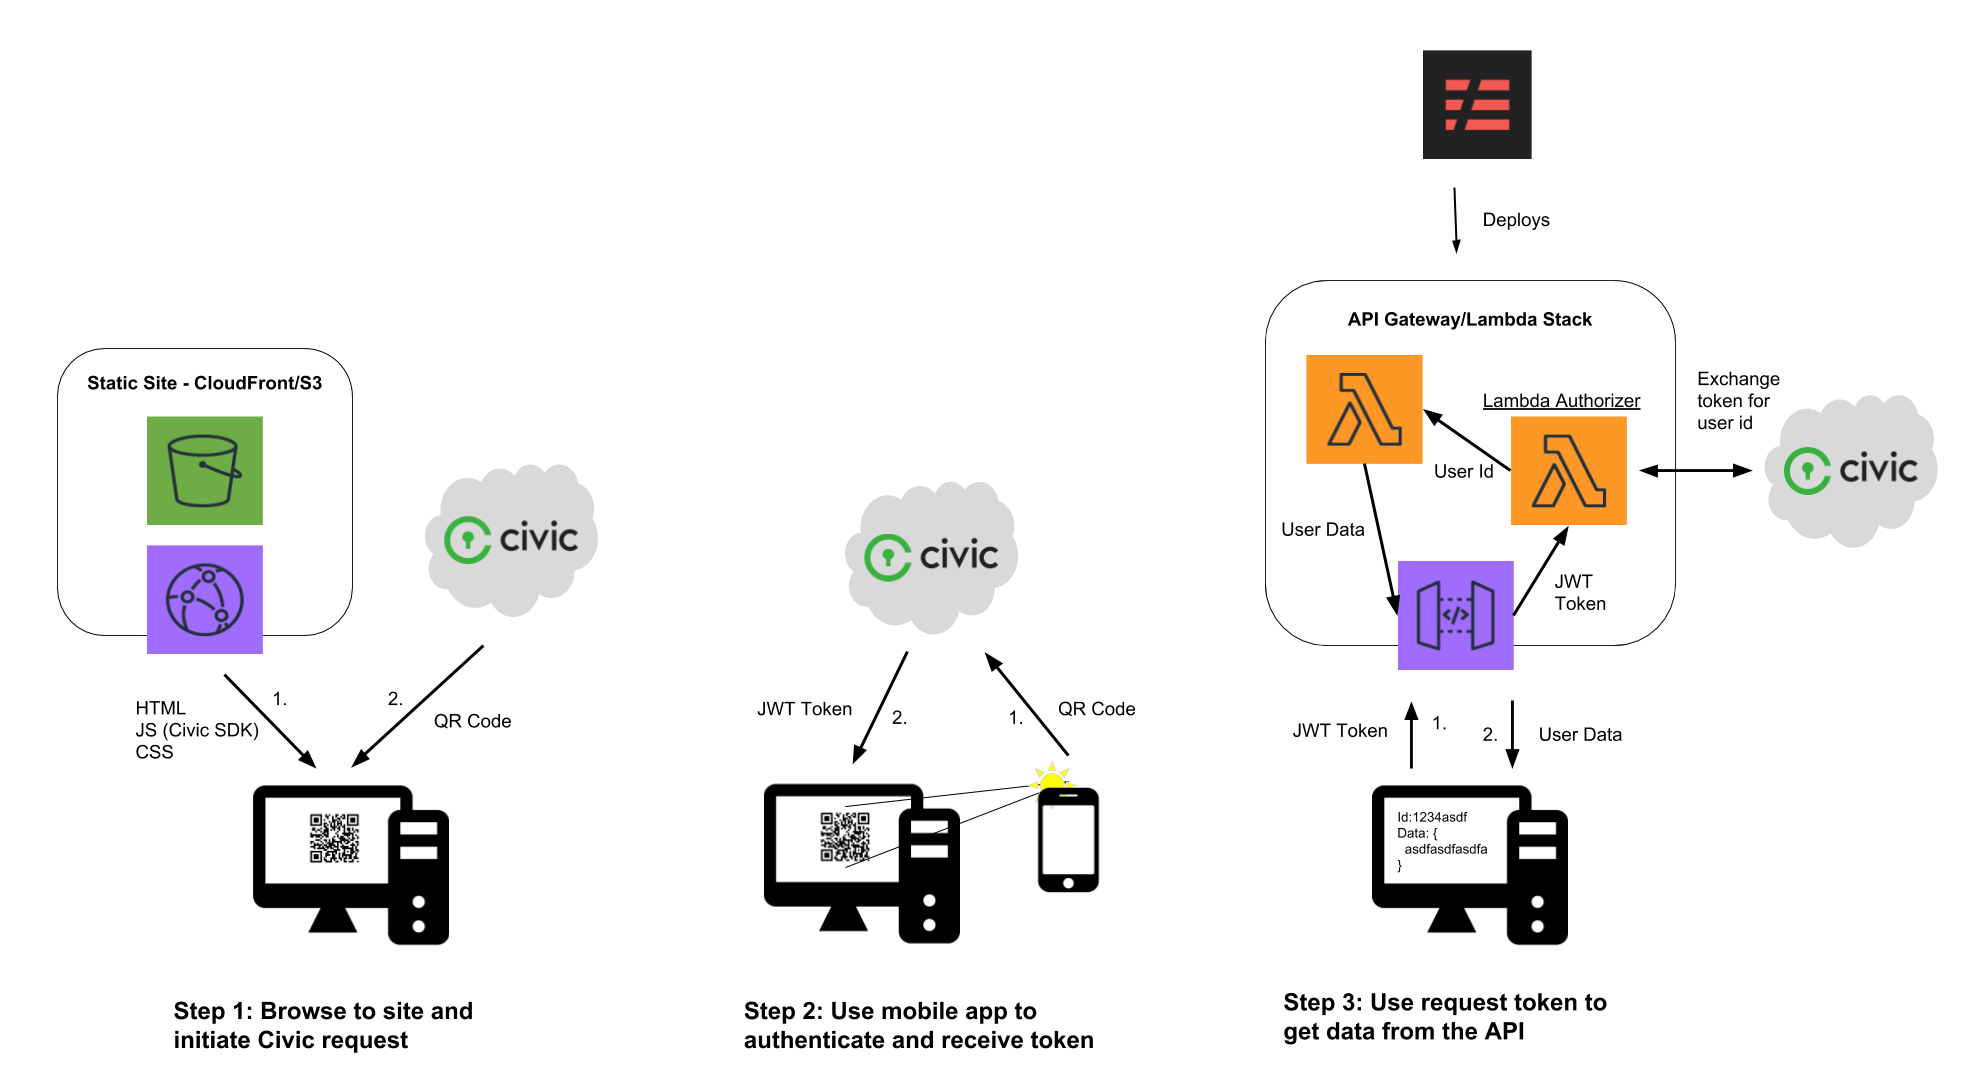
From the user's perspective, there are three basic steps.
- When the user navigates to the static site, Civic's SDK will download either a QR code, or a code for linking to their mobile app if it is a mobile browser.
- Once the user has scanned the QR code or used the deep link to open the Civic mobile app, Civic can return a signed JWT token unique to the app, user, and scope request. The token itself cannot be used to identify the user, as it is essentially a signed UUID generated for every request and must be decoded on the backend.
- The client now sends this token to the app's API, which will be able to exchange the token for the user's data. If it is an anonymous scope request, only the user ID will be returned by Civic. The API backend can now use the user ID to craft the resources sent back to the client.
Create static website with custom domain and SSL on AWS
There are many ways to accomplish this, and many online resources to help you in this process. I will give an overview, but for more detailed instructions, follow AWS' instructions for CloudFront static websites.
Register a domain and set Route53 as its DNS
If you did not get the domain through AWS, check out their instructions for migrating DNS to Route53. It essentially involves setting the name servers for your domain to AWS's name servers. That way, we can use route53 to quickly set up CNAME and ALIAS records under that domain.
Request a certificate for your domain
Here are AWS' instructions for requesting a public certificate. It's important that you add an additional sub-domain to the certificate, i.e. api.yourdomain.com or *.yourdomain.com. This is necessary since we wish to use sub-domains to differentiate between the static CloudFront frontend, and the API Gateway backend. Now we can use the same certificate for both resources.
For this project, I'm using https://color.tylerjohnhaden.com for the website and https://api.color.tylerjohnhaden.com for the API endpoint. If this app is still up when you are reading this, you can see the demo by going to the first link.
Create an S3 bucket and upload initial static files
Since CloudFront takes the longest to spin up, let us speed up the process by skipping any integration for now. We can put an index.html in a public S3 bucket to get started. Here is an intro to getting started with S3. We will not need to configure static website hosting, because CloudFront will take care of that (S3 built-in hosting does not support SSL for custom domains).
<!DOCTYPE html>
<html lang="en">
<head>
    <meta charset="UTF-8" />
    <title>Color Identity!</title>
    <link rel="icon" href="color.png" />
</head>
<body onload="requestAnonymousIdentity()">
</body>
</html>
We will define requestAnonymousIdentity() later on. And what's a website without a fun favicon?
Create a CloudFront distribution with your domain
Using the S3 bucket as an origin, spin up a new distribution. You will need to use the certificate previously created and add the domain you want the site to use as a CNAME in CloudFront.
You will also want to make sure that CloudFront has access to the bucket. This is done through "Origin Access Identity" and you can have CloudFront create a new identity and register it with the S3 origin bucket. Otherwise, you will get an Access Denied response when hitting the domain.
Finally, to get that domain to route to your distribution, we can add an alias to Route53. The easiest way to do this is to copy the domain name of the CloudFront distribution (not its CNAME), and setting it as the Alias Target in Route53. It should look something like this:
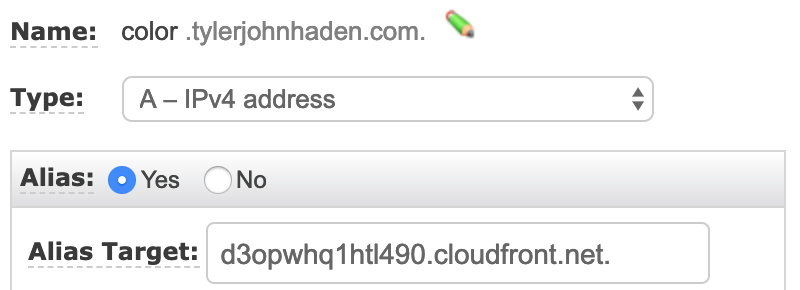
p.s. This does not need to be a sub-domain. I just happen to be using the root domain tylerjohnhaden.com for something else.
Once created, it will take a while to spin up, so let us continue with the rest of the stack. Uploading a new index.html or other resource to S3 takes a few seconds, so we can easily update our client side code later.
Setup your Civic integration
In order to use the developer tools for Civic, we need to use our identity to create an account and Civic app. Login to their developer's portal. This will also give you an identity that can be used to test out the app later on. They have straightforward instructions on downloading the mobile app and verifying your identity.
Checkout their developer's guide for an explanation of the service and APIs. They describe the flow using the following graphic.
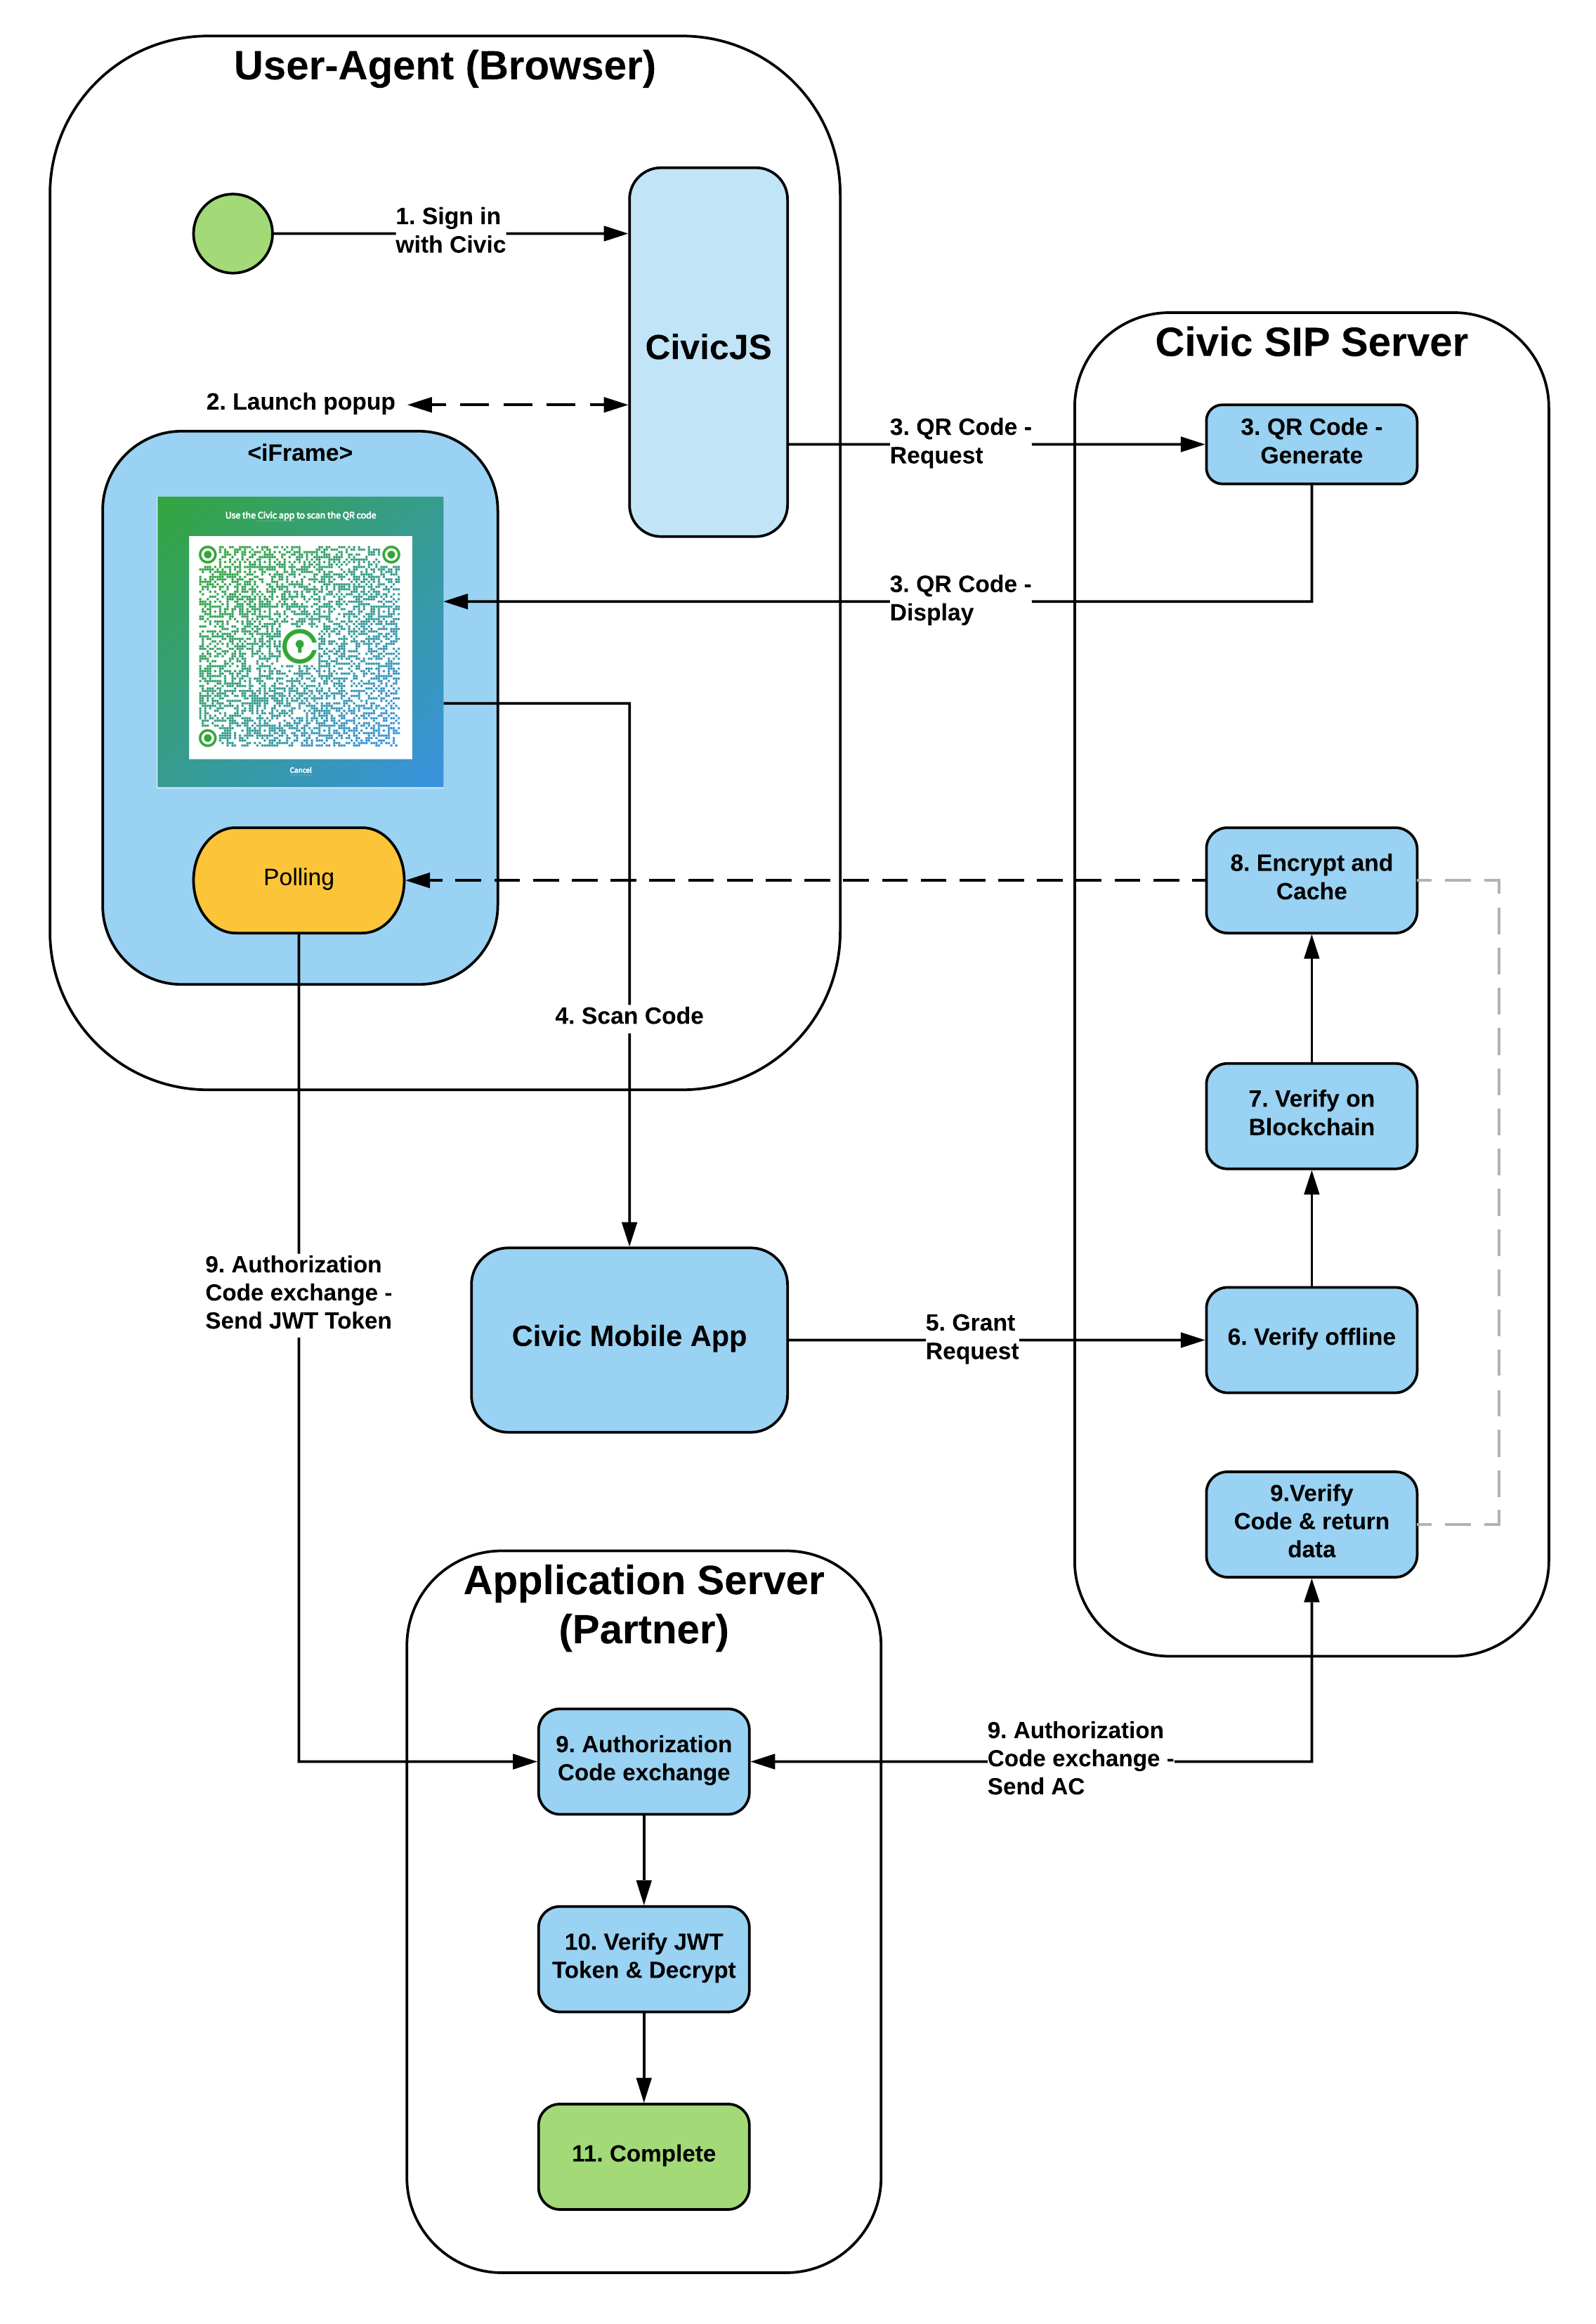
As you can see, they are pretty open about their data flow, which can give confidence to the application owner and users about what and how their data is being shared. Civic integration was designed as a security solution and is intended to be used with confidential and secure applications (so "security through obscurity" is not an option).
Referencing the above diagram, we will need to implement the "User Agent" and "Application Server" which is where Civic's front and backend SDKs come in. But first, we have to set up our application using Civic's portal.
Create a new application
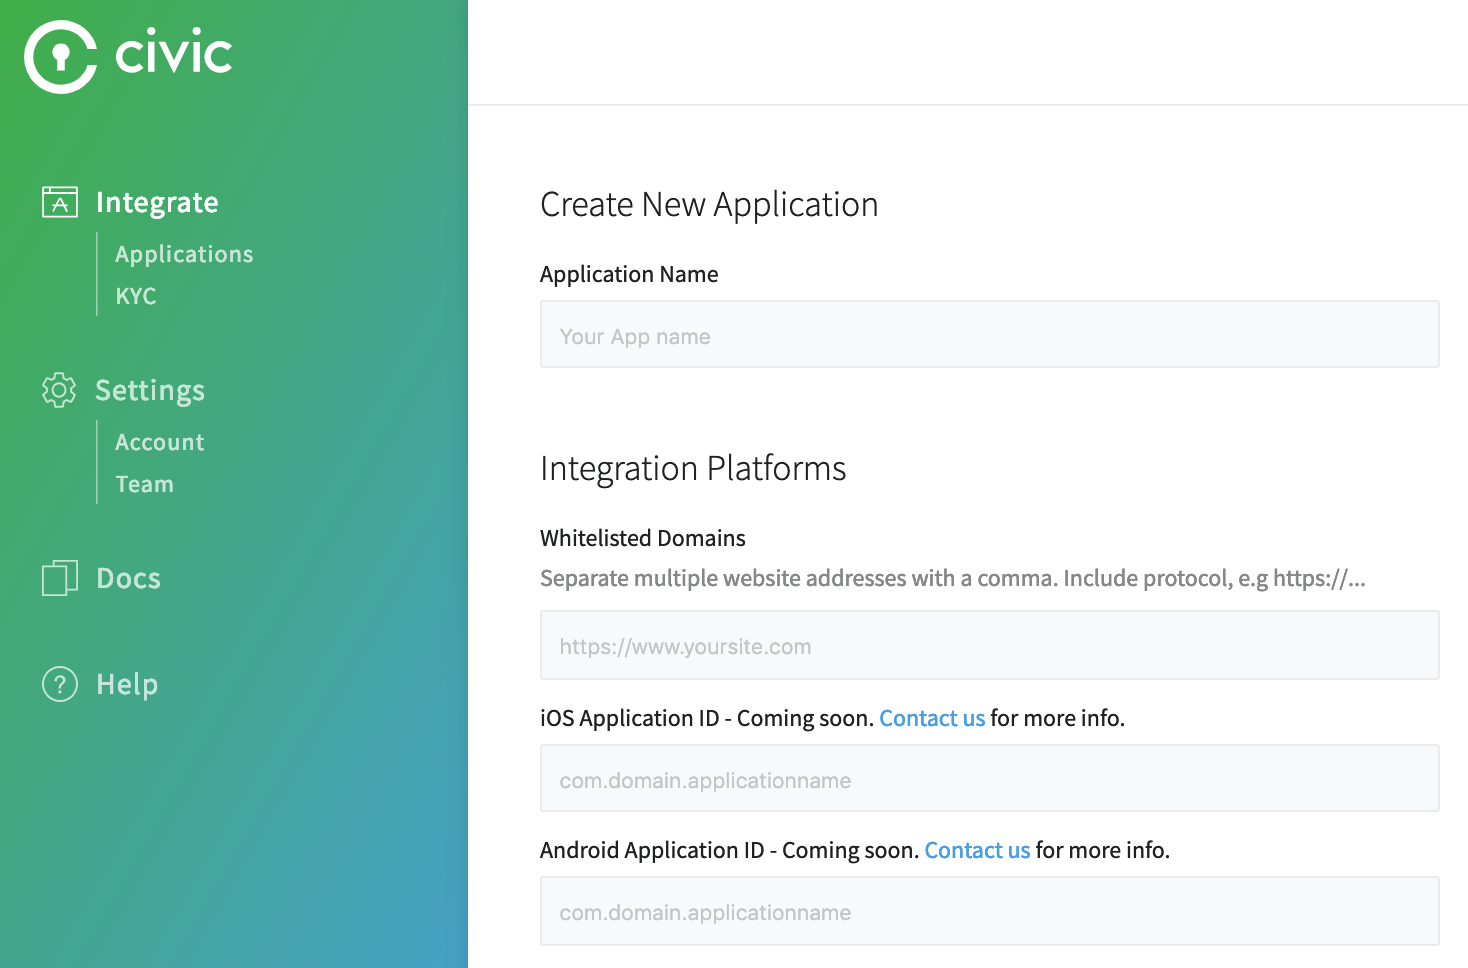
This step should be straight forward, following their clean developer interface. All you need is the name, domain, and a logo to display to users in their mobile app. The name and logo can be whatever you like, and we already set up our domain registration.
The domain you whitelist here should be the one used for the static site. Only the client side code will need this origin set to initially retrieve the JWT token. Our API endpoint is not needed since the backend uses app secrets to verify its identity. Whitelisting domains ensures Civic only sends the QR code to our website.
Generate app secrets and save them to AWS Parameter Store
Once you have your app configured, you will need to generate keys for use in Civic's SDKs. In Civic's integration portal for your app, click on the "Generate Keys Now" button. It will display several public and several private strings and will prompt you to save them before exiting. This is the last time you have the chance to save them! You can always revoke and regenerate new keys, or specify a time-to-live later on.
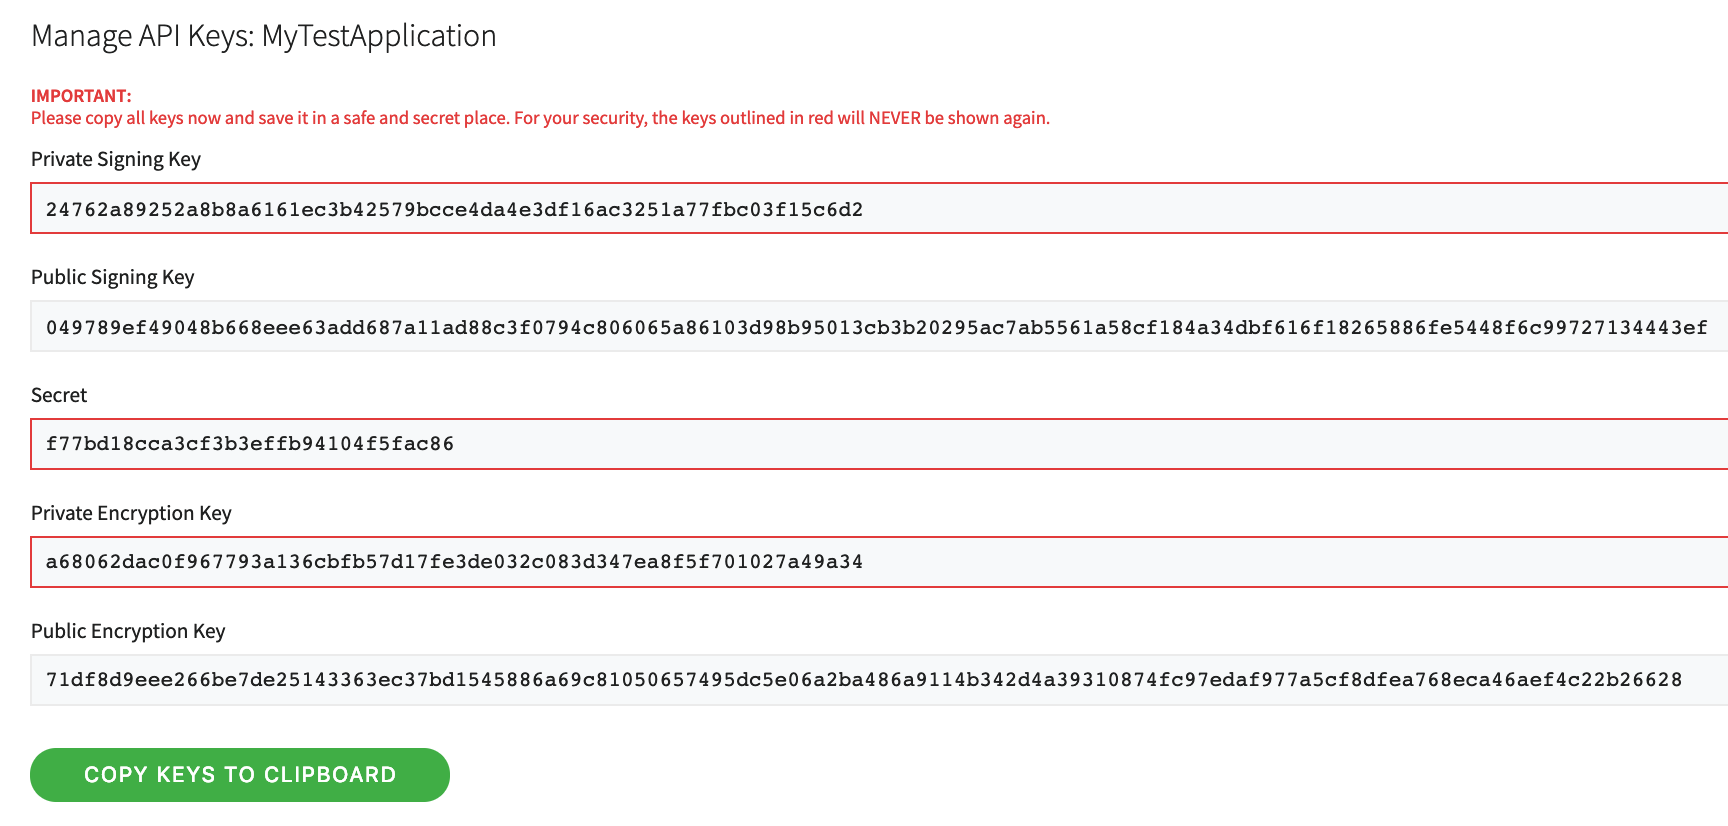
For this project, we will need to securely store the Private Signing Key, and the App Secret. The App ID, which stays constant for our application and is not necessarily secret, is also needed.
Since AWS Lambda will eventually need to use these parameters, let us save these into Systems Manager - Parameter Store (also so we don't lose them). Both the Private Signing Key and the App Secret should be encrypted at rest. Anyone with those values could capture the JWT token mid-flight and potentially access a user's data by pretending to be us.
Add Civic's client side SDK to our website
Civic's client side documentation shows how to integrate their code into your website. Their client side is CDN hosted: https://hosted-sip.civic.com/js/civic.sip.min.js.
To use it we can simply add it into our index.html:
<html>
...
<body onload="requestAnonymousIdentity()">
    <script src="https://hosted-sip.civic.com/js/civic.sip.min.js"></script>
    <script src="color.js"></script>
</body>
</html>
We also need to add some Javascript to send the scope request, pass it along to our backend (non-existent at the moment), and get back the user's identity data. Using Civic's SDK, we can build out the scope request.
const appId = "pfdsARzpj";
const apiColorIdentificationEndpoint = "https://api.color.tylerjohnhaden.com/identification";

// initialize Civic client
const civicSip = new civic.sip({ appId });

// kickoff function, is run on document load (doesn't have to though)
function requestAnonymousIdentity() {
    civicSip.signup({ style: 'popup', scopeRequest: civicSip.ScopeRequests.ANONYMOUS_LOGIN });
}
This particular application does not need any user's personally identifiable data like phone number or email. We can choose ANONYMOUS_LOGIN scope request to ensure we don't receive this data. As of writing this article, this feature is still in beta, but the use case is still achievable by simply ignoring the user's data and only passing the unique user ID with any scope. Find more about these options in their scope request docs.
In order for Civic to function as an MFA solution, you must use the userID field returned in the Anonymous or Basic scope request response as your MFA credential. Additional information such as email address or phone number can be requested as needed; however, this data is not necessarily a unique identifier for the Civic user.
After we send our scope request to Civic, the SDK exposes several events that are triggered based on the results or user interactions.
civicSip.on('auth-code-received', event => {});
civicSip.on('user-cancelled', event => {});
civicSip.on('read', event => {});
civicSip.on('civic-sip-error', event => {});
The auth-code-received event is where we want to capture a successful scope request. If you would like, you can add error logging or retries for the other events shown. Civic uses long polling after the QR code is displayed to the user, which you might observe if debugging in the browser.
After we get a successful response, we can parse it for the JWT token. The token will be enough to identify the user, application, and scope, however this information is not available to the user yet. We have to pass it back to Civic to "decrypt" this information.
civicSip.on('auth-code-received', event => {
    // receive jwt token from Civic
    const anonymousIdentityToken = event.response;

    console.info(`Civic anonymous identity token: ${anonymousIdentityToken}`);
    console.info(`Decoded token: ${JSON.stringify(JSON.parse(atob(anonymousIdentityToken.split('.')[1])), null, 4)}`);

    // pass the token to our backend for processing
    getColorIdentity(anonymousIdentityToken);
});
The decoding of the token above is just for debugging. You can see how we can't yet access the identity information inside the token. Civic requires the token to be verified on the backend before sharing the user's data. It just so happens that in this use case we eventually pass back the user ID, but this is not required.
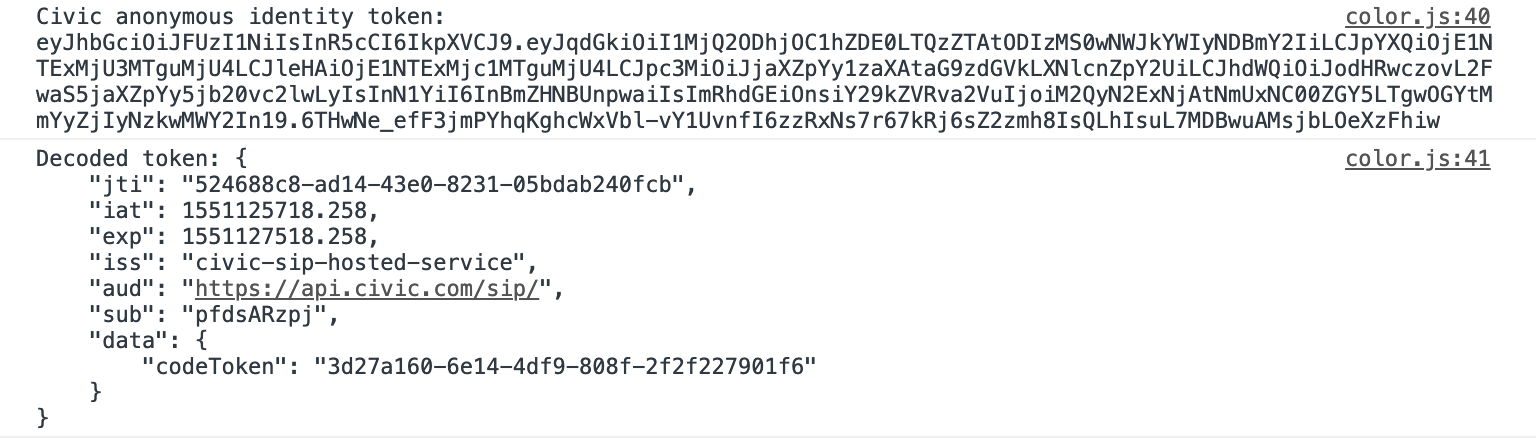
We can get a little bit of insight into the token by decoding e.g. that it expires after 30 minutes. Here, codeToken will eventually be converted into our user id. For more information on JWT in general, checkout the jwt.io docs.
Next, we send this token to our backend. There is nothing wrong with passing the token back in the body, but the standard way is using the Authorization header. This also makes it simpler for us to use AWS Lambda Authorizers (although they can use custom locations for the token).
This can be accomplished with a simple GET request with authorization credentials specified.
function getColorIdentity(token) {
    fetch(apiColorIdentificationEndpoint, {
        withCredentials: true,
        credentials: 'include',
        headers: {
            'Authorization': token,
            'Content-Type': 'application/json'
        }

    }).then(response => response.json()).then(identities => {
        console.info(`Received anonymous identity information from API: ${JSON.stringify(identities, null, 4)}`);

        // convert integer into hex color format
        const hexValue = '#' + identities.yourColorIdentity.toString(16).padStart(6, '0');

        // display color
        document.body.style.backgroundColor = hexValue;

        setTimeout(() => {
            alert(`Your personal identity is ${identities.yourUserIdentity}!\n\n` +
                  `Your color identity is ${hexValue}!`);
        }, 20);

    // or display error
    }).catch(err => console.error(err));
}
Our backend will turn the Civic JWT token into an anonymous user identity and color identity. The user ID is just for debugging, and our use case uses the color identity to set the background color of the web page.
The Javascript Fetch API and most HTTP request APIs abstract away the CORS negotiation. Since our backend is at a different origin (even sub-domains count as cross-origin), there is a request to OPTIONS that will return various important headers agreeing with our credentials and cross-origin request. More on this in the next section.
Upload new static files
With index.html and color.js finished, upload these to your S3 bucket we created before. You may want to invalidate your CloudFront cache to see the new site populate without waiting for CloudFront auto-invalidation.
To test our latest static web site, navigate to it in a browser. You should get Civic to respond with a QR code, but the request to our backend will fail. Now we can continue on to writing our API!
Review
So far, we have stood up a CloudFront distribution serving a static website from an S3 bucket. This website runs Civic's client side SDK to fetch an anonymous Civic JWT token. We also call our yet-to-be-implemented API to exchange the token for our color identity.
To get the source code used for this article, checkout my Github repo. It's open source, so feel free to fork, submit issues, or contribute.
In the next part, we will delve into the wonderful world of serverless computing!


Comments