

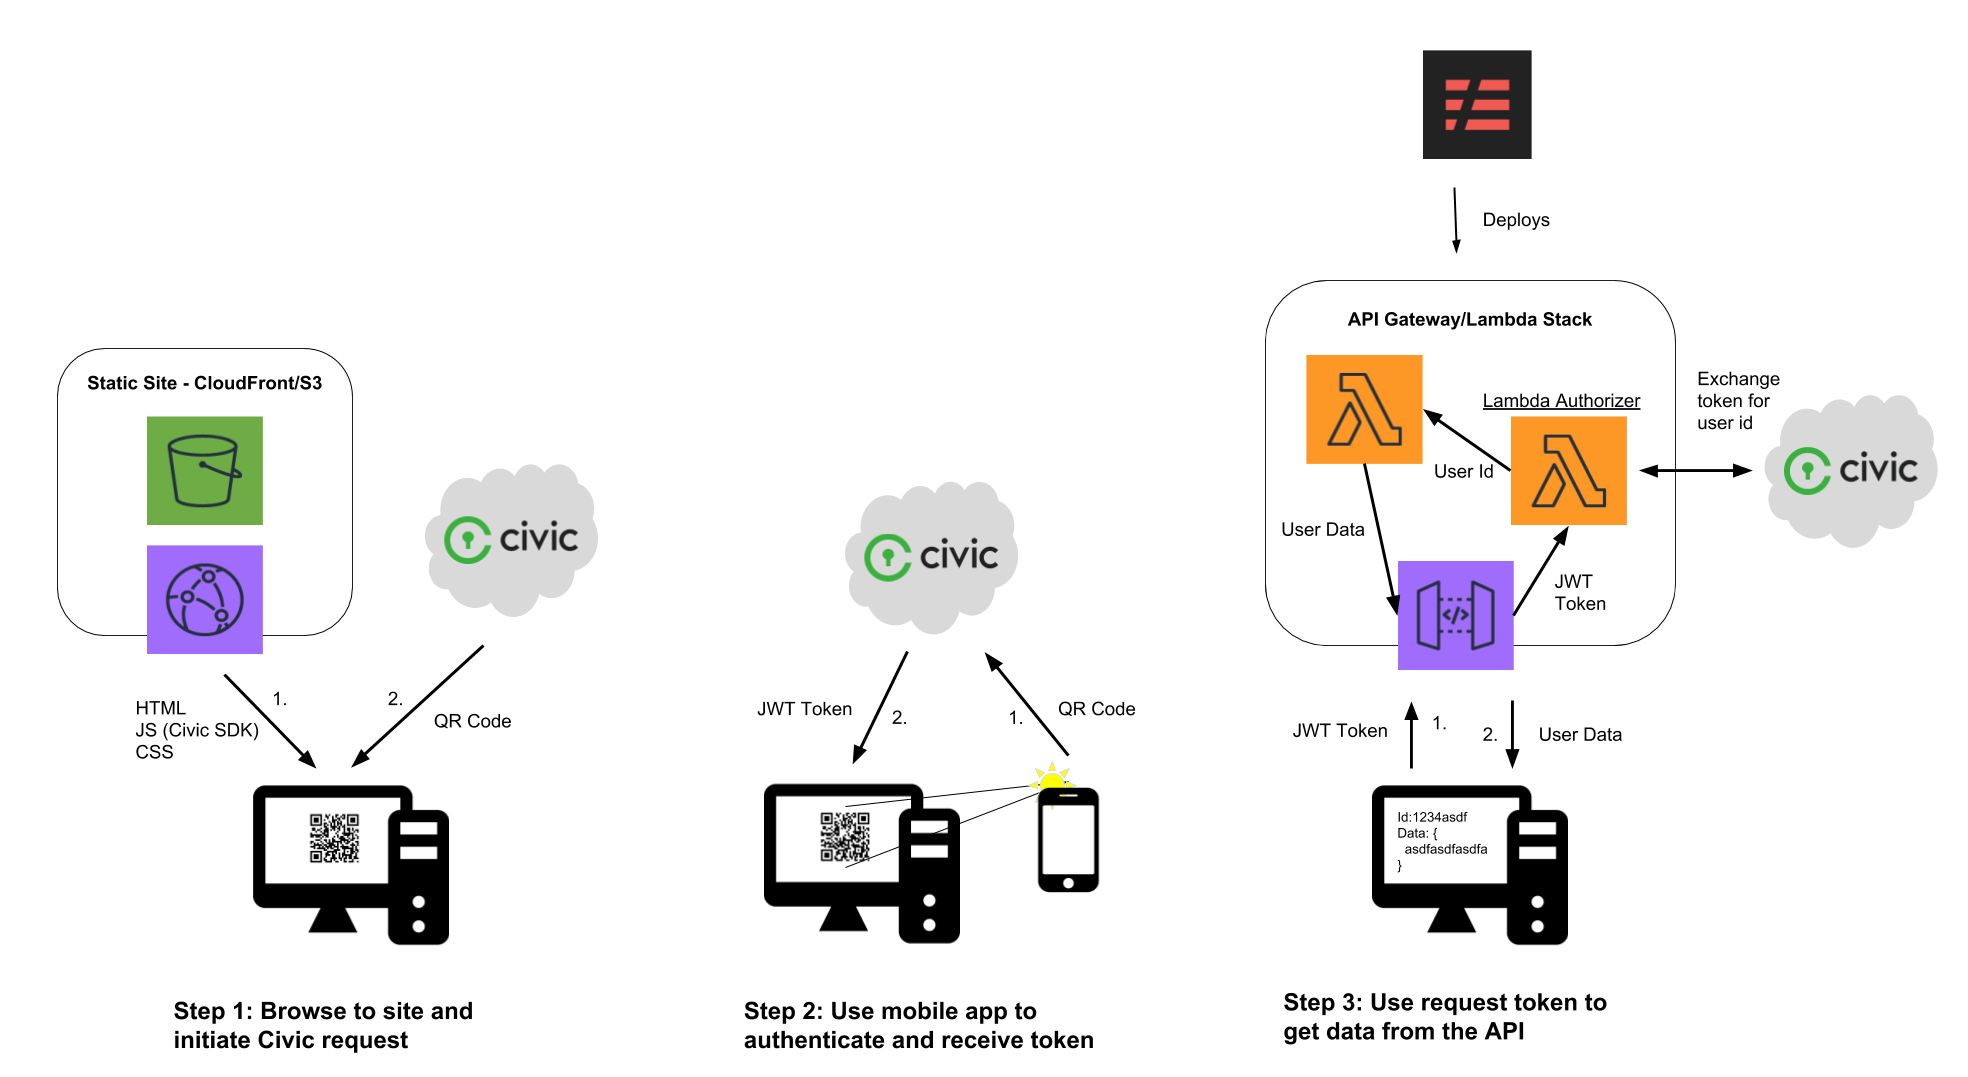
This is the second part of this tutorial (first part here). By now your static website should be up and running. All that is left is to generate our API backend using Serverless. In the picure below, the user can complete the first two steps, but the third will fail for now.
Project Architecture
Create a backend to verify identity
The way we designed our architecture, the backend API is a completely separate component from our static website. This offers several advantages and is common in a serverless architecture. Of course there is only one API call needed so it is not a great concern, but scalability should always be considered.
Our solution is to use AWS Lambda to both interface with Civic and to perform our backend "color processing". Writing a special Lambda authorizer function will best suit our needs for interfacing with Civic, although we could use one function for the entire backend. Isolating our app secrets to one runtime, and abstracting away Civic is desirable and will increase extensibility if we were to add more functionality to the app later on.
Using the Serverless framework, we can specify both functions, setup CORS, and even auto configure our custom domain in the API Gateway. For a more general tutorial on Serverless, checkout the first steps with the Serverless Framework or you can get more information on using JWT tokens as authentication in a serverless environment if you would like.
Start a Serverless application
To start, install the Serverless npm package. I won't go into detail about npm or Node (maybe this article would be a place to start).
npm install -g serverless
p.s. You will be able to use sls and serverless commands interchangeably.
We could use a template to generate the directory and config file, which would take the command sls create --template aws-nodejs --path ServerlessCivicApp, but we're going to change almost everything generated. You could see Serverless's list of templates for possible template options. They support a large range of languages and hosting services.
Our project structure should look like the following.
ServerlessCivicApp:
  - functions
      - auth.js
      - color.js
  - package.json
  - serverless.yml
package.json just needs to keep track of our dependencies. (don't forget to npm install!)
{
  "name": "serverless-civic-app",
  "version": "1.0.0",
  "dependencies": {
    "civic-sip-api": "^1.1.0",
    "jsonwebtoken": "^8.4.0"
  },
  "devDependencies": {
    "serverless-domain-manager": "^2.6.13"
  }
}
serverless.yml lets us configure the functions, environments, AWS settings, etc. This Serverless article is probably the best resource for understanding the layout of this file.
service: my-serverless-civic-app

provider:
  name: aws
  runtime: nodejs8.10
  stage: dev
  region: us-east-1

functions:
  color-identification:
    handler: functions/color.colorIdentification
  custom-civic-authorizer:
    handler: functions/auth.customCivicAuthorizer
Here is the core of the config file. We will be adding more to this later.
serviceis just the title that is used to generate various resource names in AWS. It should be descriptive and will tie each deployment together (if you keep deploying from the same project).providerlets Serverless know where to deploy our resources.nameandruntimeare the only ones required, as the others have defaults.functionslists out our lambdas. We only have two so you can see where Serverless picks up the function handlers. Those functions will need to be exported from each file as we will see later.
Write our Lambda authorizer
A good resource that AWS provides for learning how to define Lambda functions using NodeJS can be found here. The main pieces of information that we need to know are what the function signatures should be and how to return or error out of the function. All of the code here will be taking advantage of ES2017 async and await, but this can be refactored to use promises and callbacks instead.
We will be using Civic's server side SDK which comes as an npm package. First, we need to setup a Civic client for sending tokens. This can be done outside of the function handler itself because multiple calls could use the same client without issue. Importing jsonwebtoken is just used for debugging the incoming tokens and is not required for this particular authorizer. Here is the start of auth.js:
'use strict';

const civicSip = require('civic-sip-api');
const jwt = require('jsonwebtoken');

const civicClient = civicSip.newClient({
    appId: process.env.CIVIC_APP_ID,
    appSecret: process.env.CIVIC_APP_SECRET,
    prvKey: process.env.CIVIC_PRIVATE_SIGNING_KEY,
});

exports.customCivicAuthorizer = async event => {};
We are going to use environment variables for injecting app secrets and the app id. This follows best practices and Serverless can easily pull these values from our AWS Parameter Store. The asynchronous function customCivicAuthorizer will be used as the actual Lambda function handler. In serverless.yml, we need to link the Parameter Store values to the function variables.
...

functions:
  ...
  custom-civic-authorizer:
    handler: functions/auth.customCivicAuthorizer
    environment:
      CIVIC_APP_ID: ${ssm:/tylerjohnhaden/civic-color/APP_ID}
      CIVIC_APP_SECRET: ${ssm:/tylerjohnhaden/civic-color/APP_SECRET~true}
      CIVIC_PRIVATE_SIGNING_KEY: ${ssm:/tylerjohnhaden/civic-color/PRIVATE_SIGNING_KEY~true}
Add the above environment variables. Serverless allows us to add them to the individual functions, or to the whole stage but we can improve security by limiting the scope of the app secrets to just the authorizer. The ssm links to AWS System Manager Parameter Store, and the ~true tells Serverless to use your local credentials to decrypt via KMS.
Let us continue with defining the handler. According to AWS's authorizer documentation, the Lambda authorizer input event will have the following pattern:
{
    "type": "TOKEN",
    "authorizationToken": "<caller-supplied-token>",
    "methodArn": "arn:aws:execute-api:<regionId>:<accountId>:<apiId>/<stage>/<method>/<resourcePath>"
}
Once we get the token from the input, we can pass it directly to Civic. If this fails, we assume Civic rejected the token and return a 401 Unauthorized response. Without adding CORS headers to this API response, the browser will actually throw a cross-origin error instead of a 401. This is fixed by setting default 4XX response CORS in API Gateway, which we can do using our Serverless config. More on this later.
...

exports.customCivicAuthorizer = async event => {
    const { methodArn, authorizationToken } = event;

    console.info(`Received Civic jwt token from client: ${authorizationToken}`);
    console.info(`Decoded token: ${JSON.stringify(jwt.decode(authorizationToken, {complete: true}), null, 4)}`);

    let identityData = null;

    try {
        identityData = await civicClient.exchangeCode(authorizationToken);

    } catch(error) {
        console.error(`civicClient.exchangeCode threw on await: ${JSON.stringify(error)}`);
        throw new Error('Unauthorized');
    }

    console.info(`Received identity data from Civic: ${JSON.stringify(identityData, null, 4)}`);
};
A successful response will be different depending on the scope request. The ANONYMOUS_LOGIN will return the user ID as the only form of identity inside identityData.
{
  "data": [
    {
      "label": "verifications.levels.CIVIC:IAL1",
      "value": "CIVIC:IAL1",
      "isValid": true,
      "isOwner": true
    }
  ],
  "userId": "c6d5795f8a059ez5ad29a33a60f8b402a172c3e0bbe50fd230ae8e0303609b42"
}
Use BASIC_SIGNUP or PROOF_OF_IDENTITY to get user information such as phone number, email, address, and other PII. Civic has a full KYC platform for sharing identity documents and other personal artifacts.
In our authorizer, all that is left is to check that isValid flag and return the userId. However it is not that easy inside a Lambda authorizer...
A Lambda authorizer function's output must include the principal identifier (principalId) and a policy document (policyDocument) containing a list of policy statements. The output can also include a context map containing key-value pairs. If the API uses a usage plan (the apiKeySource is set to AUTHORIZER), the Lambda authorizer function must return one of the usage plan's API keys as the usageIdentifierKey property value.
Our response should follow these specs:
{
  "principalId": "yyyyyyyy",
  "policyDocument": {
    "Version": "2012-10-17",
    "Statement": [
      {
        "Action": "execute-api:Invoke",
        "Effect": "Allow|Deny",
        "Resource": "arn:aws:execute-api:{regionId}:{accountId}:{appId}/{stage}/{httpVerb}/[{resource}/[child-resources]]"
      }
    ]
  },
  "context": {
    "stringKey": "value",
    "numberKey": "1",
    "booleanKey": "true"
  },
  "usageIdentifierKey": "{api-key}"
}
We won't need usageIdentifierKey because our API isn't using a usage plan with keys. context can be any non-object mapping and that is where we will return our anonymous user id. Now we can finish our authorizer handler with the following:
...

exports.customCivicAuthorizer = async event => {
    ...

    if (
        identityData &&
        identityData.data &&
        identityData.data.length &&
        identityData.data[0].isValid
    ) {

        return {
            principalId: identityData.userId,  // whatever our app uses, helps track usage
            policyDocument: {
                Version: '2012-10-17',
                Statement: [
                    {
                        Action: 'execute-api:Invoke',
                        Effect: 'Allow',
                        Resource: methodArn,  // parsed from the input event
                    }
                ],
            },
            context: {
                "anonymousUserId": identityData.userId  // duplicates principalId to be more explicit
            },
        };

    } else {
        throw new Error('Unauthorized');
    }
};
We duplicate values for principalId and context.anonymousUserId so we actually could get away with an empty context. However, this makes it a little more explicit what data we are passing between Lambdas.
Write our main Lambda function
Now we can take care of the core functionality of our backend. The goal is to take a unique user ID and turn it into a unique color id. It would also be nice if this function was one-way so that once a user know's their user id, they still need our service to calculate their color id. This is easily done by hashing the user ID with a server side secret and then casting to a 24 bit integer (3 bytes for RGB).
The setup is the same as the authorizer, except we won't need any Civic code.
'use strict';

const crypto = require('crypto');

exports.colorIdentification = async event => {};
crypto is built into Node so we do not need to install it. Its hashing library will help us with the one-way requirement.
The event input is different than for the authorizer, and will be specific to AWS Lambda proxy integration. All we need is the context that was add by our authorizer which we will find in event.requestContext.authorizer.
...

exports.colorIdentification = async event => {
    const { requestContext: { authorizer: { anonymousUserId } } } = event;

    try {
        // hash the user's unique ID and our secret together to generate the user's unique color hash
        // ps Node's crypto doesn't store intermediate state so we can't "cache" the secret part :(
        const colorIdDigest = crypto
            .createHash('sha256')
            .update(process.env.CIVIC_PRIVATE_SIGNING_KEY, 'ascii')
            .update(anonymousUserId, 'ascii')
            .digest('hex');

        // take last 24 bits of entropy and cast to integer as color identification
        const colorId = parseInt(colorIdDigest.slice(-6), 16);

        console.info(`Success! Turned userId: ${anonymousUserId} into colorId: ${colorId}`);

        return {
            statusCode: 200,
            headers: {
                'Access-Control-Allow-Credentials': 'true',
                'Access-Control-Allow-Origin': 'https://color.tylerjohnhaden.com',
            },
            body: JSON.stringify({
                yourUserIdentity: anonymousUserId,
                yourColorIdentity: colorId,
            }),
        };

    } catch (error) {
        throw new Error(`Unable to hash userId: ${anonymousUserId} into colorId because: ${JSON.stringify(error)}`);
    }
};
Notice the headers returned if successful. These only need to be added if using proxy integration vs standard Lambda. Set the origin to the URI where the static site is served.
We are using the same signing key from the Civic integration to hash into the color id. This could be any server side secret, but it is already available to us. Now we need to add it to the function environment, along with a few other configuration details.
...

functions:
  color-identification:
    handler: functions/color.colorIdentification
    events:
      - http:
          path: 'identification'
          method: get
          authorizer: custom-civic-authorizer
    environment:
      CIVIC_PRIVATE_SIGNING_KEY: ${ssm:/tylerjohnhaden/civic-color/PRIVATE_SIGNING_KEY~true}
  ...
events will be exposed by the API Gateway. custom-civic-authorizer is the name of the other function specified in this file. This can also refer to a Lambda not specified here, you will just have to use the ARN of the Lambda.
Configuring CORS for our back end
So far there have been two places that CORS came up. When we set the API endpoint on the frontend we used a sub-domain, although we did not need to add anything special to the headers except Authorization. Later, when building the Lambda proxy response, we included Access-Control-Allow-Credentials and Access-Control-Allow-Origin as headers. However these headers will only be returned if everything is otherwise successful.
If our Lambda proxy integration fails at some point, then API Gateway will send back it's own response, i.e. 401 or 500. These have defaults, but will not include CORS enabling headers. The result is, if we are unauthorized or there is a server error, the browser will display a CORS error instead of the proper descriptive response. Serverless lets us change the default responses just like we could do in the API Gateway console.
service: my-serverless-civic-app

...

resources:
  Resources:
    GatewayResponseDefault4XX:
      Type: 'AWS::ApiGateway::GatewayResponse'
      Properties:
        ResponseParameters:
          gatewayresponse.header.Access-Control-Allow-Origin: "'https://color.tylerjohnhaden.com'"
          gatewayresponse.header.Access-Control-Allow-Headers: "'*'"
        ResponseType: DEFAULT_4XX
        RestApiId:
          Ref: 'ApiGatewayRestApi'
    GatewayResponseDefault5XX:
      Type: 'AWS::ApiGateway::GatewayResponse'
      Properties:
        ResponseParameters:
          gatewayresponse.header.Access-Control-Allow-Origin: "'https://color.tylerjohnhaden.com'"
          gatewayresponse.header.Access-Control-Allow-Headers: "'*'"
        ResponseType: DEFAULT_5XX
        RestApiId:
          Ref: 'ApiGatewayRestApi'

...
The last place we need to add special CORS configuration is in the GET event.
...

functions:
  color-identification:
    handler: functions/color.colorIdentification
    events:
      - http:
          ...
          cors:
            origin: 'https://color.tylerjohnhaden.com'
            allowCredentials: true
            headers:
            - Content-Type
            - X-Amz-Date
            - Authorization
            - X-Api-Key
            - X-Amz-Security-Token
    ...
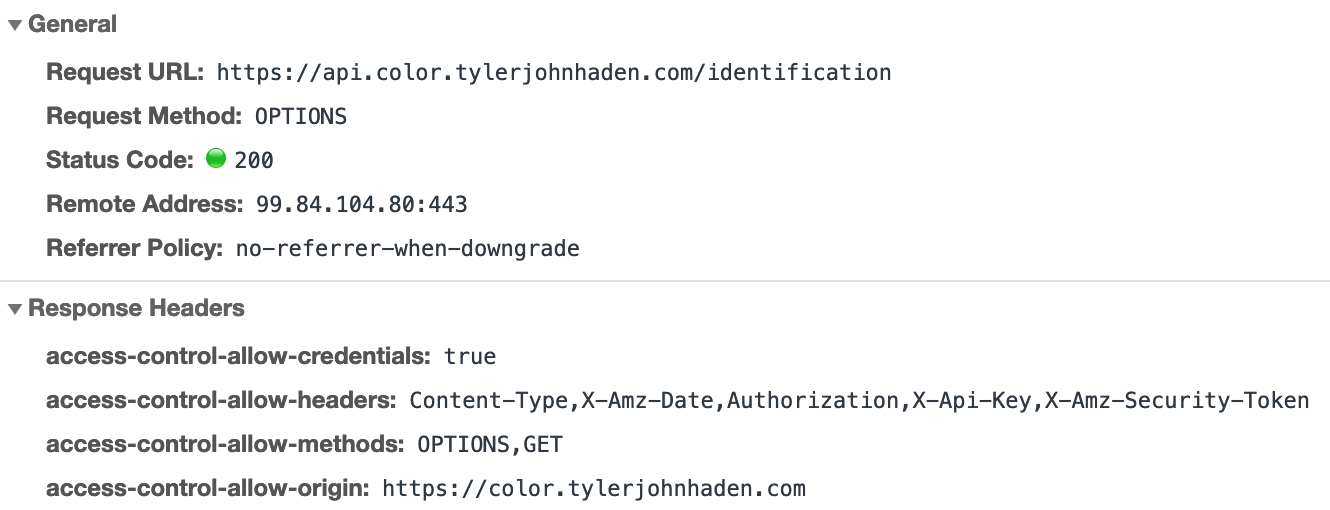
This will allow the incoming request to be cross-domain with the authorization token in the header. The headers are the default for AWS proxy integration, and may not all be necessary for our usage. Our API will now include an OPTIONS along with the GET when created in API Gateway.
To debug problems with CORS, it helps to watch the network requests in the browser. The OPTIONS pre-flight check should be successful and allow the next method to be sent. Here is a Serverless specific CORS guide.
Specify a custom domain and certificate
Last thing to add to our serverless.yml configuration is the API's custom domain. API Gateway allows us to specify a custom domain (technically CloudFront) that will allow us to attach an SSL certificate too. Yay security!
...

plugins:
  - serverless-domain-manager

custom:
  customDomain:
    domainName: api.color.tylerjohnhaden.com
    certificateName: 'color.tylerjohnhaden.com'
    basePath: ''
    stage: ${self:provider.stage}
    createRoute53Record: true
    endpointType: edge
    enabled: true

...
We already installed serverless-domain-manager in package.json. This plugin will add the record to Route53, link the certificate, and add this domain to our API, simple as that.
Deploy to the cloud
Finally, we have our project built. Two commands left to run.
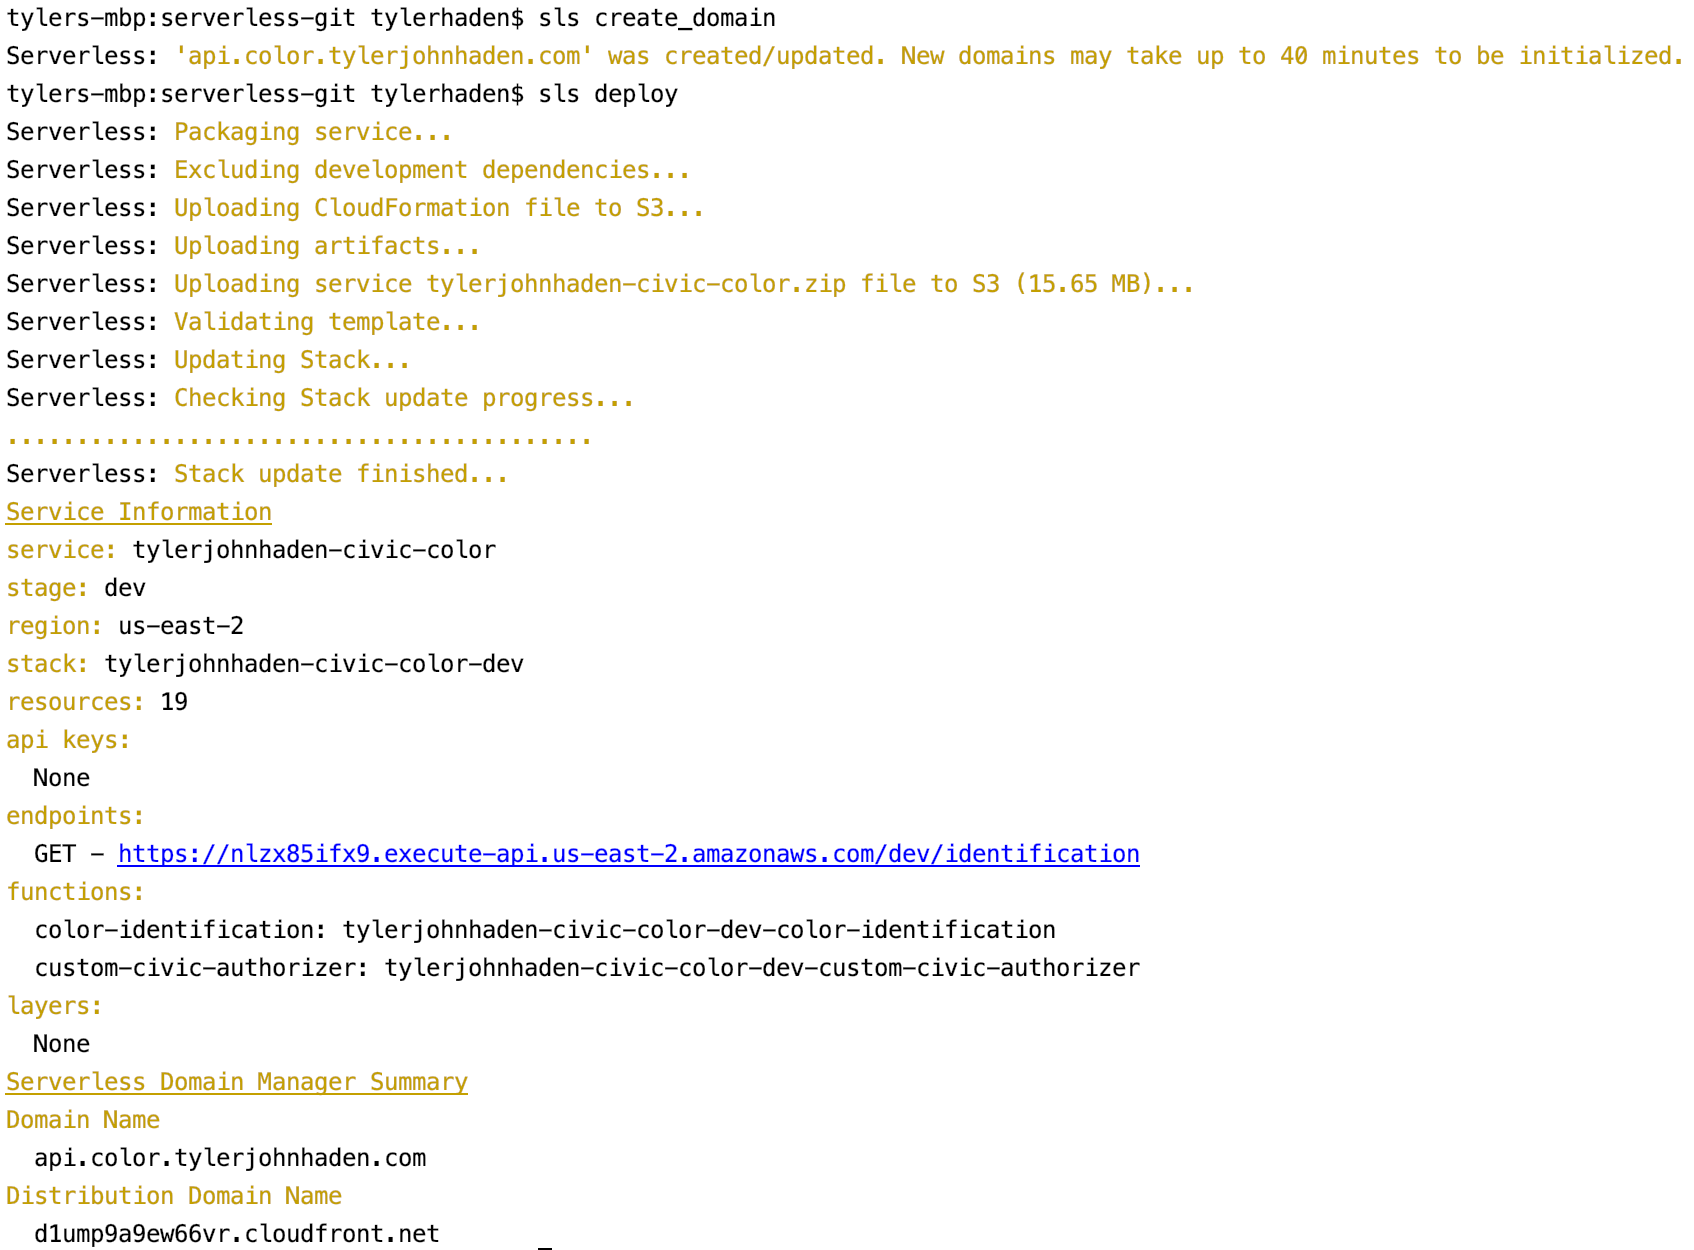
sls create_domain needs to be run first to add the custom domain to API Gateway. It will take about 40 minutes to fully spin up, but we can immediately deploy the rest of API.
sls deploy is the magic command. This will create the CloudFormation template, a new bucket to store or Lambda code, our Lambda functions, and the API Gateway to connect them.
You can use the AWS console to explore the resources generated using the CloudFormation template. The CloudFormation, S3 bucket, Lambdas, CloudWatch logs, and API Gateway should all be available. You can individually test the Lambdas by crafting the test event payloads for quick debugging feedback.
Since we already have our static site available, all we need to do is wait till the CloudFront inside the API spins up with the custom domain.
Success!
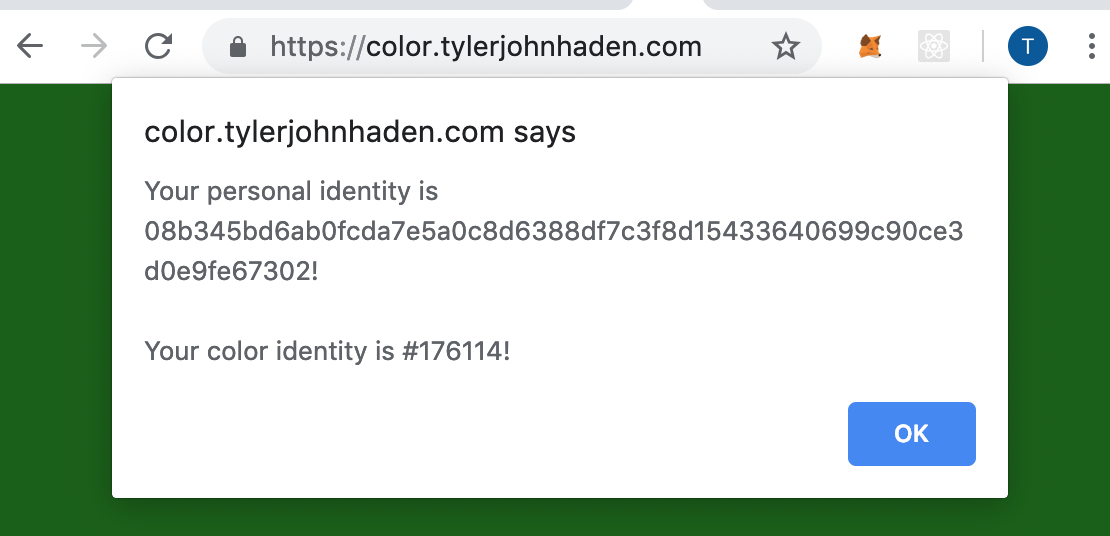
Looks like my personal identity maps to some greenish color.
P.S. To tear down the Serverless stack, you can use the sls remove Serverless command.
Review
We have completed the whole picture. A serverless static website that can anonymously identity users using Civic. The flexibility and extensibility built into this architecture makes it easy to build up the core functionality. The authorizer can be seamlessly integrated into many AWS services through the API Gateway, and the client side code can be easily injected to any existing website!
To get the source code used for this article, checkout my Github repo. It's open source, so feel free to fork, submit issues, or contribute.
Here is the link back the the first part, https://blog.ippon.tech/integrating-civic-into-a-static-serverless-website-part-1-of-2/


Comments