
Linux Server Security: Essential Hardening


Introduction
Who is this guide for?
- Linux Administrators: If you manage production servers where uptime and security are critical.
- Homelab Enthusiasts: If you run a personal server or lab environment for learning and experimentation.
- General Users: If you are new to Linux server management and want to build a strong security foundation.
Throughout this guide, we’ll highlight recommendations best suited for specific situations and use cases to help you make informed decisions.
Securing a Linux server might sound daunting, but it's crucial for protecting your digital assets. This guide will walk you through the essential security measures in simple and understandable terms.
Why Server Hardening Matters
Think of server hardening like securing your house - you want strong locks (user authentication), an alarm system (intrusion detection), and automatic lights (updates) to keep intruders away. These measures protect your server from unauthorized access and cyber attacks.
| Platform Note: The referenced commands are intended for Debian-based systems, which utilize apt-get for package management. For Fedora, CentOS, and other Red Hat-derived distributions, please use yum or dnf as the package management tool instead. This distinction ensures compatibility with the respective system architectures. |
Creating a Secure User Account
We'll start by creating a secure user account that will be used through this process and will serve as our administrator user.
Why not use root
Using the root account is like giving everyone a master key to your house and it’s dangerous as it gives users full permissions to change anything on your system.
Creating a limited user
|
# Create User # Add user to the sudo group # Verify the user got added to sudo group # To switch to demoUser |
This creates a user named 'demoUser' with limited permissions meaning they can only manage their own files and cannot perform system-wide administrative tasks without explicitly using sudo, similar to having a regular house key but keeping the master key locked away safely.
Automating System Updates
Keeping your server's software up-to-date is a critical line of defense in maintaining its security and stability. But what exactly are automatic updates, and why are they so important?
What are Automatic Updates
Automatic updates are a system feature that autonomously manages the process of checking for, downloading, and installing software updates without requiring manual intervention. Typically, a dedicated system service executes these tasks with administrative privileges, allowing it to modify necessary system files and software. This service operates on a regular schedule, often daily and potentially at specific off-peak times to minimize disruption. During its operation, the system refreshes its software package lists and applies available updates, prioritizing security patches by default but also configurable for broader package upgrades.
Why Automatic Updates Matter
Think of updates like security patches for your home's locks and windows. Without frequent updates, your system becomes vulnerable to known security threats(are publicly documented software vulnerabilities, identified through vendor testing, research, or active exploits, and known to software developers, security experts, the public, and malicious attackers via a central database). Regular system updates are crucial for maintaining server security, but manually updating can be time-consuming and prone to human error. Let's set up automatic updates to ensure your server stays protected against known vulnerabilities.
Setting Up Unattended Upgrades
On the next steps we’ll install the unattended-upgrades package and enable it :
|
# Install the package |
Understanding Key Configuration Files
Configuring 20auto-upgrades: The Foundation of Your Automated Updates
The 20auto-upgrades file, located in /etc/apt/apt.conf.d/, is where you establish the fundamental behavior of your system's automated update mechanism. These settings are the starting point, controlling whether and how often your system checks for new updates and if it should automatically install them.
Why These Core Settings Are Essential
Before diving into the specific configurations, let's understand the importance of each directive:
Regularly Refreshing Package Information (APT::Periodic::Update-Package-Lists): This ensures your system regularly checks for new software versions and security patches from repositories. It keeps the local package list current, so the system accurately knows what updates are available.
Activating Unattended Upgrades (APT::Periodic::Unattended-Upgrade): This instructs the system to automatically download and install available updates without manual intervention. It ensures crucial updates, especially for security, are applied promptly to protect your server.
Enabling Basic Automatic Update Behavior
To enable the daily update of package lists and the subsequent automatic installation of upgrades, you'll edit the /etc/apt/apt.conf.d/20auto-upgrades file to include the following lines:
| APT::Periodic::Update-Package-Lists "1"; APT::Periodic::Unattended-Upgrade "1"; |
Setting these values to "1" typically configures the tasks to run daily. This ensures your system regularly checks for and applies important updates, forming the backbone of your automated update strategy.
Optimizing 50unattended-upgrades for a Cleaner and More Effective System
Beyond just enabling automatic updates, fine-tuning the 50unattended-upgrades configuration file allows for a more optimized and well-maintained system. Understanding why these settings are beneficial will help you tailor them to your needs.
Why These Settings Matter
- To prevent disk space wastage from old kernels, maintain system cleanliness, and reduce boot menu clutter: You'll want to enable Remove-Unused-Kernel-Packages.
- To remove packages that were installed as dependencies but are no longer needed after other software changes: The Remove-New-Unused-Dependencies setting handles this.
- To keep your system generally lean by removing other obsolete packages that are no longer required: The Remove-Unused-Dependencies setting is key.
- To ensure critical kernel updates properly take effect: Enabling an Automatic-Reboot is often necessary.
- To allow these automatic reboots even if there are active users (use with caution): This can be configured with Automatic-Reboot-WithUsers.
- To schedule these necessary reboots for a time that minimizes disruption: You can specify an Automatic-Reboot-Time, for instance, 3 AM.
| Important Considerations for Automatic Reboots: Automatic reboots are convenient for homelabs or non-critical workloads, where occasional downtime is acceptable. For production environments, especially critical applications that demand a highly available infrastructure, it’s best to manage updates and reboots manually to avoid unexpected disruptions. |
Configuring These Optimizations:
Now that you understand the benefits, you can enable these crucial settings in the /etc/apt/apt.conf.d/50unattended-upgrades file:
| Unattended-Upgrade::Remove-Unused-Kernel-Packages "true"; Unattended-Upgrade::Remove-New-Unused-Dependencies "true"; Unattended-Upgrade::Remove-Unused-Dependencies "true"; Unattended-Upgrade::Automatic-Reboot "true"; Unattended-Upgrade::Automatic-Reboot-WithUsers "true"; #Optional; Unattended-Upgrade::Automatic-Reboot-Time "03:00"; |
Best Practices for Maintaining Reliable Automated Updates
- Monitor the update logs regularly at /var/log/unattended-upgrades.
- Keep your package sources clean and reliable.
- Test automatic updates on non-production systems first.
- Set up monitoring to alert you of failed updates.
- Automated updates provide a crucial security baseline while reducing administrative overhead. The careful timing of updates and reboots ensures your server stays secure with minimal service interruption.
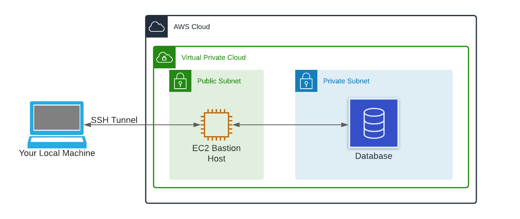
Securing SSH Access: Implementing Key-Based Authentication
SSH (Secure Shell) is your server's front door. While password authentication is common, key-based authentication provides significantly stronger security. Let's set up this enhanced security measure step by step.
Understanding SSH Keys
SSH keys come in pairs: a public key (shared with servers) and a private key (kept secret on your computer). Think of the public key as a lock and the private key as your unique key - only they work together.
Generating SSH Keys
First, create a new ED25519 key pair, which offers superior security compared to traditional RSA keys:
| ssh-keygen -t ed25519 |
When prompted:
- Press Enter to accept the default location (~/.ssh/id_ed25519)
- Enter a strong passphrase for additional security. This should be a long, unique, and memorable password that encrypts your private key file, making it unusable by others if the file itself is ever compromised.
- Your keys will be generated in the .ssh directory.
Deploying Your Key
Copy your public key to the server :
| ssh-copy-id -i ~/.ssh/id_ed25519.pub username@server-ip |
Enhancing SSH Security
Open a new terminal window on your local machine while keeping your current SSH session active. This ensures you don't lock yourself out while making changes.
Edit the SSH daemon configuration:
| sudo nano /etc/ssh/sshd_config |
Modify the following critical security settings:
|
PermitRootLogin no |
This will disable the password login and root access, which will :
- Remove the traditional lock that thieves know how to pick.
- Install a modern security system that only responds to authorized key cards.
Applying Changes
Restart the SSH service to implement the new settings :
| sudo systemctl restart sshd |
Testing the New Configuration
In your original terminal, log out :
| exit |
Then try logging back in with your key :
| ssh username@server-ip |
If everything is configured correctly, you'll log in using your SSH key. If you entered a passphrase during key generation, you'll need to enter it now.
Security Tips
- Store your private key securely.
- Use a strong passphrase for your key.
- Keep backups of your keys in a secure location.
- Never share your private key.
- Consider using ssh-agent to manage your keys conveniently.
- With these measures in place, your server is now protected by one of the strongest authentication methods available.
Protection Against Intruders
What is Fail2Ban
Fail2Ban is an intrusion prevention software framework that protects computer servers from brute-force attacks and other malicious login attempts.
Understanding Fail2Ban
Fail2Ban acts like a security guard for your server. It watches for suspicious activity (like someone trying different keys in your lock) and temporarily blocks access from those IP addresses.
Installation and Initial Setup
First, install Fail2Ban using the package manager :
| sudo apt install fail2ban |
After installation, verify that the service is running :
| sudo systemctl status fail2ban |
If you see that it's not active, start the service :
| sudo systemctl start fail2ban |
Configuration Setup
Fail2Ban uses configuration files to determine its behavior. While the default configuration file is /etc/fail2ban/jail.conf, it's best practice to create a separate jail.local file :
| cd /etc/fail2ban sudo cp jail.conf jail.local |
This approach ensures your custom settings remain intact even after system updates.
Essential Configuration Settings
Open the configuration file for editing:
| sudo nano jail.local |
Key Settings to Modify:
bantime: Set to 60 minutes (60m) - determines how long an IP address remains banned
ignoreip: Add your trusted IP addresses here to prevent accidental lockouts
| bantime = 60m ignoreip = 127.0.0.1/8 ::1 your-public-ip-address |
Understanding the Configuration
Ban Time
The 60-minute ban duration provides a good balance between security and practicality. This means any IP address that triggers Fail2Ban's rules will be blocked from accessing your server for one hour.
IP Whitelist
The ignoreip setting creates a whitelist that includes:
Local loopback address (127.0.0.1/8)
IPv6 loopback (::1)
Your public IP address
Adding your public IP address of the machine that you use to ssh into your linux server is crucial to prevent accidentally locking yourself out of your own server.
After making these changes, restart and enable Fail2Ban to apply the new configuration:
| sudo systemctl restart fail2ban sudo systemctl enable fail2ban |
When configured correctly, Fail2Ban could :
- Monitor login attempts.
- Block IP addresses that show suspicious behavior.
- Maintain a whitelist for trusted IP addresses.
- Keeps logs of blocked attempts.
- Regularly monitor system logs for unusual activity.
- Keep your SSH keys secure and password-protected.
- Maintain a list of authorized users and regularly review access.
Final Thoughts
Server security is an ongoing process, not a one-time setup. These measures provide a strong foundation, but staying informed about new security threats and regularly updating your security measures is essential, how you implement them will depend on your environment. For non-critical systems like homelabs, automation is safe and convenient. For production servers, extra caution and manual control are recommended to ensure continuous availability and security.
| Remember: The goal is to make your server secure enough that potential attackers will move on to easier targets, while keeping it usable for legitimate users. |

Comments