

On development teams, there are a lot of basic concepts we talk about like setting up a development environment, and I've often wanted to run through some of that stuff on my own just to do it. For a variety of reasons, I kept putting it off (I'm not a developer! What if I don't know how to do it? I majored in English! Questions would be embarrassing!) but this week I finally did it and I thought I'd document the experience in case there's anyone else out there who's also not a developer, but working on dev teams every day, and might be curious about doing this too.
For anyone like that, I would just say... go for it! This series of blog posts is going to lay out all the information you'll need, particularly if you're installing this on a Mac. If you're installing onto a PC, most of the time it's simple enough to just select the appropriate operating system but if you have more detailed questions just reach out to me and I'd be glad to help.
I knew I would need a place to do the development work on my laptop and I was pretty sure I didn't have any appropriate tools downloaded. Jake Henningsgard advised me to download IntelliJ first and then follow the steps outlined in Richard Yhip's post on Introduction to Continuous Integration with JHipster, where he does a thorough job of covering what's needed to install everything.

This is Jake. He's actually very professional.
For the purposes of this blog post, I first interviewed Jake to ensure I had a good plan to follow, and then followed the steps as closely as possible. I'll take you along with me as I attempt -- hopefully with success -- to perform these steps and set up my very own development environment for web applications and install JHipster, for the first time. As I install each tool, I'll also include a brief, English-major friendly explanation of what each of these things does and why they're important to have - the idea being, if I found this useful, maybe somebody else will, too.
Heh, "idea" -- see what I did there? Inside joke about IDEA. Pretty funny.
OK, here goes...
Please note: I am downloading and installing all of these onto a Mac. However, if you want to do this on another operating system like Windows or Linux, you can simply select the appropriate OS when you are viewing the options at the download options.
First, the overview for what we're doing, because it helped me to appreciate what we're doing a bit more when I had a visual picture for the application environment and what all of these things are that I'm installing.
Here is a high-level overview of best practices for what needs to be installed in order to generate a web application (one lane for front end, another lane for back end):
Fig 1: Web Application Overview Before Installing JHipster
You'll notice that JHipster is not present in that diagram, and you'll also notice that, holy crap, there's a lot of stuff in there! That would be a lot of stuff to work with, manage, sync up, etc. But... you know, welcome to the modern world of development, right?
However, then we install JHipster (Step 8), and here's what happens:
Fig 2: Web Application Overview After Installing JHipster
Step 1 of 7: Install IntelliJ IDEA
IntelliJ IDEA is an IDE (integrated development environment), kind of like Eclipse. The reason you want it is because code has gotten really complicated over time, and an IDE provides smart assistance for things like code syntax, making sure all these tools you're using are hooking up correctly, etc. It's kind of like using a word processor instead of a manual typewriter for writing a novel. This allows you to spend your time focusing on writing the code (the novel) instead of having to focus on code syntax, making sure things are synced up, worrying about little tiny mistakes that could destroy your whole project. The IDE will be running in the background checking for that stuff, and you can set up custom checks to watch out for special things as you need them. In our case, this will be running on Java but it could be running for something else if we were using a different language.
This went very smoothly. I did a search for IntelliJ download for Mac, and ensured that the link I went to was from intelliJ or JetBrains (the company that provides IntelliJ). For my needs, the free Community edition was perfect so that was what I downloaded.
IntelliJ IDEA opened immediately after installation.
Now, I had a cool IntelliJ icon in my taskbar. Awesome!![]()
Step 2 of 7: Install Java 8
Java is the actual coding language that is being used. The reason that you have to download something for this is because you need to be able to run, and probably also compile, Java. The reason I chose to download Java JDK (rather than Java JRE) was so that I could get the package that included a compiler. The compiler essentially converts code from human-readable format to machine-readable format, and that's why for any coding language you're working in, you would most likely need to download a package that includes a compiler.
Why Java 8 and not Java 9? As discovered by longtime active JHipster contributor Matt Raible (@mraible), Java 9 and Spring Boot are currently incompatible. Until this is resolved, JHipster will need to be run with either Java 8 / Spring Boot combination or with Java 9 & some modifications to Spring Boot in order to resolve any potential issues. To simplify the environment setup for myself, and because Java 8 was great for my purposes, I went with a Java 8 / Spring Boot combination.
This installation also went very smoothly. I did a search for Java 8 download for Mac, ensured that I was directed to the Oracle website for the download, accepted the license agreement and selected the option for Mac OS before selecting to download. The download options were very simple and easy to install.
Unlike IntelliJ, Java 8 did not open immediately after installation.
I couldn't locate it anywhere and nothing seemed to happen. Apparently this is fairly normal because there are some high complexity development suites that have to be installed to keep everything running optimally.
To be certain I had installed it properly, I entered the following command in Terminal:java -version
If you're checking for something else, like git, you'd just put "git" instead of java.
I entered that command in (for java) and got the following result:
Know what that means?
Success!! Java is installed!
Which means we can "git" on with it. Heh, that was a git joke. You git it, right?
Step 3 of 7: Install Git
Git is used for distributed version control. Version control is important because things will inevitably go wrong, or need to be changed, and when that happens it's very helpful to be able to go back to previous versions and go back to an uncorrupted version or the version before the one that blew up in your face. If you've been working in tech, you've probably been working in some flavor of version control already, like a content management system (CMS) or a something that has versions of its own, even if it's not Git.
Also very straightforward in terms of installation! I simply went to the git website and clicked the download button for Mac. In my case, the download did not start automatically so I directed myself to sourceforge to start the download manually, which worked great.
The file downloaded just fine, but then I was not able to complete the installation immediately - I got the following message: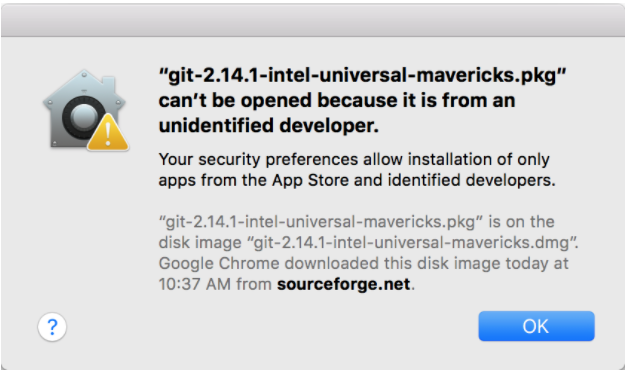
However - this was not a problem. Since I knew that this was a trusted source for the file, I just opened up security preferences by going to Apple Menu --> System Preferences, selected "Security & Privacy" and on the General tab, I clicked the button for "Open Anyway":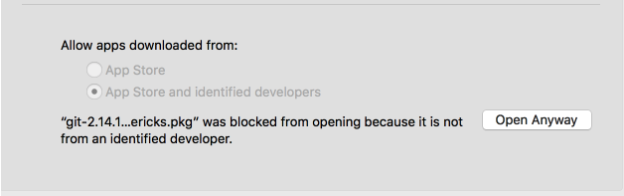
And ta-da! It opened just fine. No sweat.
On to the next step!
Step 4 of 7: Install Node.js
Node.js is a javascript runtime, which is a way to execute javascript on the server. It took me a while to understand why this one is important, but essentially it makes it possible to use javascript outside of a web browser. For javascript (which used to run only in web browsers) this is huge.
I went to install Node.js. As described in the JHipster instructions, I selected the LTS version - this was easy to do, as it was clearly labeled.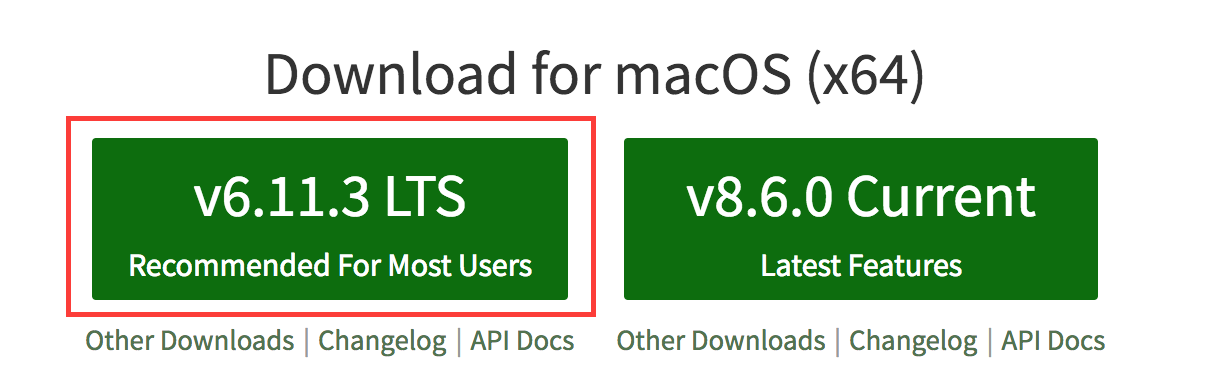
This went very smoothly but again required that I confirm the download. To be certain I had installed it properly, I opened up Terminal on my Mac and entered the following command:node --version
In response, I got the following:
This was great, as it confirmed that I did in fact have that version of node.js installed.
(Had I not had node.js installed, I would instead have received a message of command not found.)
Step 5 of 7: Install Yarn
Yarn is a package manager for code, similar to products like Docker. Package managers are important because they handle code packages (like that JDK we just installed), ensuring that updates, restarts, etc. are being performed appropriately. This might not be AS big a deal if you're only running one or two packages but at an enterprise level where hundreds of packages might be installed, this becomes way more important and you might even have different package managers that are specializing in different things like front-end, etc.
For the Yarn installation, there are a lot of ways to approach this but here's what I did, step by step.
- I went to the Yarn install page.
- I installed homebrew (an open source package manager that simplifies software installations for Mac OS) by pasting in the Terminal command that is on the first step of the instructions (this step took a few minutes).
- At the Terminal command line, I ran the
brewcommand for installing Yarn without Node (since I already installed Node.js). This only took 2 seconds to complete, thanks to the Homebrew install.
This was surprisingly easy to do, and very satisfying to complete. On to the next step!
Step 6 of 7: Install Yeoman
Yeoman is a web application scaffolding tool. The reason for having it is because when starting a new application, it will quickly build out a skeleton based on best practices, to get things started quickly. You can add additional generators to add other pieces to the skeleton as you desire, depending on the special needs of applications you tend to build regularly. Or, if you don't tend to build applications from scratch, this may not be something you really tend to use much.
At this point, I was following the JHipster instructions pretty closely and the instructions for the this step were noted in yarn:
- Install Yeoman:
yarn global add yo
So, I typed in the yarn command in Terminal.
Success!
Step 7 of 7: Install JHipster
OK, I've basically been installing all of these other things just so I could install JHipster. If you've followed along this far and read all the other explanations I think you're with me as far as the idea that we are in a world now that is super complex as far as what our development teams have to grapple with just to even do basic development tasks. JHipster offers a way to build a project using Yeoman, Gulp, and Maven using Java with Spring Boot and Angular and Bootstrap. By this point, I have a new appreciation for how convenient and efficient that really is.
Now that I have all the preliminary installations out of the way, it's time to install JHipster, which is what I'll be using to (in conjunction with all the other stuff I've installed) build an application.
I'm pretty excited to have this one go smoothly.
- Install JHipster:
yarn global add generator-jhipster
And... Success!
Summary
These steps I just walked you through are all it takes to set up your very own Mac OS development environment. That's it! This was so much easier to do than I realized it would be, and I really wish I hadn't put it off for as long as I have.
If there are any non-developers out there who have considered doing this but didn't want to ask questions, or just keep putting it off, please consider giving it a try. Follow these instructions and reach out if you have any questions while you're getting started - I'd love to hear from you.


Comments