


This post is a continuation in a discussion on developing APIs which prescribe to the Open API 3.0 specification using Swagger tools. In this post, we will continue our dicussion with adding security to your API and testing your security configurations using Swagger Hub.
Security Schemes
Recall from the first post in this discussion the section on schemas to describe our API models. These schemas lived under the components section of an OAS 3.0 compliant API. Security schemes are deployed in the same way. Using OAS 3.0 notation, we can define multiple security schemes underneath the component section of your API. Once you've defined your security schemes, you apply these schemes using the security tag, either at the root of your API, or against individual paths. The nesting quality of the security tag allows you to customize access to your API in a very deterministic and detailed way.
Additionally, some security schemes come with customizable "scopes" (think read or write, admin or guest) which we can apply to our API and endpoints in the same way. This provides for more granular security across our API. We'll explore exactly what I mean using the workout API from the previous posts; but first, let's discuss the different OAS 3.0 supported security paradigms and how we can "scope" them to API paths and apply roles to our security.
Basic Authentication
Basic Authentication is the most primitive authentication scheme available to you. If you're familiar with the HTTP protocol, you'll know this scheme is built straight into HTTP using the "Authorization" header. The username and password are concatenated with a ":" and are converted into their base-64 encoding. The resulting mish-mosh of characters, along with the "Basic" specifier, is your authorization token. There's not much else to discuss here, especially as it applies to OAS 3.0.
Defining Basic Authentication in your security schemes takes the form
components:
    securitySchemes:
        basicAuth:     # <-- arbitrary name for the security scheme
          type: http
          scheme: basic
If you were to employ Basic Authentication against an endpoint, it would take the form
paths:
  /something:
    get:
      security:
        - basicAuth:[]
Please notice two important things here. First, the security tag mentions basicAuth as a scheme. This is not a keyword, nor does OAS 3.0 recognize this string as being Basic Authentication. The only reason the string basicAuth is associated with Basic Authentication is because of how it is defined above in the security schemes section. Within the basicAuth tag we define scheme: basic as the scheme. The scheme key is how you truly specify which authentication scheme you are employing; the name of the scheme is irrelevant, and it serves only to identify that scheme for future use in your API.
The second important detail to notice in this example is the square brackets after the basicAuth under the security tag. This is semantically required by OAS 3.0 to support the "scoping" of authentication schemes. Because Basic Authentication is so simple, we do not have to worry about scopes when using it. That is why the square brackets are empty. We will see scopes being used in more detail later in this post, but for now it is important to recognize where they are used and why this notation exist.
Bearer Authentication
Bearer Authentication is a token-based HTTP scheme which similarly employs the Authorization HTTP header. This scheme works similarly to the Basic Authentication scheme, except instead of "Basic base64 encoded username:password" being passed to the Authorization header, the string "Bearer token" is passed to the Authorization header. This token is usually disseminated to users in an e-mail after they have confirmed their intent to use your API, or after they have paid for a service plan. You can specify the use of Bearer Authentication in your API using the OAS 3.0 notation below.
components:
  securitySchemes:
    bearerAuth:            # arbitrary name for the security scheme
      type: http
      scheme: bearer
      bearerFormat: JWT    # optional, arbitrary value for documentation purposes
paths:
  /something:
    get:
      security:
        - bearerAuth: []
Notice again the scheme name serves only as an identifier for the scheme later on when applied to an endpoint. Additionally, this scheme has no scope, and so therefore has empty square brackets when it is employed as a security scheme against an endpoint.
API Keys
Think of API Key authentication schemes as a more extensible Bearer Authentication scheme. Where Bearer Authentication is passed via the request header only, API Keys can be passed in the request body, the request header, or as a cookie.
# 1) Define the key name and location
components:
  securitySchemes:
    ApiKeyAuth:        # arbitrary name for the security scheme
      type: apiKey
      in: header       # can be "header", "query" or "cookie"
      name: X-API-KEY  # name of the header, query parameter or cookie
# 2) Apply the API key globally to all operations
security:
  - ApiKeyAuth: []     # use the same name as under securitySchemes
As was the case with Basic and Bearer Authentication, API Keys do not have API based scopes, hence the square brackets. This makes sense because API Keys are traditionally provisioned from the APIs backend. The backend logic which provisions these API keys will keep track of permissions associated with the keys. Therefore, keeping track of key permissions via scopes at the API layer is not only redundant, but could be completely wrong. There's no way your API can reflect in its specification the permissions associated with a backend generated key. If we consider an API Key a glorified username and password or a bearer token, this logic applies transitively to Basic and Bearer Authentication schemes. In short, the empty brackets defining scope are reserved for our last scheme, OAuth2.
OAuth2 Connect
The below ASCII art taken from the OAuth 2.0 RFC succinctly summarizes the basic idea behind how OAuth 2.0 will authorize access to a resource.
+--------+                               +---------------+
|        |--(A)- Authorization Request ->|   Resource    |
|        |                               |     Owner     |
|        |<-(B)-- Authorization Grant ---|               |
|        |                               +---------------+
|        |
|        |                               +---------------+
|        |--(C)-- Authorization Grant -->| Authorization |
| Client |                               |     Server    |
|        |<-(D)----- Access Token -------|               |
|        |                               +---------------+
|        |
|        |                               +---------------+
|        |--(E)----- Access Token ------>|    Resource   |
|        |                               |     Server    |
|        |<-(F)--- Protected Resource ---|               |
+--------+                               +---------------+
OAuth 2.0 is widely regarded as the standard for authorization. It is a complex paradigm whose details are beyond the scope of this article. For more information, check out the OAuth 2.0 information page.
A quick summary of OAuth2 as it applies to OAS 3.0 requires the understanding of grant types, referred to as flows in Swagger notation. These flows define actions which a seperate authentication server will authorize against your API. This decouples authorization from your API. OAS 3.0 has supports several OAuth2.0 flows, each flow having its own purpose and sub-key API specifications. For a detailed look at how OAuth2.0 is specified using OAS 3.0, I strongly recommend checking the documentation. This article is about using Swagger tools to secure your API, not about the finer points of OAuth2.0.
It is worth mentioning that OAuth2 schemes utilize scopes with Swagger development. When defining your OAuth2 scheme in your API, you simultaneously define scopes
components:
  securitySchemes:
    oAuthSample:
      type: oauth2
      flows:
        implicit:
          authorizationUrl: https://api.example.com/oauth2/authorize
          scopes:
            read_pets: read pets in your account
            write_pets: modify pets in your account
paths:
  /pets/{petId}:
    patch:
      summary: Updates a pet in the store
      security:
        - oAuthSample: [write_pets]
From the above example, you can see we've defined two scopes which boil down to read and write access for users. We've applied the "write" scope to the /pets/{petId} endpoint, indicating the use of this endpoint is reserved for those users with "write_pets" authorizations. This is the power of scopes in Swagger API development; they let us lock down whole APIs or individual endpoints based on very customizable access settings.
Securing your Security
It is worth noting Basic, Bearer, and API Key Authentication are easily reversible or spoofable. By inspecting packets, you can easily hijack API Keys or Bearer Tokens. With Basic Authentication, you can even reverse engineer usernames and password. These schemes should always be employed over an encrypted channel like HTTPS. By using SSL/TLS encryption, your request headers, cookies, and query strings will be encrypted, thus keeping your authorization keys secure when using the API.
Deploying your Secure API
When you have finishing locking down your API endpoints using the described authorization methods, you can very easily generate stubbed server methods. For example, I added Basic Authentication to one of the methods in the API example from previous posts on this topic and exported the stubbed server in Spring. The YAML for that GET method was
paths:
  /exercises:
    summary: Returns a paginated list of exercises
    description: Returns a paginated list of exercises
    get:
      tags:
        - Exercise
      security:
      - BasicAuth: []
    summary: 'Sample GET operation on the /exercises endpoint.'
      description: 'This operation, defined by the noun "exercises" and the verb "GET" implies we will be making an HTTP GET request against the API, will receive multiple Exercise objects in the response.'
    operationId: 'getAllExercises'
    responses:
        '200':
            description: Successfully retrieved paginated list of all Exercise objects
            content:
                application/json:
                schema:
                    type: array
                    items:
                        $ref: '#/components/schemas/Exercise'
        '401':
            $ref: '#/components/responses/UnauthorizedError'
        '500':
            description: Server error prevented successful retrieval
The resulting stubbed method generated by Swagger for me was
@ApiOperation(value = "Sample GET operation on the /exercises endpoint.", nickname = "getAllExercises", notes = "This operation, defined by the noun \"exercises\" and the verb \"GET\" implies we will be making an HTTP GET request against the API, will receive multiple Exercise objects in the response.", response = Exercise.class, responseContainer = "List", authorizations = {
@Authorization(value = "BasicAuth")    }, tags={ "Exercise", })
@ApiResponses(value = {
    @ApiResponse(code = 200, message = "Successfully retrieved paginated list of all Exercise objects", response = Exercise.class, responseContainer = "List"),
    @ApiResponse(code = 401, message = "Authentication information is missing or invalid"),
    @ApiResponse(code = 500, message = "Server error prevented successful retrieval") })
@RequestMapping(value = "/exercises", produces = { "application/json" }, method = RequestMethod.GET)
ResponseEntity<List<Exercise>> getAllExercises();
Why is this useful? Well, as an architect designing an API to be written by an application developer, it may not be instantly clear which methods will be secured and how. But when authoring APIs using Swagger Hub and generating stubbed server code in this way, it is nearly impossible to introduce developer errors into your code base. Each stubbed method is fully annotated; the functionality is explicitly defined in a way that is easily recognized by architects and developers alike.
Furthermore, as an application developer looking to utilize this API endpoint, it is easy to see from the documentation page how to utilize this method. By clicking on the "lock" icon next to the method I am trying to use, I can quickly see how I need to write my application to utilize this API endpoint.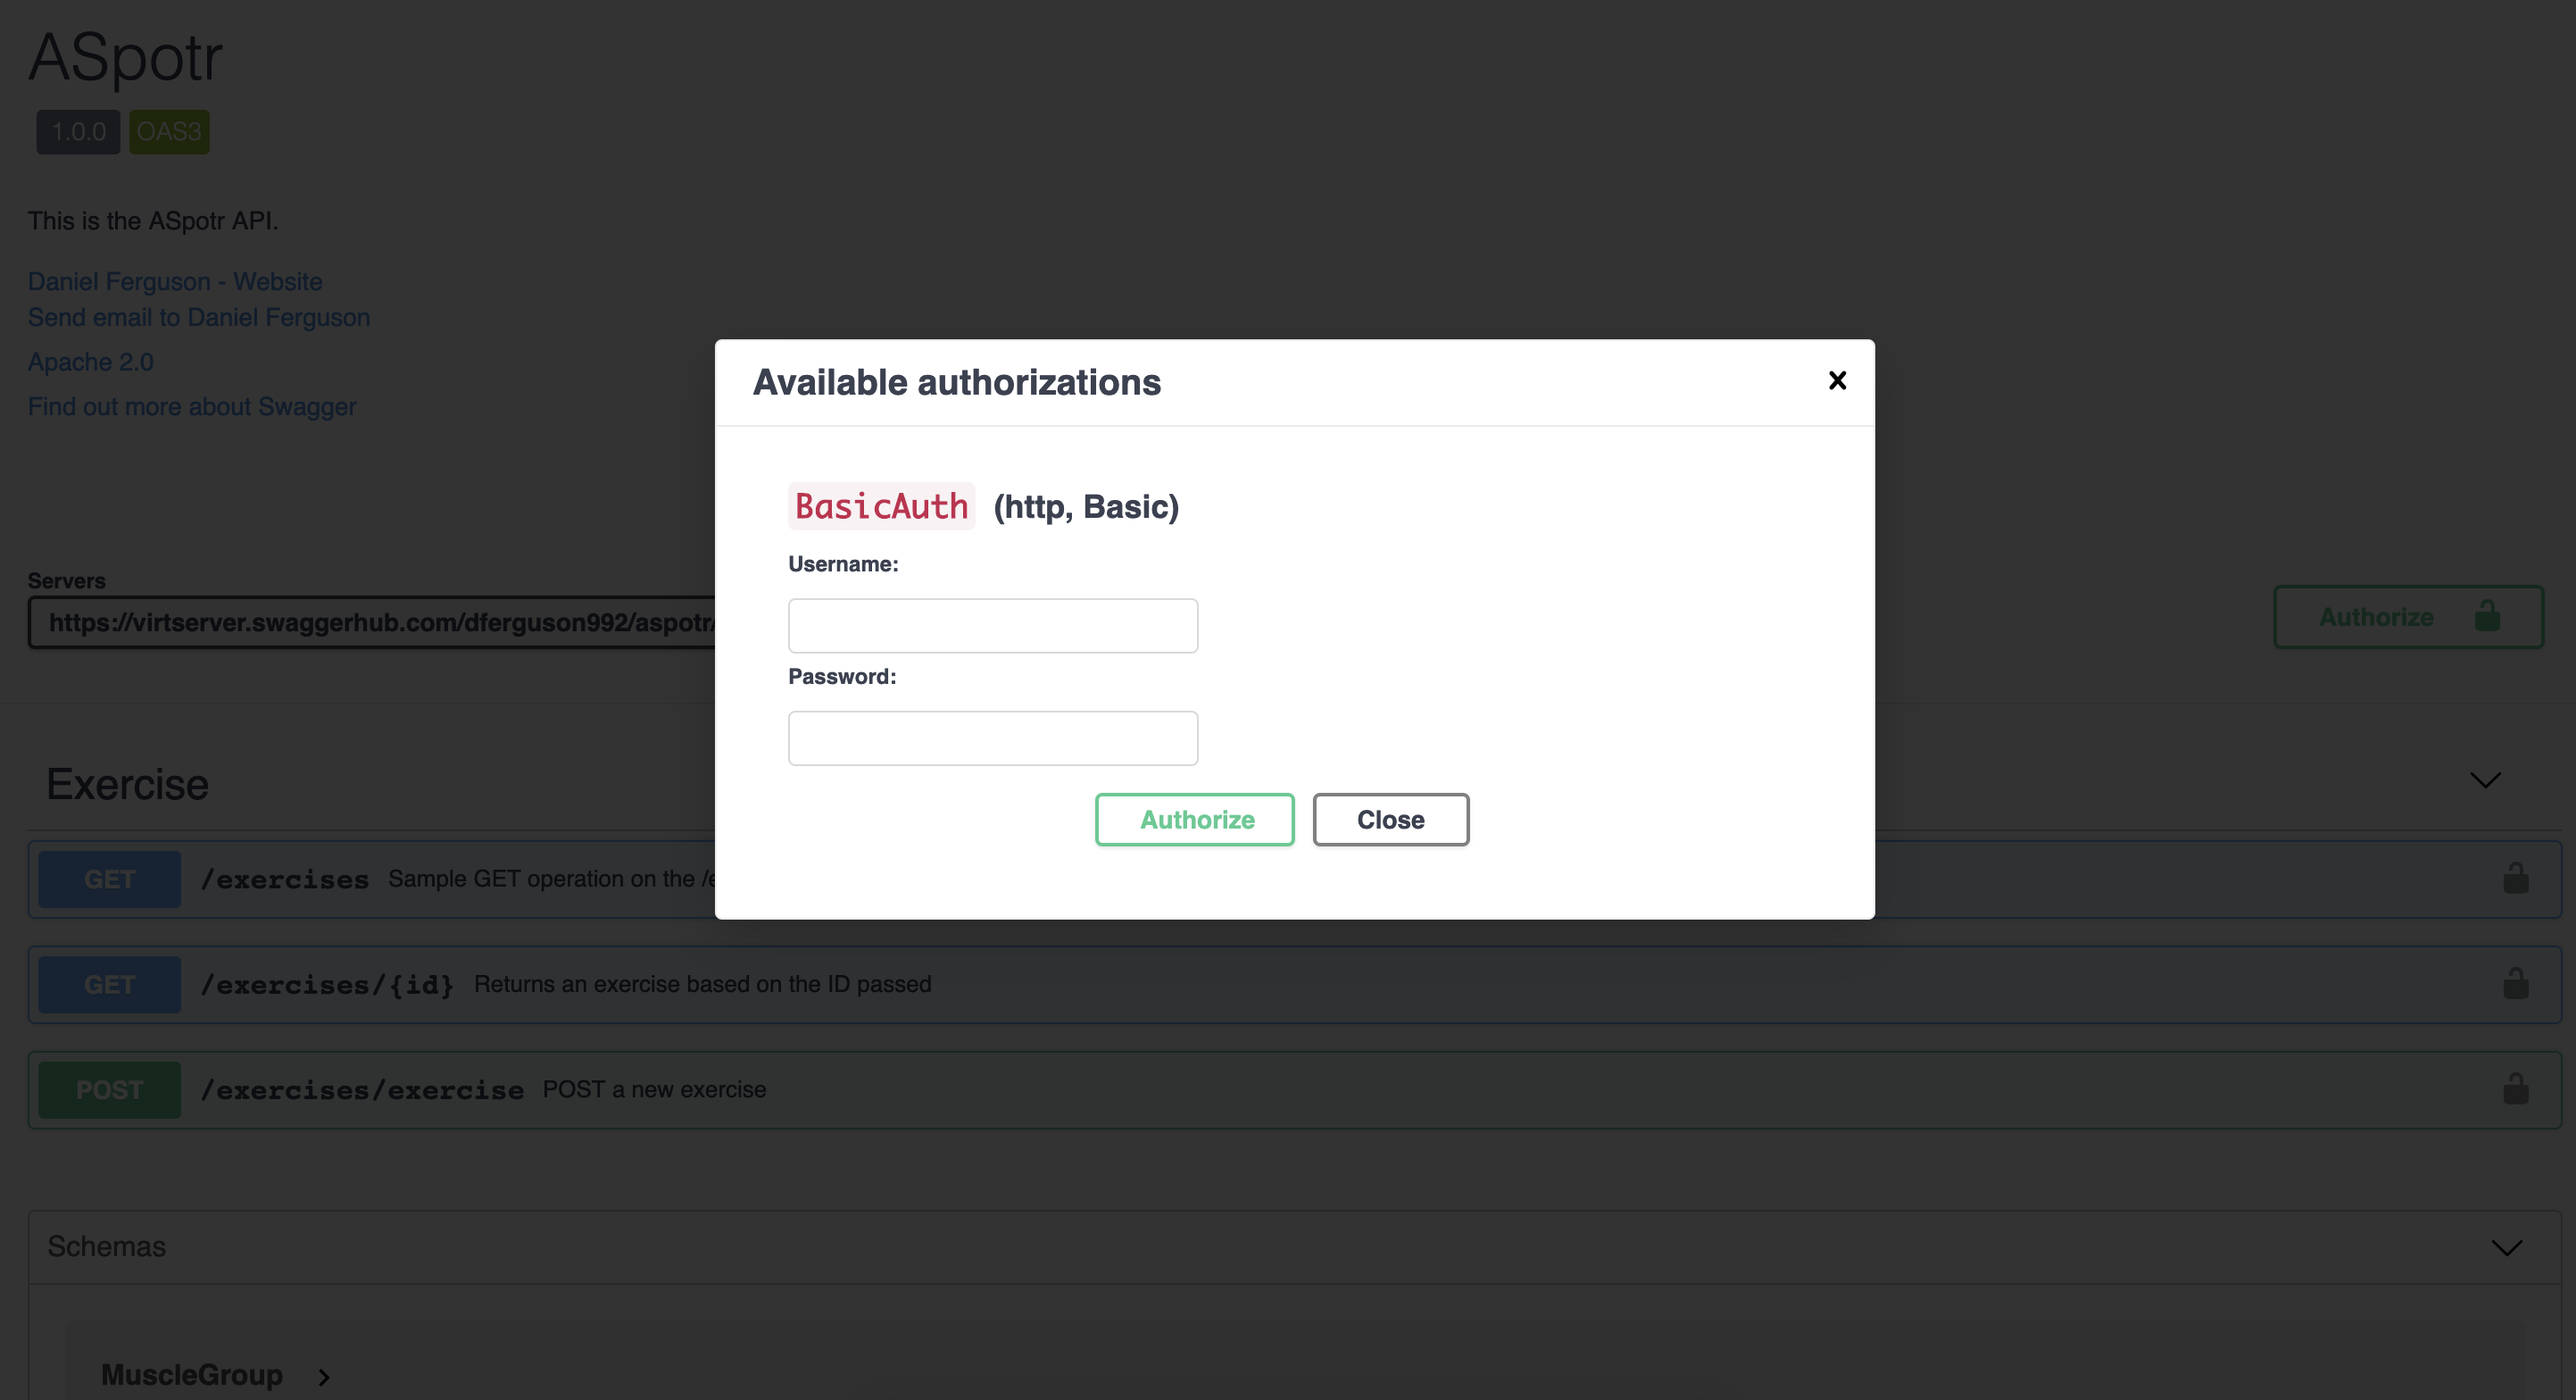
Summary
Swagger Hub is a powerful and concise tool used to author explicit and well-defined APIs. When used properly, Swagger can bridge the gap between architects, back-end developers, and front-end developers by creating an organic, dynamic representation of your API should be used. Furthermore, the code-generation tools used by Swagger allow it to generate code agnostic APIs that fit your business use case and your developer's skill sets. Furthermore, Swagger's strong adherence to the Open-API Specification 3.0 allows your API to be well-understood across all industries. No matter how amazing a product is, if it is difficult to use, no one will use it. Tools like Swagger help keep APIs easy to understand, easy to use, easy to document, and easy to develop against.

Comments