
The rise of serverless computing and platform agnostic, app-based services use has forced the casual developer to learn proper API development, a task usually reserved for platform architects. Unfortunately, there are many programmers, start-ups, and full-fledged companies that do not adhere to proper API development and maintenance. The skillsets and mindsets involved in creating APIs are different from those involved in developing the business logic which uses an API.
This schism does not affect developers or architects; it only affects the users of the API. Poorly developed or poorly documented APIs which are susceptible to frequent changes or misleading design decisions are difficult to use. If a product is difficult to use it likely will not be used at all, especially if that product is an API. The good news is there are specifications and tools which aid in the development of easy to use APIs that change as fast as your business. I am speaking specifically about the Open API Specification and Swagger.
OpenAPI Initiative and Swagger
As REST APIs became more prevalent across the Internet, the standards used to develop them became more varied. To fix this issue, a bunch of companies got together and created the OpenAPI Initiative. This initiative sought to codify and finalize a standard ruleset for REST API development. Since the inception of this open source group, the OpenAPI Specification (OAS) has gone through 3 versions, the last two of which are fully supported by the Swagger API Editor.
Swagger is a company that creates and supports open source API development tools. Many of these tools are available on their website, or as we will shortly see as Docker containers. These tools like Swagger Hub, Swagger Editor, Swagger UI, and Swagger Validator all work together to aid in developing proper APIs. Furthermore, all Swagger tools support the OAS 3.0.n specification. This fact makes adhering to OAS standards very easy when using Swagger tools.
The exact rules defining OAS are on Github for any user to peruse, but tools like Swagger make conforming to these rules easy for anyone. You do not have to be familiar with every detail of the OpenAPI specification to develop an API which conforms to said specification. The rules themselves are very detailed, and describing each one in this blog post would be redundant. Instead, we are going to use Swagger to build a demo REST API which conforms to OpenAPI standards and syntax. After walking through this tutorial, I encourage the reader to browse the specification in more detail. I will cover as many features of the OpenAPI version 3.0.0 specification as possible in this article, but the most detail can be found in the specification itself.
What is this API going to do?
Every API needs to have a purpose which defines how it will be used. Personally, I love to exercise. Going to the gym, taking a fitness class, and running are all ways I like to workout. But as my workouts become more varied, it is difficult to track my progress from workout to workout. We are going to develop a sample API which will help me track my exercises, no matter how varied they are.
Take a look at this graphic:
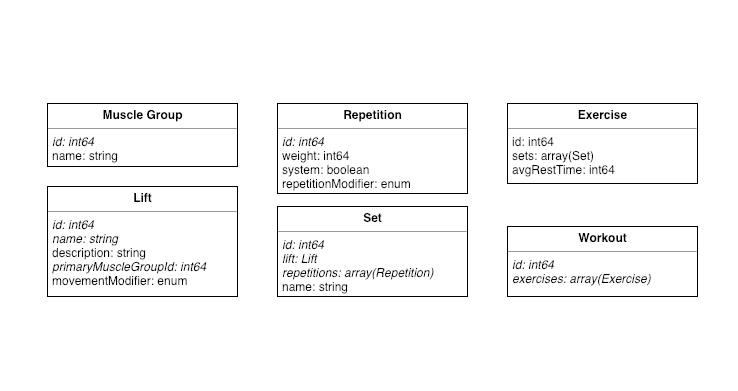
Here we define a workout as an array of exercises. Each exercise is a combination of sets with a rest time. Each set is an array of repetitions defined primarily by a weight, as well as a lift, which is defined primarily by an affected muscle group. Now we have the framework to easily define a weight lifting workout. How do we translate this diagram of loose fitting parts into an API?
There are three steps we will need to take to turn these UML diagrams into tangible JSON packets. The first step is to set up our local Swagger development environment. The second is to populate our API definitions with some sample paths. The last step is to test these sample paths using Swagger's testing tools on Swagger Hub. It is important to note that because we are using Swagger tools to develop our API, we will automatically be prescribing to OAS 3.0 standards, ensuring our API will be easy to use for developers.
Setting up Swagger-Editor
If you prefer to work entirely online, feel free to check out Swagger.io. Their service, Swagger Hub, functions exactly like Swagger Editor, and it even includes testing features which we will explore later. Personally, I prefer to use Docker containers so I do not always have to be connected to the Internet. If you do decide to use Swagger Hub, you can skip over this portion of the post.
MacOS
For MacOS, install Docker on your laptop by running the following in a terminal:
brew install docker
Windows
For Windows, navigate to the Docker download link and follow the prompts until Docker is installed.
Next Steps
Once Docker is installed, run the docker search swagger command using the docker CLI to search for the swagger editor container. It is important to note here, we want the swaggerapi/swagger-editor image. The swagger-ui image is better for presenting API documentation in a web browser. The swagger-generator image starts a web server that will generate clients or servers in a RESTful context when given an API as input. The swagger-validator image is used for assigning Swagger badges to Github repositories. In this instance, we only care about the swagger-editor image, as it will allow us to deploy a local web service that we can use to edit our API without logging into Swagger's online services.
$ docker search swagger
NAME                                     DESCRIPTION                                     STARS               OFFICIAL
swaggerapi/swagger-editor                The swagger-editor web service                  240
swaggerapi/swagger-ui                    A simple docker container for hosting swagge…   145
swaggerapi/swagger-generator             The swagger codegen web service                 66
......
$
$
$ docker pull swaggerapi/swagger-editor
Once you have your container downloaded, run the following command to start the container and map the container port 8080 to your computer's port 8080
$ docker run -p 127.0.0.1:8080:8080 swaggerapi/swagger-editor &
This should start the container, but we can confirm by running docker ps which should give output similar to the following:
$ docker ps
CONTAINER ID        IMAGE                       COMMAND                  CREATED             STATUS                  PORTS                      NAMES
258a99d971e9        swaggerapi/swagger-editor   "sh /usr/share/nginx…"   1 second ago        Up Less than a second   127.0.0.1:8080->8080/tcp   elated_margulis
By navigating to port 8080 in our browser, we can see the default Swagger Editor UI. You should see the standard Pet Store sample API definition in the Swagger UI:
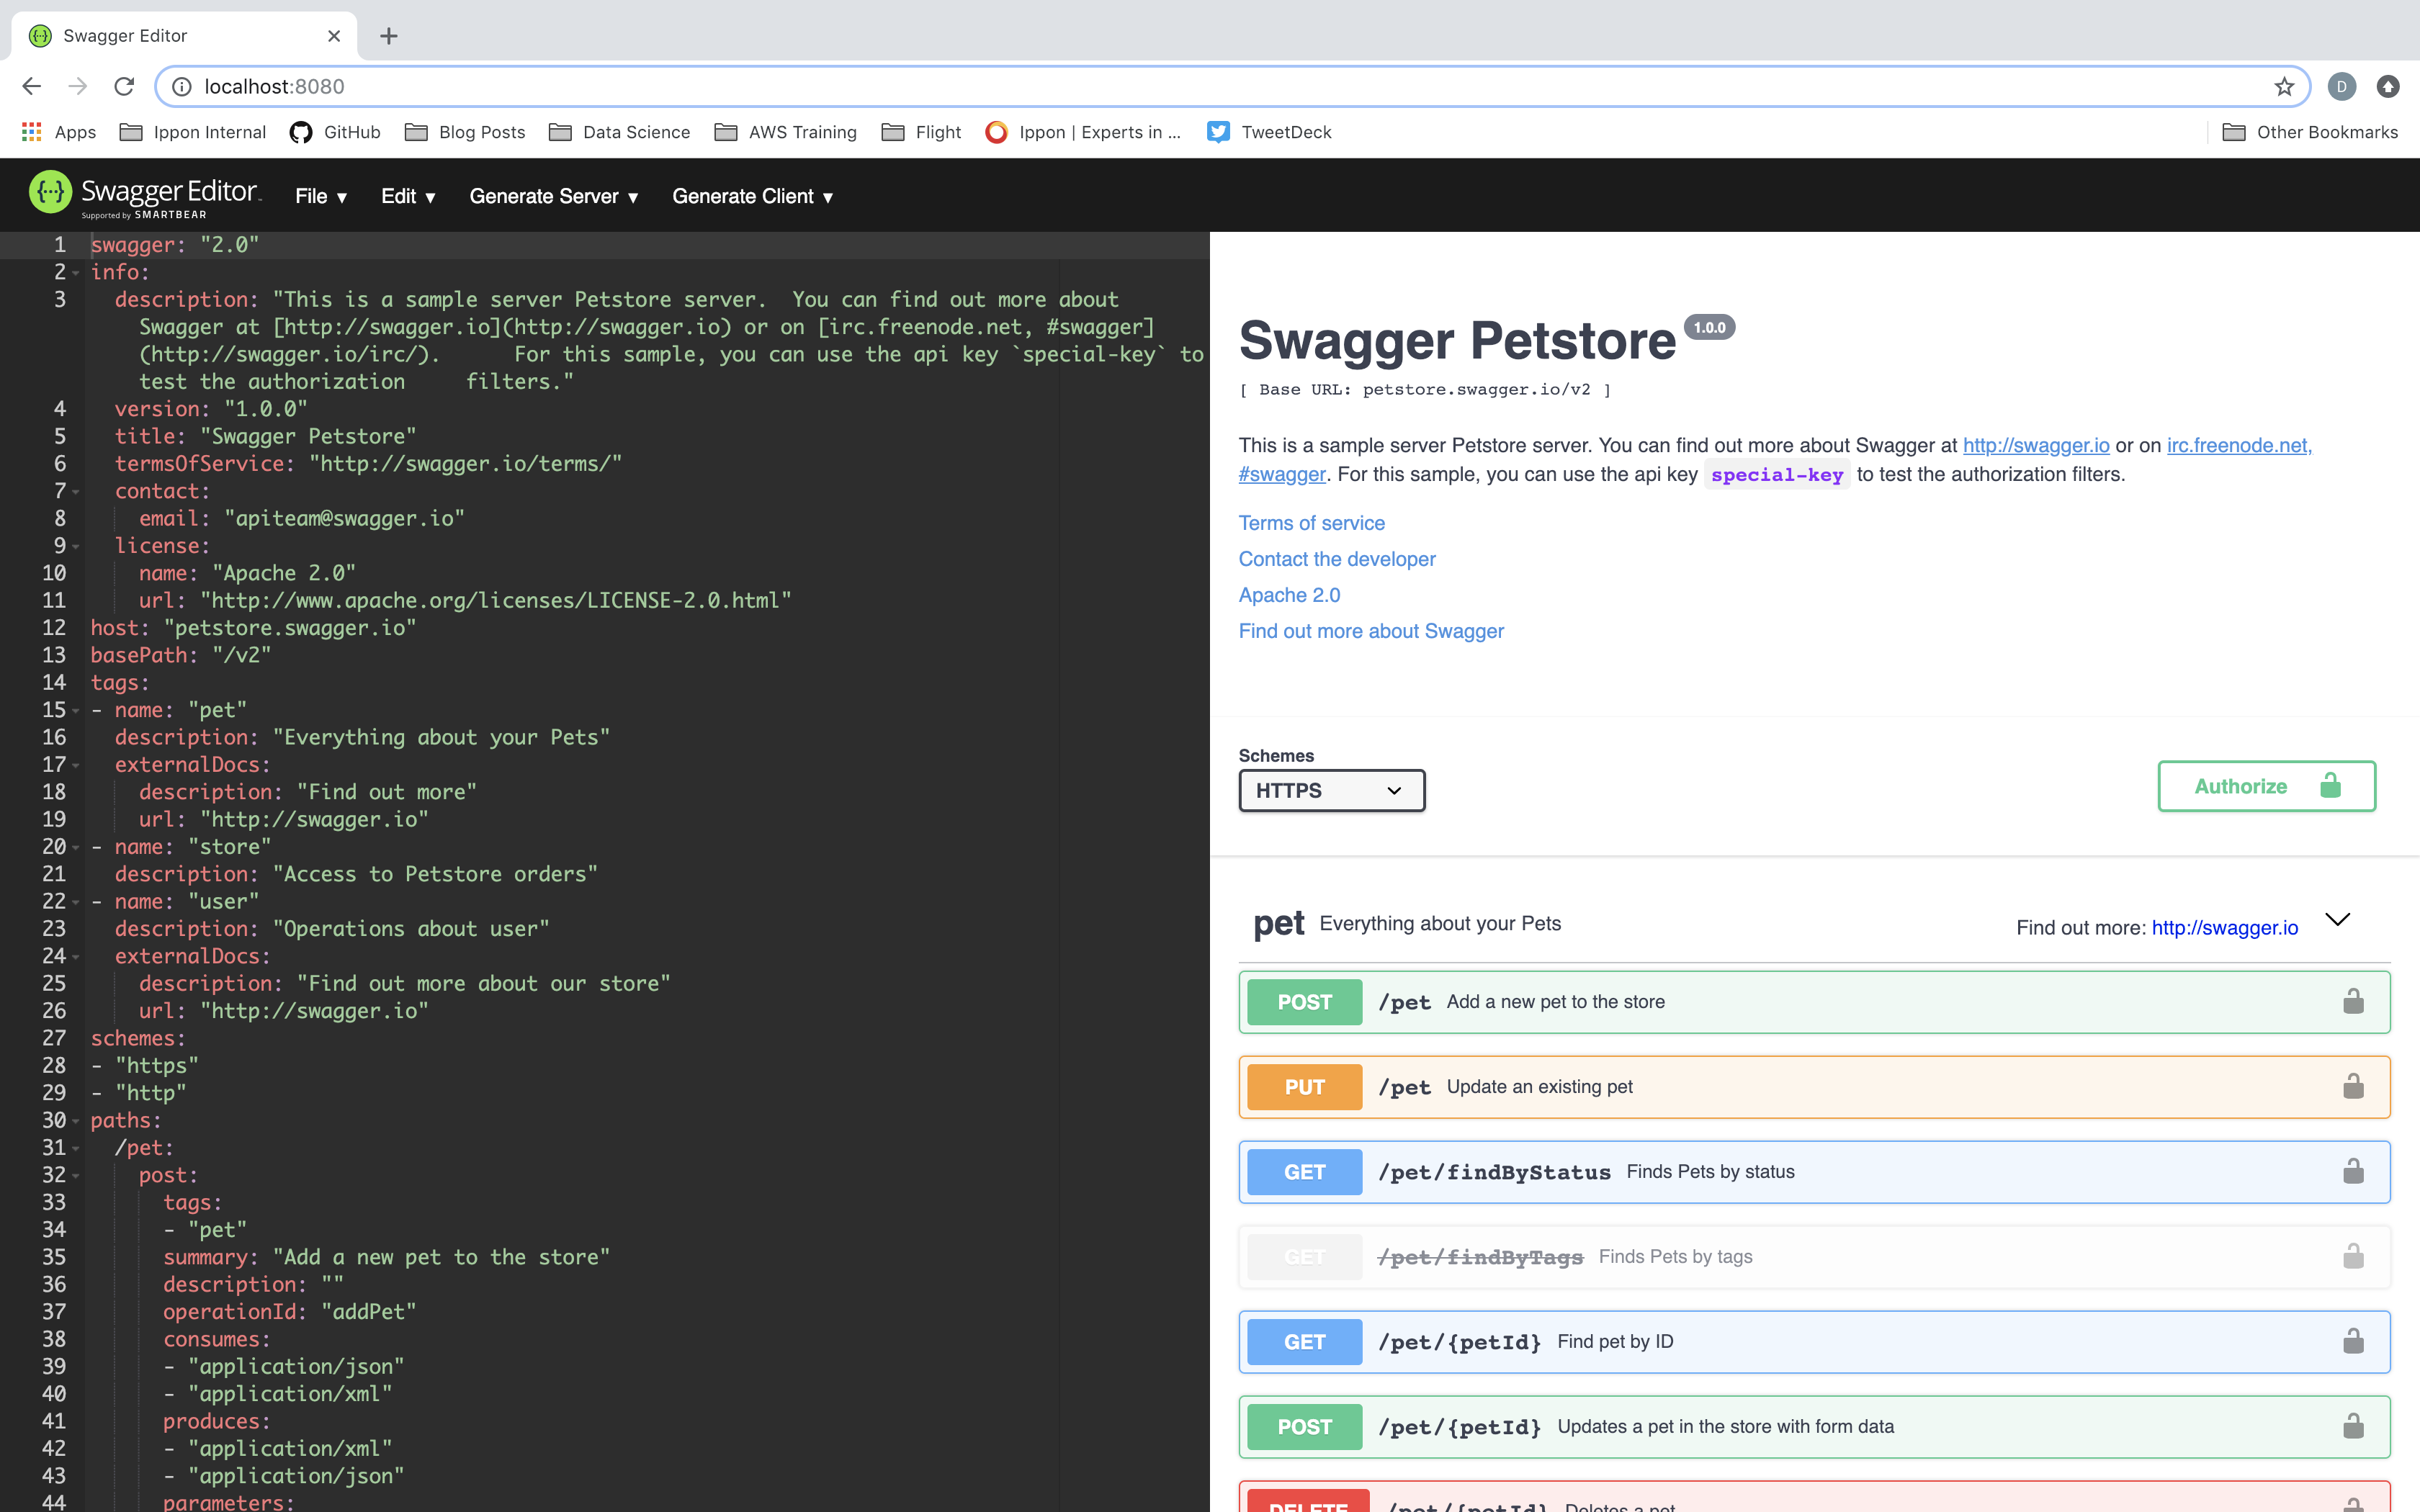
The Pet Store API is the sample API for the Swagger 2.0 specification. In the next section, we'll explore how we can convert this API into an OpenAPI 3.0 Specification API, in accordance with the UML diagrams above.
Swagger-Editor vs. Swagger Hub
If the above steps were at all difficult or prohibitive for you, check out Swagger.io. This website hosts all of the web services discussed here in their newest versions. The only drawback is you will have to login to the Swagger website and host your API there. If this is not a problem for you, feel free to use Swagger Hub for the remainder of this tutorial. Both platforms feature Ctrl+Space code completion tips that are essential if you find yourself struggling to format your API properly. We will be using Swagger Hub later in this post to test our API.
Configuring Swagger for OpenAPI 3.0 Specification
The default Swagger file in the Swagger Editor conforms to Swagger 2.0 (also known as Open API Specification 2.0). The Swagger Editor supports the generation of clients and servers in nearly any language for the given API so long as that API conforms to the 2.0 specification. This alone is a strong impetus to retain the 2.0 API specification; but since the goal of this project is to eventually build an API and program its functions using serverless technology, we do not need to generate client and server code to handle API calls. Even so, it should be noted for those of you using Swagger Hub, the online tool, you can still generate clients and servers against OAS 3.0, you just cannot generate clients and servers against OAS 3.0 using the Swagger Editor container.
API Metadata & Additional Docs Section
The first component of an OAS 3.0 API is not relevant to the function of the API. This section of an API specification retains information about the API like which version it is, who wrote the API, servers where you can contact the API, additional documentation, licensing information, and the APIs schema. In our case, this block of YAML should look similar to the following:
openapi: 3.0.0
info:
  title: ASpotr
  version: 1.0.0
  description: This is the ASpotr API.
  contact:
    email: dferguson@ippon.fr
    name: Daniel Ferguson
    url: 'http://dferguson992.github.io'
  license:
    name: Apache 2.0
    url: 'http://www.apache.org/licenses/LICENSE-2.0.html'
servers:
  - url: 'http://www.aspotr.com'
    variables: {}
    description: ASpotr API Gateway, ASpotr is serverless
externalDocs:
  description: Find out more about Swagger
  url: 'http://swagger.io'
The first line defines the specification this API adheres too. This will usually be swagger: 1.0, swagger: 2.0, or openapi: 3.0.n where n is some minor version number. Here I use 3.0.0 for simplicity's sake. This first line tells the swagger validator what to expect in the rest of the document, much like defining XSD files in an XML file. The next block, info, is for information about the API. This is an optional component, but it is good practice to specify this block, as well as servers and externalDocs anyway. This entire section is completely optional, but a good API, especially an open source one, will maintain license and contact information for use by contributors.
Components Section
The second major component to an OAS 3.0 API are the components. For those of you with an object-oriented programming background, it is easy to think of components as plain objects without any business logic. In order to build strong path definitions in your API, it is imperative we build strong, well-defined models that can be referenced from your paths. This is where the UML diagram from above comes in handy. Considering the UML diagram, we can create API models defined below. As you read this section, pay close attention to the use of the $ref tag:
components:
  schemas:
    MuscleGroup:
      type: object
      properties:
        id:
          type: integer
          format: int64
        name:
          type: string
          description: The name of the Muscle Group
    Lift:
      type: object
      properties:
        id:
          type: integer
          format: int64
        name:
          type: string
          description: The name of the Exercise
        description:
          type: string
        primaryMuscleGroupId:
          $ref: '#/components/schemas/MuscleGroup'
        movementModifier:
          type: string
          description: >-
            Select these modifiers to further describe the exercise you're
            doing.
          enum:
            - isolation
            - supination
            - wide
            - narrow
      required:
        - id
        - name
        - primaryMuscleId
    Repetition:
      type: object
      properties:
        id:
          type: integer
          format: int64
        weight:
          type: integer
          format: int64
        system:
          type: boolean
          description: English(T) or Metric(F) units
        repetitionModified:
          type: string
          description: >-
            Select these modifiers to further describe the repetition you're doing.
          enum:
            - tempo
            - static
            - plyometric
            - isometric
      required:
        - id
    Set:
      type: object
      properties:
        id:
          type: integer
          format: int64
        exercise:
          $ref: '#/components/schemas/Lift'
        repetitions:
          type: array
          items:
            $ref: '#/components/schemas/Repetition'
        name:
          type: string
          description: The name of the set.  Should be autogenerated by the API based on the information within the set.
      required:
        - id
        - exercise
        - repetitions
    Exercise:
      type: object
      properties:
        id:
          type: integer
          format: int64
        sets:
          type: array
          items:
            $ref: '#/components/schemas/Set'
        avgRestTime:
          type: integer
          format: int64
      required:
        - id
        - sets
    Workout:
      type: object
      properties:
        id:
          type: integer
          format: int64
        exercises:
          type: array
          items:
            $ref: '#/components/schemas/Exercise'
      required:
        - id
        - exercises
Starting with our most primitive objects built on basic data types like MuscleGroup, we can define complex objects like Workout. The glue that binds these objects together is the $ref tag. This tag references another location in your API specification. When defining models, we use it heavily to build our complex objects based on definitions of simpler objects. This tag works by defining a structure similar to directories, where the # character is the root tag, and the / character separates each level of the YAML document.
This structure helps to define components in your API using other, previously defined components. This tag is incredibly powerful, as it allows you to not only reference components in this document and also reference components in other API specification documents as well. This is a great strategy if you are linking two or more extraneous APIs, or if you want to keep your component descriptions separated from the rest of your API document.
It is important to note that the demo API in this post may not be a scalable API design. For our purposes, this design may work just fine; it is glaringly obvious this design will create large, nested JSON payloads for even the shortest workouts. The example API in this post implies each transaction is stateful, and payload components are dependent upon other potentially unrelated components.
For example, say you want to track the number of push-ups you've done in a day. With this API design, you have two choices. The first is to slowly build your JSON workout object by periodically adding set objects to it throughout the day. The second option is to send small workout requests objects throughout the day, each containing one exercise of about 20 or so push-ups.
The first option is not convenient, but it lends itself well to exercise tracking, mainly if you wanted to model the data you've collected and build progress projections over time. This first approach is how one would assume any workout tracking is to be done. The second approach is much more convenient for the user, even if the machine learning conducted on your data set is blown out of the water if multiple workouts of the same exercise are logged per day.
For our purposes now, this API will work just fine; but as you continue to read, consider optimizations to the API that would make it scalable and easy to use. It is essential to think about the API from all perspectives, those modeling the business logic on the back-end, and those submitted REST requests on the front-end. If you keep these tenants in mind, you can build a much more atomic API that maintains its usability by both developers and users.
Summary
This post is the first in a series discussing API development for serverless applications. In the next post, we will discuss developing API paths in your Swagger specification, and how to test that API specification using Swagger tools.
If something in this article piqued your interest and you would like more information on JHipster or the services we offer at Ippon USA we’d love to hear from you! Please contact us at contact@ippon.tech with your questions and inquiries.


Comments