


This is an introduction on how to get started with a Truffle-based Solidity project. The first part is here (part 1 of 2). In the second part, we will go over connecting you project to Infura through forking, adding linting, and writing tests. The goal is to be prepared for security auditing by ensuring good code practices and including automated acceptance and unit tests.
If you would like to explore the source code as a simple boilerplate project, checkout the github (blog written as of commit 0x435f745).
Using Infura to connect to public networks
So far, we have created a real working blockchain. However there are already a few out there that are running "decentralized". In fact, the one called Mainnet is what most people are talking about when they say Ethereum. The developers of Ethereum, and other organizations created some test networks that are public and decentralized, but you do not need money to start using it. They usually require Proof of Authority but their differences are explained here For our purposes, we are going to work with the three main test networks Kovan, Rinkeby, and Ropsten, along with Mainnet (the big one).
Again, as long as you know the protocols (which are public domain), you can connect to these public networks with your own custom clients. However, this is a lot of work, and hipsters don't like working more than they have to. So we can either use Ethereum's open source Go client Geth or we can be even lazier, and use a free hosted service called Infura.
Infura is a super easy way to connect to the public networks because you do not have to worry about running code on a server, or keeping it available. We are going to sign up for a free project. It will give us a few important things to work with. For this article, we will need the project id, and the endpoint url. 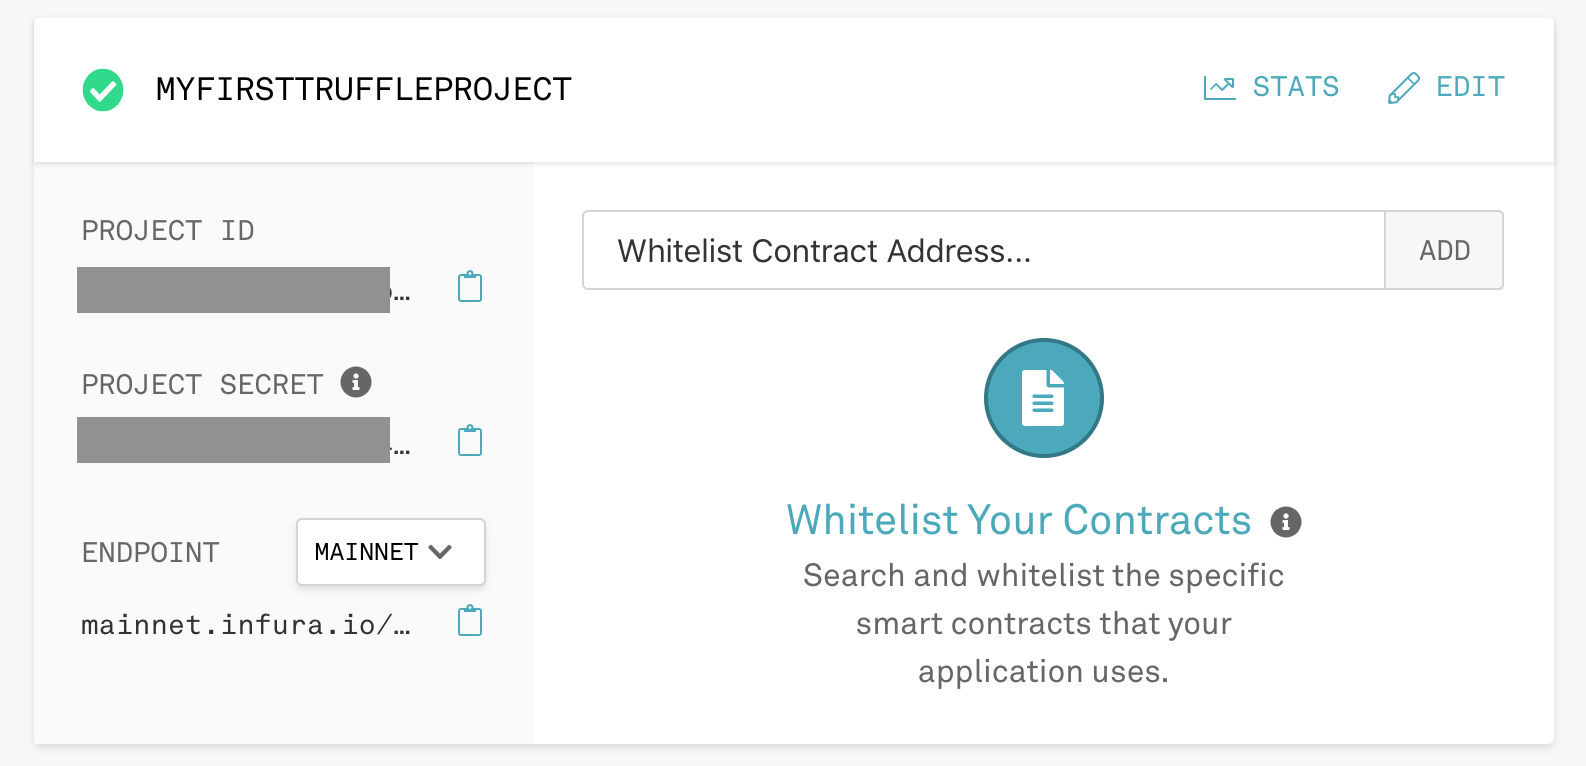 We will call this our Infura client because in the background, Infura is running a Geth client as a node in one of the public networks. Infura's Getting Started Guide
We also want to use public networks because we might want to call other contracts that may not exist on our local development network. For example, if you want to exchange Dai tokens (a stablecoin), you have to test on Kovan because only Kovan and Mainnet have the Dai contract.
-
Add this project id as an environment variable
export INFURA_PROJECT_ID=1234whatever -
Let's check to see if it is working properly.
curl https://mainnet.infura.io/v3/$INFURA_PROJECT_ID \
    -X POST \
    -H "Content-Type: application/json" \
    -d '{"jsonrpc":"2.0","method":"web3_clientVersion","params": [],"id":1}'
Awesome, looks like we hit our new Infura client
Forking from Infura
You can use this new client to do essentially everything we just did on our Ganache client, see Infura's API docs. However, if you want to write transactions to these public blockchains, it will cost Ether. Even on the test networks, you still have to acquire Ether. Follow these links to lean more about faucets. Also, all of these public transactions are persisted across the world. For development, we still want to spin up a local ganache client to keep our code base relatively private, and so we are not incurring unnecessary costs.
We can leverage our Infura client by forking it into our local Ganache. Forking is a very literal term in the sense that we are taking the "linked list" that makes up the public blockchain, and then adding our own transactions onto the end of it. We do not care about public transactions "post fork" because our linked list continues off from the other (never linking back up again).
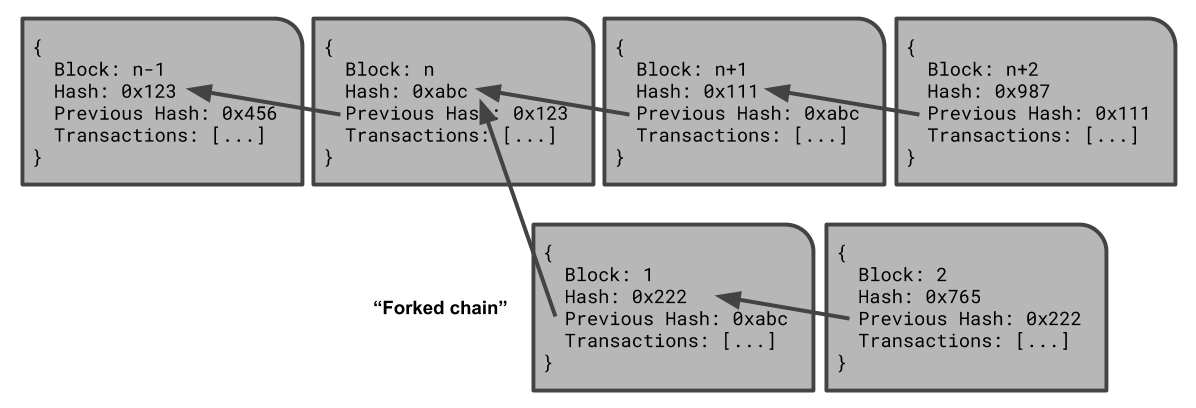
If we reference a contact that was created before the fork, our local ganache will simply search our Infura client for that particular code. It will never change, even if other people interact with the same contract on a different blockchain. Notice how the blocks only retain information about the past blocks (the previous hash). Think of that as a checksum on the past.
Luckily, it is very easy to fork into Ganache. We just have to specify the Infura client endpoint along with which network.
-
Let's add to our scripts in
package.json{ ... "scripts": { ... "start:kovan": "concurrently \"npm run ganache:kovan\" \"npm run migrate\"", "start:rinkeby": "concurrently \"npm run ganache:rinkeby\" \"npm run migrate\"", "start:ropsten": "concurrently \"npm run ganache:ropsten\" \"npm run migrate\"", "ganache:kovan": "npm run ganache -- --fork \"https://kovan.infura.io/v3/$INFURA_PROJECT_ID\"", "ganache:rinkeby": "npm run ganache -- --fork \"https://rinkeby.infura.io/v3/$INFURA_PROJECT_ID\"", "ganache:ropsten": "npm run ganache -- --fork \"https://ropsten.infura.io/v3/$INFURA_PROJECT_ID\"" }, ... } -
We need to add to our
truffle-config.jsto point to these new networks:var HDWalletProvider = require('truffle-hdwallet-provider'); // environment variables not set in the package config var infuraProjectId = process.env.INFURA_PROJECT_ID; var mnemonic = process.env.MNEMONIC; // naive environment assertions, since these aren't present by default if (infuraProjectId === undefined || infuraProjectId === '') { throw new Error('truffle-config.js needs the environment variable "INFURA_PROJECT_ID"'); } else if (mnemonic === undefined) { throw new Error('truffle-config.js needs the environment variable "MNEMONIC"'); } else if (mnemonic.split(' ').length != 12) { throw new Error('The environment variable "MNEMONIC" must be 12 words (space delineated)'); } ... modules.export = { networks: { ... kovan: { provider: () => new HDWalletProvider(mnemonic, `https://kovan.infura.io/v3/${infuraProjectId}`), network_id: 42, // Kovan Id gas: 3000000, gasPrice: 100000000000 }, rinkeby: { provider: () => new HDWalletProvider(mnemonic, `https://rinkeby.infura.io/v3/${infuraProjectId}`), network_id: 4, // Rinkeby Id gas: 3000000, gasPrice: 100000000000 }, ropsten: { provider: () => new HDWalletProvider(mnemonic, `https://ropsten.infura.io/v3/${infuraProjectId}`), network_id: 3, // Ropsten Id gas: 3000000, gasPrice: 100000000000 }, live: { provider: () => new HDWalletProvider(mnemonic, `https://mainnet.infura.io/v3/${infuraProjectId}`), network_id: 1, // Mainnet Id gas: 4000000, gasPrice: 100000000000 } }, ... }We have to use the mnemonic here, because when we start sending transactions to the main networks, we have to use existing addresses with balances.
-
Now we need to install HDWalletProvider so we can turn mnemonics into our addresses and private keys.
npm install truffle-hdwallet-provider --save-dev -
Try running one or all of the forking scripts:
npm run start:kovan
This command will start our local ganache (which forked from kovan), and then will migrate our contracts to it. Our local client will keep running, and we can view the contracts which have been successfully deployed.
Run node_modules/.bin/truffle networks: 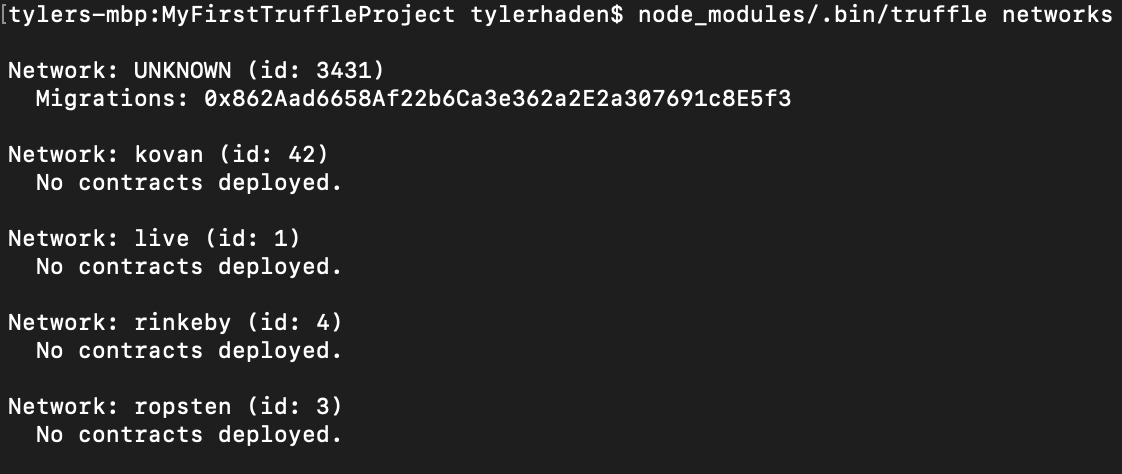
You can send function calls as transactions to this address on our local client.
Adding linting to your project
When working with contract code, you should always follow best practices. Not because your technical lead is particularly stubborn, but because this code will be handling your client's money. You may assume that your Solidity code will be audited for security and optimization. Linting is always the first step in this process.
-
Add Ethlint (formally know as Solium) to your project
npm install ethlint --save-dev -
Init Solium
node_modules/.bin/solium --initThis generated two files
.soliumrc.jsonand.soliumignore..soliumrc.jsonwill store your rules for running lint on the Solidity code.{ "extends": "solium:recommended", "plugins": [ "security" ], "rules": { "quotes": [ "error", "double" ], "indentation": [ "error", 4 ], "linebreak-style": [ "error", "unix" ] } }.soliumignoretells Ethlint what to skip.
There will end up being Solidity code from third parties, such as OpenZeppelin. Obviously you will want to vet any code you include, but as far as getting started with development, you do not want to have to fix other people's styling errors.node_modules contracts/Migrations.sol
-
Update
.soliumrc.jsonto include better security and general linting:{ "extends": "solium:all", "plugins": ["security"], "rules": { "arg-overflow": "off", "blank-lines": "off", "error-reason": "off", "indentation": ["error", 4], "lbrace": "off", "linebreak-style": ["error", "unix"], "max-len": ["error", 120], "no-constant": ["error"], "no-empty-blocks": "off", "quotes": ["error", "double"], "uppercase": "off", "visibility-first": "error", "security/enforce-explicit-visibility": ["error"], "security/no-block-members": ["warning"], "security/no-inline-assembly": ["warning"] } } -
Optionally, update
.soliumignoreso that Ethlint will lintMigrations.sol -
Add Ethlint to your list of scripts. Then run the linter:
{
    "scripts": {
        ...
        "lint:sol": "solium -d ."
    }
}
npm run lint:sol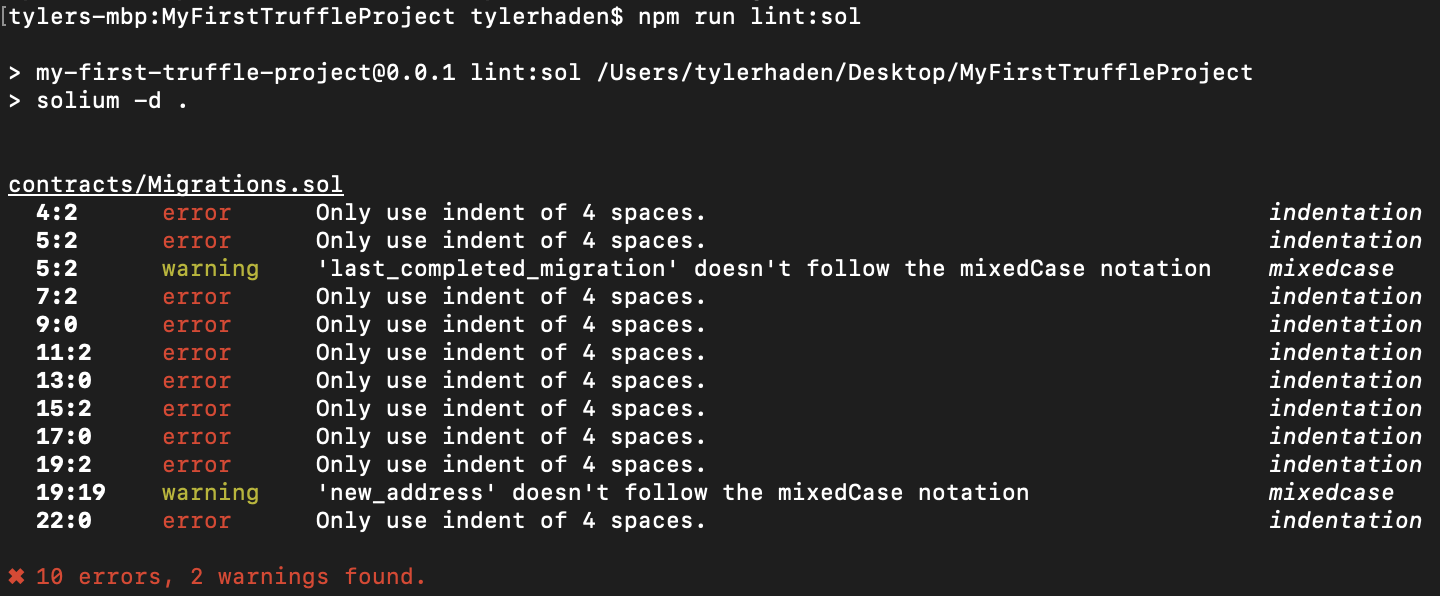
As you can see, the
Migrations.solgenerated for us has some styling errors. You will have to come up with your own criteria linting.
Testing
The best part of the whole article, we finally get to write some tests.
Truffle comes with the command truffle test which will run all the unit tests, or specific ones if you specify them, see the Truffle docs. First, we will add some scripts to abstract away the running of our local blockchain in conjunction with running the tests.
-
Install two cool modules to help us run the unit and acceptance tests:
npm install truffle-test-utils eth-gas-reporter --save-dev -
Add a script to
package.json{ ... "scripts": { ... "test": "concurrently \"npm run ganache\" \"npm run migrate && truffle test\" --kill-others --success first" }, ... }All this does is start a local Ganache client, migrate the current contracts, then run units/acceptance tests on that deployed code.
--kill-others --success firstjust tells Concurrently to stop running the Ganache client after the tests have finished. -
We can update
truffle-config.jsto use eth-gas-reporter in its Mocha configuration... modules.export = { ... mocha: { reporter: 'eth-gas-reporter', reporterOptions : { currency: 'USD', gasPrice: 2 } } }This will give us more information during the testing, including gas usage for each function called. We'll see this in our testing output later.
-
Now we can add our first test. Create the file
test/Deployment.test.js:require('truffle-test-utils').init(); const Migrations = artifacts.require('Migrations'); const MAX_DEPLOYED_BYTECODE_SIZE = 24576; contract('Migrations', (accounts) => { let migrations; // build up and tear down a new Migrations before each test beforeEach(async () => { migrations = await Migrations.deployed(); console.log(migrations); }); it('has a validated contract size', async () => { // bytecode is in hexadecimal, where each byte is represented by two characters: 0x00 -> 0xff let bytecodeSize = migrations.constructor._json.bytecode.length / 2; let deployedBytecodeSize = migrations.constructor._json.deployedBytecode.length / 2; console.info('Migrations deployed at address: ' + web3.utils.toChecksumAddress(migrations.address)) console.info(' -- size of bytecode in bytes = ', bytecodeSize); console.info(' -- size of deployed in bytes = ', deployedBytecodeSize); console.info(' -- initialisation and constructor code in bytes = ', bytecodeSize - deployedBytecodeSize); // Make assertion on deployed since the initial transaction takes constructor bytecode into account assert(deployedBytecodeSize <= MAX_DEPLOYED_BYTECODE_SIZE, 'Contract bytecode is too big to deploy!'); }); });Here is an acceptance test. It can be writen for every contract because it makes no assumptions about the contract functions or data. Instead, it tests the compiled bytecode's size. It is important when writing smart contracts, to be aware of the transactions with the blockchain because not only do you pay for every byte of code, but some transactions are too large and will fail.
-
We can also write a unit test
it('sets lastCompletedMigration by the owner', async () => {
    let expectedCompleted = 1234;
    await migrations.setCompleted(expectedCompleted, { from: accounts[0] });
    assert.equal(expectedCompleted, await migrations.last_completed_migration({ from: accounts[0] }),
        'setComplete did not update last_completed_migration');
});
Here is a unit test that tests the happy path for the function
setCompleted. Notice the use of async and await in these tests. Every time we call the contract, we must wait for our client to respond. -
Run the tests
npm run test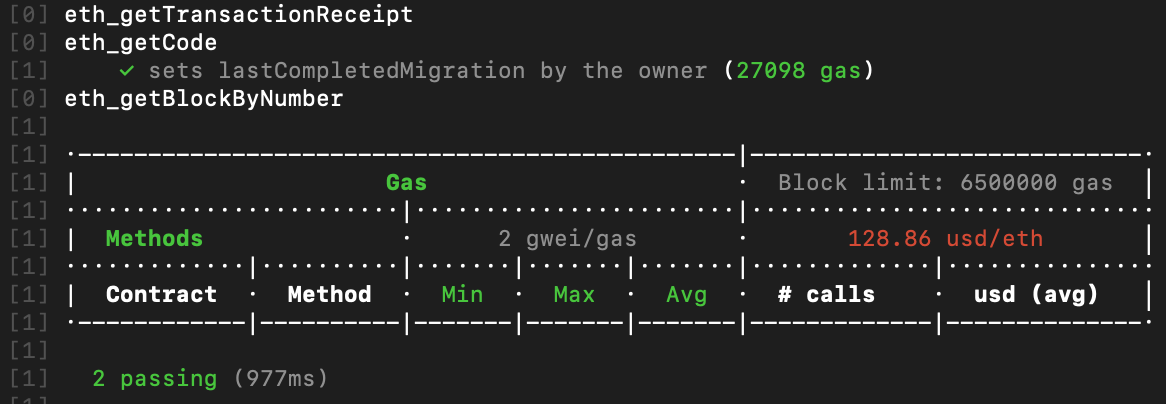
Here, we don't see any listed methods in the table. This is because the only non-contract-creation transaction we tested was
last_completed_migrationwhich was a view function, which does not get picked up by Mocha.We will get back a lot of logs, and the more the better. First, we see ganache starting up and truffle migrating our contract. Next we start to see the tests getting run. Once the pass, we can see the gas usages generated by Mocha.
Recap
You have now learned enough to get started and run your Solidity contracts on public networks. The languages and tools are constantly improving, and smart contract applications can start relying on tried and tested software development patterns. Don't forget to keep security in mind, and never take someone's word on the state of a contract. Trustless applications are intended to be verified, and bytecode is intended to be public.
- [x] Part 1: Truffle initialization and starting your very own blockchain
- [x] Part 2: Using Infura to connect to public networks, linting, and testing
To see the latest version of our boilerplate code, submit issues, or contribute, check out our public repository.


Comments