

June 8, 2020
Traditionally, bringing up a Minecraft server involves manually installing all separate components and spending too much time in the command line. Using the Terraform recipe from this blog post we can easily bring up our own server without worrying about the granularities of manual deployment. Not only that, but with a new Google Cloud Platform (GCP) account, you get $300 worth of credits, which will allow you to do this for virtually free.
There are a lot of good reasons to bring up your own Minecraft server. It can serve as a shared digital space for you and your friends to keep in touch, or for your kids/gremlins to jump onto. The limitations of Minecraft Realms (Mojang’s own server solution) such as the low 10-block draw distance and the choice between expensive third-party providers make self-deployment an easy choice.
I will be diverging from several aspects of the original Futurice code by adding a few more twists into it. A 35GB SSD instead of a 20 GB HDD, a non-preemptive instance, and 3 GB of RAM allocated to Minecraft are some examples. I will be using macOS, but will have links for other systems.
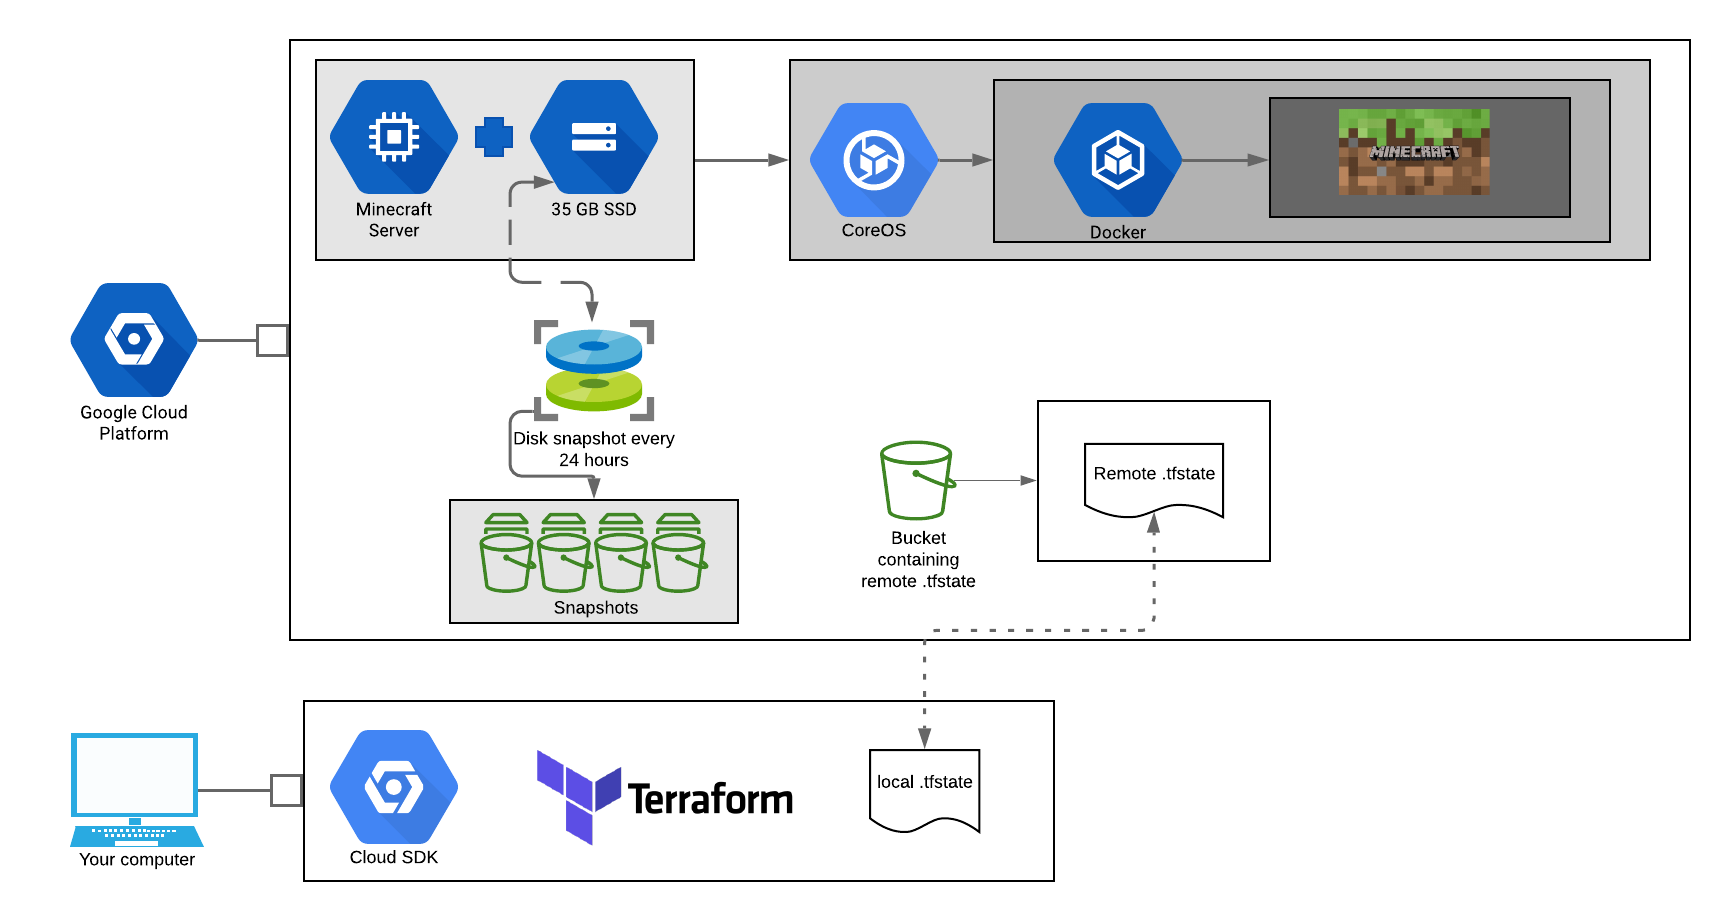
GCP will host our infrastructure, which will be comprised of a compute instance with an attached 35 GB SSD. This combination will run Google's container-optimized operating system known as COS (comes with Docker pre-installed). Docker will be pulling and running a Docker Minecraft image in a container using the startup script in our Terraform configuration. We will set up a snapshot schedule which will take automatic snapshots every 24 hours as our backup solution. Finally, we will have a bucket housing our remote .tfstate.
GCP
GCP is where we create a project for the resources to live in, a bucket to store the “.tfstate” (more on this later), and an instance we can connect to. The Google Cloud SDK will allow us to interact with GCP from the command line. https://cloud.google.com/compute/docs/regions-zones is a good place to find your closest/default region.
- Go to https://cloud.google.com/ to sign up for a GCP account
- Go to https://console.cloud.google.com/ and create a new project
- Go to https://console.cloud.google.com/storage/browser and create a bucket. Choose settings appropriate to your location. I went with multi-region, us, standard, fine-grained, Google-managed key, and a retention-period of 7 days
- Install and initialize the Google Cloud SDK for your machine (Windows, macOS, etc)
- Test out Google Cloud authentication with
gcloud auth application-default login
Terraform
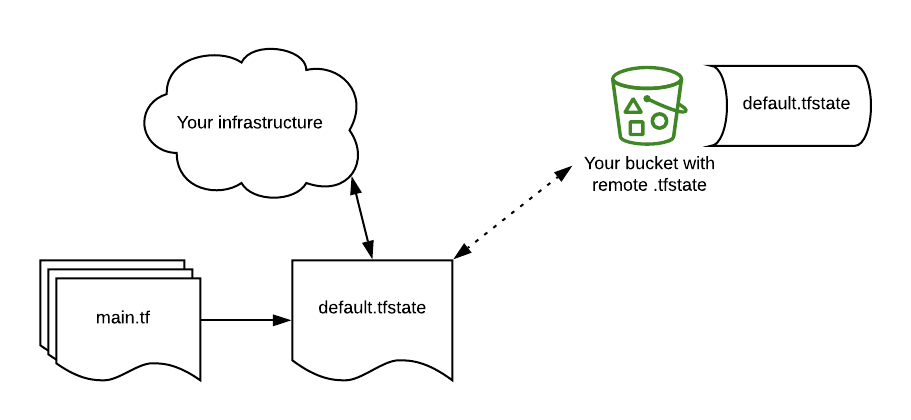
Terraform allows you to declaratively provision and manage code. When you run a Terraform configuration for the first time, it creates a ".tfstate" file, which keeps a detailed map of our infrastructure. This includes our instance network information, our disk ID, and anything else Terraform provisions. The ".tfstate" file acts as a record of the infrastructure at the time of provisioning.
Every subsequent run of the configuration file will check the real infrastructure before committing any changes. If we add another instance to our configuration file, then Terraform will refresh the ".tfstate" with the new real infrastructure (which includes all our old resources + our additional instances.)
This also means that if you create a small change in your configuration file, then only that change will be committed rather than your whole configuration file. Our ".tfstate" file will be stored remotely in the bucket we created earlier.
- Download and install Terraform https://www.terraform.io/downloads.html (if using a Mac, you can use “brew install terraform”)
- Download the main.tf from https://github.com/futurice/terraform-examples/blob/master/google_cloud/minecraft/main.tf
- Change the terraform block in main.tf to match your bucket name (I’m using Atom as a text editor)
terraform {
  backend "gcs" {
    prefix = "minecraft/state"
    bucket = "<BUCKET_NAME>"
  }
 }
- Change the locals block in main.tf to match your project_id and region
locals {
	project = "<PROJECT_ID>"
 	region  = "<REGION>"
 	zone    = "<REGION>"
}- Change the "google_compute_disk" resource block in main.tf to use an SSD with size 35 (default is GB)
resource "google_compute_disk" "minecraft" {
  name  = "minecraft-disk"
  type  = "pd-ssd"
  size  = 35
  zone  = local.zone
  image = "cos-cloud/cos-stable"
}- Change the "google_compute_instance" resource block in main.tf to use the following startup script:
metadata_startup_script = "docker run -e EULA=TRUE -e MEMORY=3G -d -p 25565:25565 -v /var/minecraft:/data --name mc itzg/minecraft-server:latest;"
- Change "preemptible to false" in main.tf. This keeps the server running 24/7
  scheduling {
    preemptible       = false # True closes within 24 hours
    automatic_restart = false
}- Run terraform while in the directory containing main.tf
terraform initterraform apply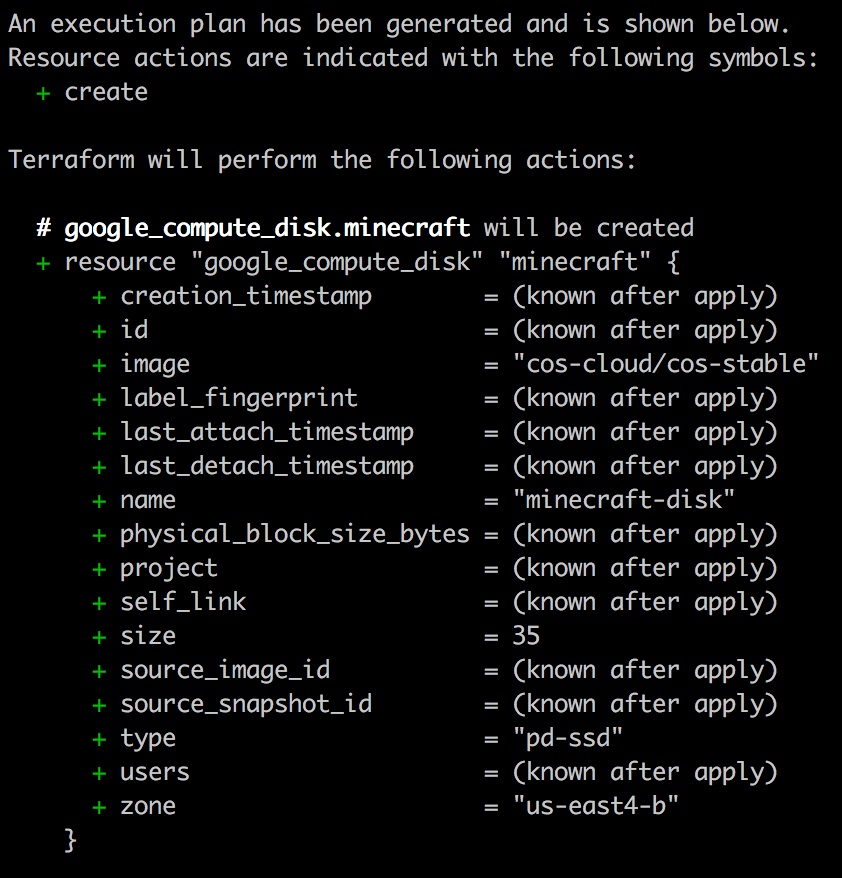
- Answer "yes" and watch the magic happen
Back to GCP
Now go back to https://console.cloud.google.com/compute/ and watch as your instance is initialized. There are handy performance-metrics you can view by clicking "SHOW INFO PANEL" on the top right side. From here you can also connect to the instance by clicking on SSH. The external IP is what you and your friends will use to connect to your Minecraft session.

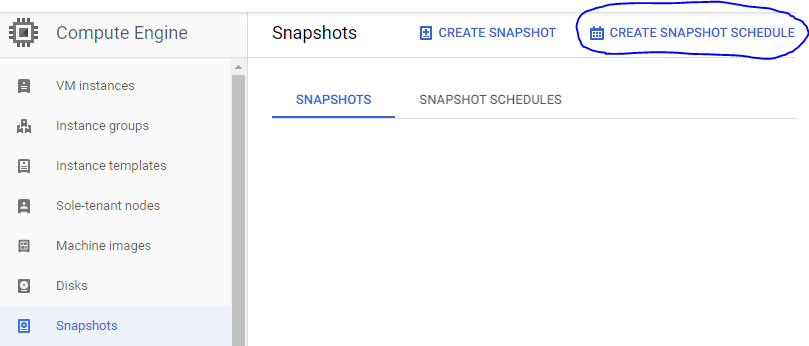
Snapshots
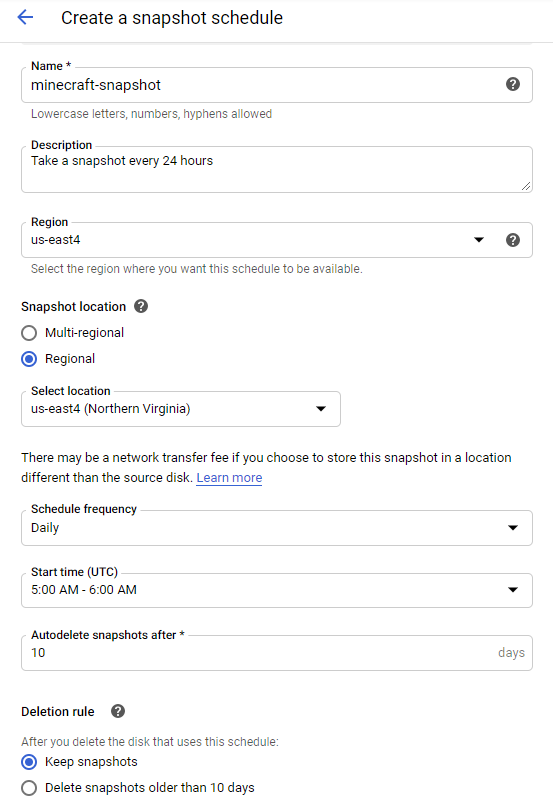
- Click on "Snapshots" on the left side, followed by "CREATE SNAPSHOT SCHEDULE"
- Fill in the details. Longer retention times will be costlier. (I chose 10 days)
- Navigate to Compute Engine >> Disks
- Select your 35 GB disk
- At the top of the page, click Edit
- In Snapshot schedule select the schedule you just created.
- Click save
Importing an existing world
The steps above will generate a new world, but we can import our own existing world. Skip this section if you want to start with a new world.
- Find your world location locally or download it from Realms
- Copy the world into another folder (just to be safe)
- Run the below tar command while your command line is in the directory containing your world directory
tar -czvf newworld.tar.gz "<YOUR_WORLD>"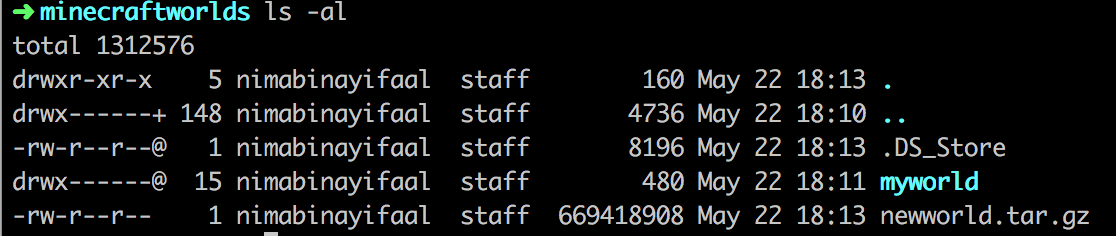
- Upload your compressed world to your instance
gcloud compute scp "<YOUR_WORLD.TAR.GZ>" minecraft:~
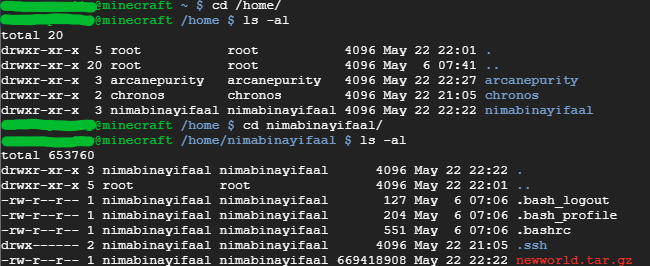
- SSH into your Minecraft instance through the GCP console and become a super user
sudo su- Navigate to your home folder, where you will find your world.tar.gz
- Untar/un-compress your world
tar -xvf "<YOUR_WORLD.TAR.GZ>"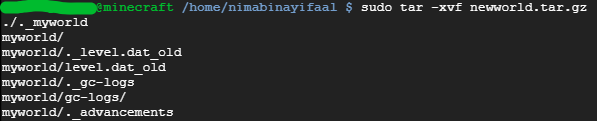
- Create a new directory in the Minecraft data folder and copy your world to it
mkdir -p /var/minecraft/myworld && cp -R "<YOUR_WORLD>" /var/minecraft/
- Navigate into your Minecraft data folder and open up the server properties with our text editor (nano)
cd /var/minecraft
nano server.properties- Change
level-name=worldtolevel-name="<YOUR_WORLD>" - Change the values of server.properties to customize your experience. I changed motd, view distance, max-players. View distance lets you see 1 block further per increment, but draws processing power. I set mine at 20
- CTRL+O, then press ENTER to save, and CTRL+X to quit nano
- Fix the permissions of your world folder so docker can access it
chown -R chronos:chronos "<YOUR_WORLD>"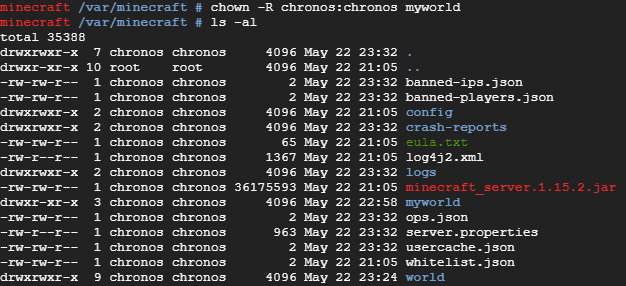
- Stop the currently-running Minecraft container, then wait until it has stopped
docker stop mc
docker ps -al
- Fix the permissions of your world folder so docker can access it
chown -R chronos:chronos "<YOUR_WORLD>"
- Start the container back up and check out the container logs as it starts up!
docker start mc
docker logs -f mc
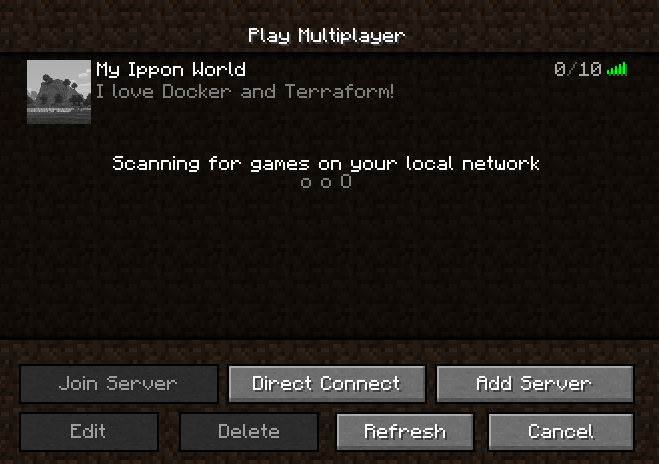
Connecting
- Open Minecraft
- Hit multiplayer
- Click add server, set the server name, and input the external IP address from your GCP console
Wrapping Up!
This post is already long, and there's so much more you can do with this framework. I suggest checking out the original blog post and attached Google Doc for more ways to customize your experience. Different disk sizes, machine types, operating systems ("debian-cloud/debian-9" instead of "cos-cloud/cos-stable"), keeping preemptive on, giving permission to friends to turn the server on etc. There's a lot of fun stuff to play around with here.

Comments