


Published November 8, 2023
In this two part Blog Series, I would like to share with you an in-depth guide. The topic is migrating from a large, self managed Postgres database running on Elastic Compute Cloud (EC2). The source database is running Postgres version 9.6. The target database for the migration is none other than Amazon Web Service's Relational Database Service (RDS) running Postgres engine version 12.
Overview
In order to get all of the data out of the source database and into RDS without ever stopping the source database, albeit briefly, we have to run this Rube Goldberg process. If you are unsure what type of migration plan you need to run, please reference my other blog post AWS MAP - Migrating Postgres from Self-Managed EC2 to RDS. There are two main phases to the migration plan. After all prerequisites have been met - Phase I can be kicked off.
Phase I - Full Load: use pg_dump and \copy to get the bulk of the data transferred. The full load portion utilizes the maintenance read replica (see below) in a paused state and the RDS instance. DMS does provide a full load option, but on certain databases, it can fail to complete. Part 1 of the series will cover all the steps to get through the Prerequisites section and Phase I.
Phase II - Change Data Capture with DMS: use multiple DMS tasks to transfer the remaining "data delta" into RDS. The Data Delta is simply any data that has come into the database after pausing the Maintenance Read Replica. Phase II is performed against the Source Database, i.e. - the primary. Part 2 of the series will cover all the steps necessary to complete Phase II, and hopefully, the database migration.
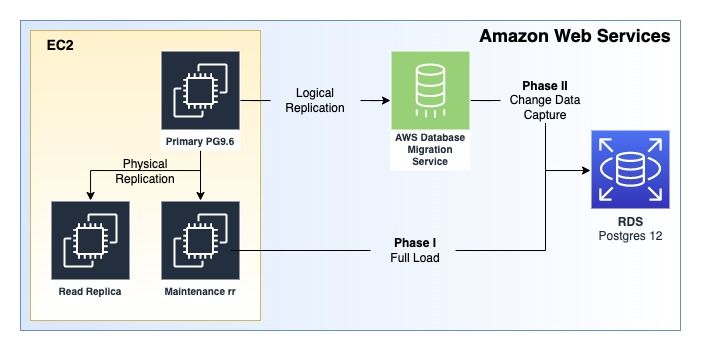
This diagram shows the AWS Infrastructure that is used for this migration.
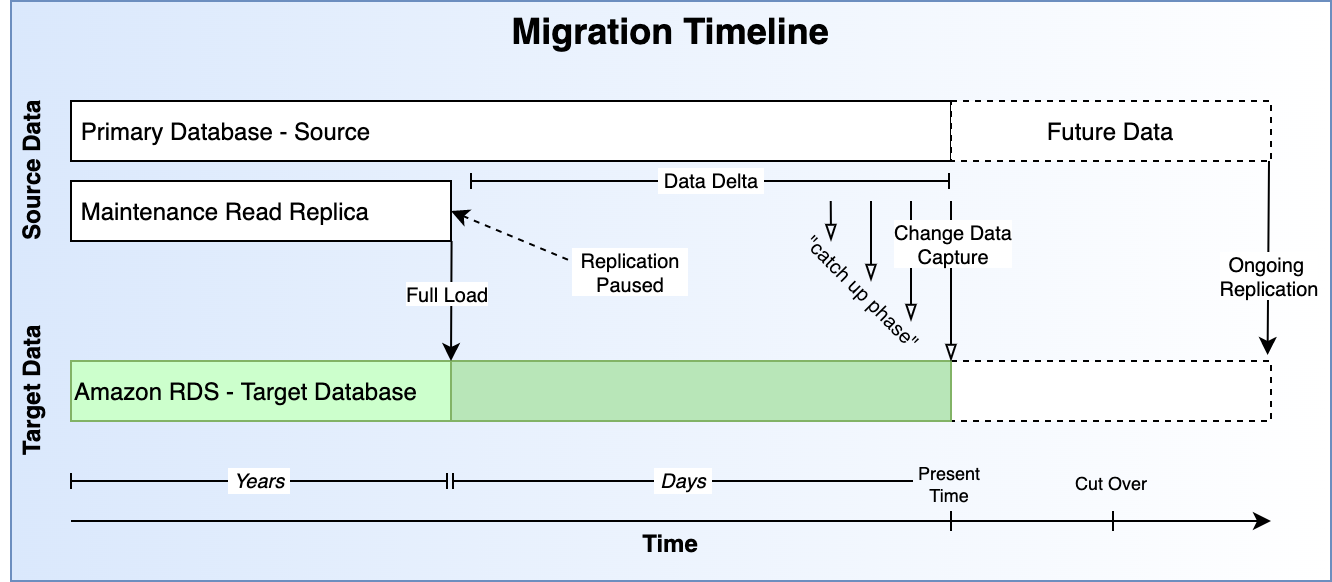
This diagram shows the timeline of the different phases of the migration.
Environment Notes
Environment: For illustration purposes, consider this setup. A Client has a Primary Database, a Read Replica, and then a second "maintenance" Read Replica. Both read replicas are replicating from the primary database using built-in Postgres 9.6 "log shipping". See Postgres Replication - Log Shipping. Most of this plan can be adapted to work with different environment setups, I will try to describe in as much detail as possible where trade-offs exist.
Constraints - The primary database can not be stopped for any significant period of time, even for a maintenance window. The Secondary (read replica) similarly cannot be stopped for any period of time. A separate read replica was created to allow this work to be done and still maintain a strong Disaster Recovery Posture.
Database size: approximately 4.5 TB. 10s of billions of rows with single tables being upwards of 1 TB.
Justification
This strategy poses near zero risk to current production operations. If the migration is successful, the required maintenance window will just be a database "cutover". We utilize native Postgresql utilities and AWS DMS on top of pglogical for additional functionality and visibility.
We use pglogical to enable a cross-version migration. This allows us to minimize the number of maintenance windows and high-risk tasks within the production setup.
Naming Conventions
Primary = Source = Production Database
Secondary = Production Read Replica
Secondary = Maintenance Read Replica
RDS = New Primary = Target
In the steps below, I will use a combination of the above naming conventions. When discussing replication via DMS CDC leveraging pglogical, I will simply say source or target. In a migration attempt, the source for the CDC portion is the Production Database, the primary. The target will always refer to RDS.
For the Full Load portion, the Maintenance Read replica will be utilized and I will refer to it simply as "the secondary" or the "maintenance read replica". The Production Read Replica is never touched during this process.
Prerequisite Steps
Install the pglogical extension on the Source (production primary database), and on the Target (RDS). The secondary does not require the pglogical extension.
Create a Maintenance Read Replica
In order to minimize risk and in an effort to not interfere with production, a fresh, separate read replica should be created and utilized for the migration. Replication will be paused on this new separate read replica before performing full load, the current production read replica will continue to replicate and can still be used in the case of an emergency. Information surrounding the point-in-time backup will be garnered from this new read replica and used to load any changed data after the full load is completed.
Add pglogical repo to Source
For the source database, the following steps may differ slightly depending on the underlying OS that you are running. The following sample steps are for a system running Ubuntu 16.04, please note, that your mileage may vary.
- Find the pgdg.list `cd /etc/apt/sources.list.d
- Edit the list to include the apt-archive repository `vim pgdg.list
- Change the entry to match this one:
deb [trusted=yes] http://apt-archive.postgresql.org/pub/repos/apt/ xenial-pgdg main
- Run
sudo apt update - Verify package with `apt list | grep pglogical
- Run `sudo apt-get install postgresql-9.6-pglogical to install pglogical
- Follow the next series of steps (install pglogical) to get postgresql 9.6 to load the plugin
Install pglogical on Source
pglogical must be installed on the source database running on EC2 as well as the target running on RDS. The github repo for pglogical will have the latest, most up-to-date instructions on how to install. Installation into the source database involves changing postgresql.conf settings. On Ubuntu, these settings are located in /etc/postgresql/9.6/main/. Note: Installation requires a database restart.
Sample Procedure:
- SSH into the source database. Be careful, this is the main production database!
- Run:
sudo -sand thencd /etc/postgresql/9.6/main - Edit the file with
sudo vim postgresql.conf - Make sure these settings are set to the following values (or higher).
shared_preload_libraries= 'pglogical'
wal_level = logical
max_replication_slots = 10
max_wal_senders = 10
wal_sender_timeout = 0
max_worker_processes = 10
track_commit_timestamp = on
- Restart the database with
systemctl restart postgresql.service - Log in to the Source Database:
sudo -u postgres psql - Connect to the desired database using
\c {database_name} - Create the pglogical extension:
create extension pglogical; - Verify the installation:
select * FROM pg_catalog.pg_extension;
Sample Return Data:
     **extname       | extowner | extnamespace | extrelocatable | extversion | extconfig | extcondition
--------------------+----------+--------------+----------------+------------+-----------+--------------
plpgsql            |       10 |           11 | f              | 1.0        |           |
hstore             |       10 |         2200 | t              | 1.2        |           |
pg_stat_statements |       10 |         2200 | t              | 1.3        |           |
pgcrypto           |       10 |         2200 | t              | 1.2        |           |
tablefunc          |       10 |         2200 | t              | 1.0        |           |
pglogical          |       10 |    585589989 | f              | 2.3.4      |           |
(6 rows)**
Install Target Version of PSQL on the Maintenance Read Replica
We need to make sure that we have a version of psql on our machine that matches the version of PostgreSQL on the Target Database. Find out which version of PostgreSQL you are migrating to, and then install that version of the psql tool on your machine.
Use whichever package manager your system supports. Here is an example using Ubuntu 16.04:
apt list | grep postgresql-client
sudo apt-get install -y postgresql-client-12
Replace the version number of postgresql-client-XX with whatever version you are migrating to. If you do not see the version listed, you may need to update your apt repo. Installing psql using this method will ensure that you don't accidentally install a different version of Postgresql on a system that is potentially already running an earlier version of Postgresql.
Setup RDS
Follow the typical process for creating an RDS instance.
To install pglogical on RDS follow this guide. (Steps 1 - 3 only).
There are a lot of settings and things to consider (sizing and such), but these processes are well documented on the internet.
Fresh Schema Dump
The schema dump should be performed as close to the start of the full load procedure as possible. This will ensure that the schemas on the source and the target match. Use pg_dumpall to ensure that all database objects are copied (i.e. - read user).
Here is an example of getting the schema dump to a file (to be run against the source database):
--On a system with access to the source database, like the maintenance read replica
pg_dumpall -l {database_name} -p 5432 -U {database_user} -s > dump_schmea_and_global.sql
Here is an example of restoring the schema dump to RDS. This can be run from any EC2 instance with psql & access to RDS. First, put a copy of the file from the last step on that box. You will be prompted for the password to RDS.
--On the Command Line
psql -d {database_name} -h {rds_host_string} -p 5432 -U {database_user} -f dump_schmea_and_global.sql
Next, add the extension for pglogical (all other extensions will be created in the previous step) if not already present.
--On the RDS Instance
CREATE EXTENSION pglogical;
Get to Know the Data
Now that we have our hands on the database schema, there are a couple of things we need to identify. One of the ways that we will be splitting up our tables for the migration process is based on the information contained within the database schema.
Compile a list of tables that have both a Primary Key and a separate Unique Constraint. Tables that fall into this category have a few special steps. Search the schema for unique: true or use some other mechanism to identify the tables. Once you have the list of tables, you will need to go through the painstaking process of writing a script to remove all of the unique constraints. That is - a saved document that has SQL commands that you can copy and paste into psql later on in the steps.
Run this command on one of the tables to describe it:
\d table_name
There will be a section called Indexes. Mark down the name of the any indexes that say UNIQUE. Set this list aside to be used later on during the migration.
Migration Steps - Phase I - Full Load
Each Replication Slot will map to one DMS task. It is important to put tables together that make sense. For instance, huge and very busy tables should have a fully dedicated slot. Tables that have primary keys and unique constraints should be put together. Tables that are closely related should be kept in the same slot. Do your research and run lots of tests. After each iteration of the migration process, apply new settings and resolve issues that arise. This is by far the hardest part of the migration to nail down properly.
Step 1 - Replication Slots
Create the replication slots on the source database - there will likely need to be several. Each replication slot will perform logical decoding of the wal_log for their specified tables contained within their respective replication sets. Make sure to test the impact of multiple replication slots on the primary database. For this guide, we are going to use 6 replication slots. Note the name of the slot, as it will be used later to create the replication sets used by pglogical.
--On the Source Database
SELECT * FROM pg_create_logical_replication_slot('dms_slot_01', 'pglogical');
SELECT * FROM pg_create_logical_replication_slot('dms_slot_02', 'pglogical');
SELECT * FROM pg_create_logical_replication_slot('dms_slot_03', 'pglogical');
SELECT * FROM pg_create_logical_replication_slot('dms_slot_04', 'pglogical');
SELECT * FROM pg_create_logical_replication_slot('dms_slot_05', 'pglogical');
SELECT * FROM pg_create_logical_replication_slot('dms_slot_06', 'pglogical');
After the database creates the replication slots, note the restart_lsn and the confirmed_flush_lsn for all slots on the Source (primary). This information can be used for troubleshooting purposes if a migration attempt fails (which it will - you will test, make tweaks and run again).
--On the Source Database
select * from pg_replication_slots;
Sample output:
slot_name | plugin | slot_type | datoid | database | active | active_pid | xmin | catalog_xmin | restart_lsn | confirmed_flush_lsn -------------+-----------+-----------+--------+---------------------+--------+------------+------+--------------+----------------+---------------------
dms_slot_01 | pglogical | logical | 16400 | db_name | f | | | 2087144987 | 35FE3/46194620 | 35FE3/463C2B08
dms_slot_02 | pglogical | logical | 16400 | db_name | f | | | 2087144987 | 35FE3/472ACCC8 | 35FE3/4737C6C8
dms_slot_03 | pglogical | logical | 16400 | db_name | f | | | 2087144987 | 35FE3/47B7C6F0 | 35FE3/47B86480
dms_slot_04 | pglogical | logical | 16400 | db_name | f | | | 2087144987 | 35FE3/486790B8 | 35FE3/488671E8
dms_slot_05 | pglogical | logical | 16400 | db_name | f | | | 2087144987 | 35FE3/4903FA28 | 35FE3/491B8EE0
dms_slot_06 | pglogical | logical | 16400 | db_name | f | | | 2087144987 | 35FE3/4985FF50 | 35FE3/49AA2C90 (6 rows)
Notice the active column which reports a value of f. A value of false in this column is to be expected, as we have not begun consuming any information from these replication slots. As long as this column returns a false value, log files will slowly start to fill storage.
IMPORTANT: If at this point in the migration plan, you see a slot that you did not explicitly create and it reports a value of true or just t in the active column, it means there could be some form of logical replication already in use on the database. Be sure to verify the use of logical replication with other team members and ensure that you do not interrupt any production workloads - i.e. - an existing read replica that is using logical replication versus physical replication or streaming. Be careful if you are performing these steps on a production database.
Step 2 - Create a Pglogical Node
Create a pg_logical node on the Source Database (the primary). If the node already exists - and you are confident that no other form of replication depends on it, drop the node and recreate it.
Drop Node
--On the Source Database
select pglogical.drop_node('{node_name}')
Create Node - populating the required fields
--On the Srouce Database
select pglogical.create_node(node_name := 'provider1', dsn := 'host={ip_address} port={port} dbname={db_name} password={password} user={db_user}');
Step 3 - Create Replication Sets
Create the replication sets. Note - the name of the replication sets must match the name of the replication slot. For instance - if the replication slot is dms_slot_01 then the replication set names are dms_slot_01 and idms_slot_01 respectively. Each replication slot will have two replication sets named after it.
--On the Source Database
SELECT pglogical.create_replication_set('dms_slot_01', false, true, true, false);
SELECT pglogical.create_replication_set('idms_slot_01', true, false, false, true);

SELECT pglogical.create_replication_set('dms_slot_02', false, true, true, false);
SELECT pglogical.create_replication_set('idms_slot_02', true, false, false, true);

SELECT pglogical.create_replication_set('dms_slot_03', false, true, true, false);
SELECT pglogical.create_replication_set('idms_slot_03', true, false, false, true);

SELECT pglogical.create_replication_set('dms_slot_04', false, true, true, false);
SELECT pglogical.create_replication_set('idms_slot_04', true, false, false, true);

SELECT pglogical.create_replication_set('dms_slot_05', false, true, true, false);
SELECT pglogical.create_replication_set('idms_slot_05', true, false, false, true);

SELECT pglogical.create_replication_set('dms_slot_06', false, true, true, false);
SELECT pglogical.create_replication_set('idms_slot_06', true, false, false, true);
Note: the name of the replication set having to match the replication slot name is an artifact of using AWS DMS for CDC in phase II. If you are performing a purely pglogical approach, then this guide is not for you, although a lot of the setup and lessons learned still apply.
Step 4 - Populate Replication Sets
Add all of the tables that need to be migrated to the replication sets. NOTE - you should have a general idea about the schema and the data contained within the tables - make sure you have separated your replication sets according. For instance:
dms_slot_01- a Huge table, all by itselfdms_slot_02- a Collection of larger tables, but not too many!!dms_slot_03- a Collection of larger tables with Primary Keys and Unique Constraints- These tables may require different settings.
dms_slot_04- Similar to slot 2 but small tables and probably a lot more!- etc... These different replication sets (and therefore the replication slots they reference) will eventually be mapped to Change Data Capture (CDC) tasks in AWS DMS. Refer back to this step after reading the section on CDC in Part 2 if need be.
NOTE: Set aside the list of tables that have a Primary Key and a separate Unique Constraint from the prerequisite steps. They will be used later before the Full Load process starts.
To add the tables, run these commands on the source database.
--On the Source Database
select pglogical.replication_set_add_table(set_name := 'dms_slot_01', relation := 'some_table_001', synchronize_data := false);
select pglogical.replication_set_add_table(set_name := 'idms_slot_01', relation := 'some_table_001', synchronize_data := false);

select pglogical.replication_set_add_table(set_name := 'dms_slot_02', relation := 'some_table_002', synchronize_data := false);
select pglogical.replication_set_add_table(set_name := 'idms_slot_02', relation := 'some_table_002', synchronize_data := false);

select pglogical.replication_set_add_table(set_name := 'dms_slot_02', relation := 'some_table_003', synchronize_data := false);
select pglogical.replication_set_add_table(set_name := 'idms_slot_02', relation := 'some_table_003', synchronize_data := false);

--etc...
Notice how each table gets added to two replication sets? Earlier, when we created the replication sets, we had one set for insert and truncate, and then another set for update and delete. Every table in your database should be added to two sets. Tables without primary keys will throw an error saying that they cannot be added to a replication set that replicates updates and deletes. This is to be expected.
If this step is confusing or if you feel like you are missing part of the puzzle, please read through the pglogical documentation as well as the AWS DMS pglogical documentation. There are two sections in the AWS documentation that I want to highlight.
- Under the section "Enabling change data capture (CDC) using logical replication" there is a sub-section called "configuring the pglogical plugin".
- Also familiarize yourself with the "notes" regarding
REPLICA IDENTITY FULLand read up onrestart_lsnandwal_logs. Check back frequently for a write-up on "all you need to know about postgresql wal_logs".
- Also familiarize yourself with the "notes" regarding
- Under the section "Using native CDC start points to set up a CDC load of a PostgreSQL Source" there is a sub-section called "To use a new replication slot not previously created as part of another DMS task".
- This section is crucial. Because we are performing the full load portion of the migration outside of DMS, we will not have "previously created" a replication slot through DMS.
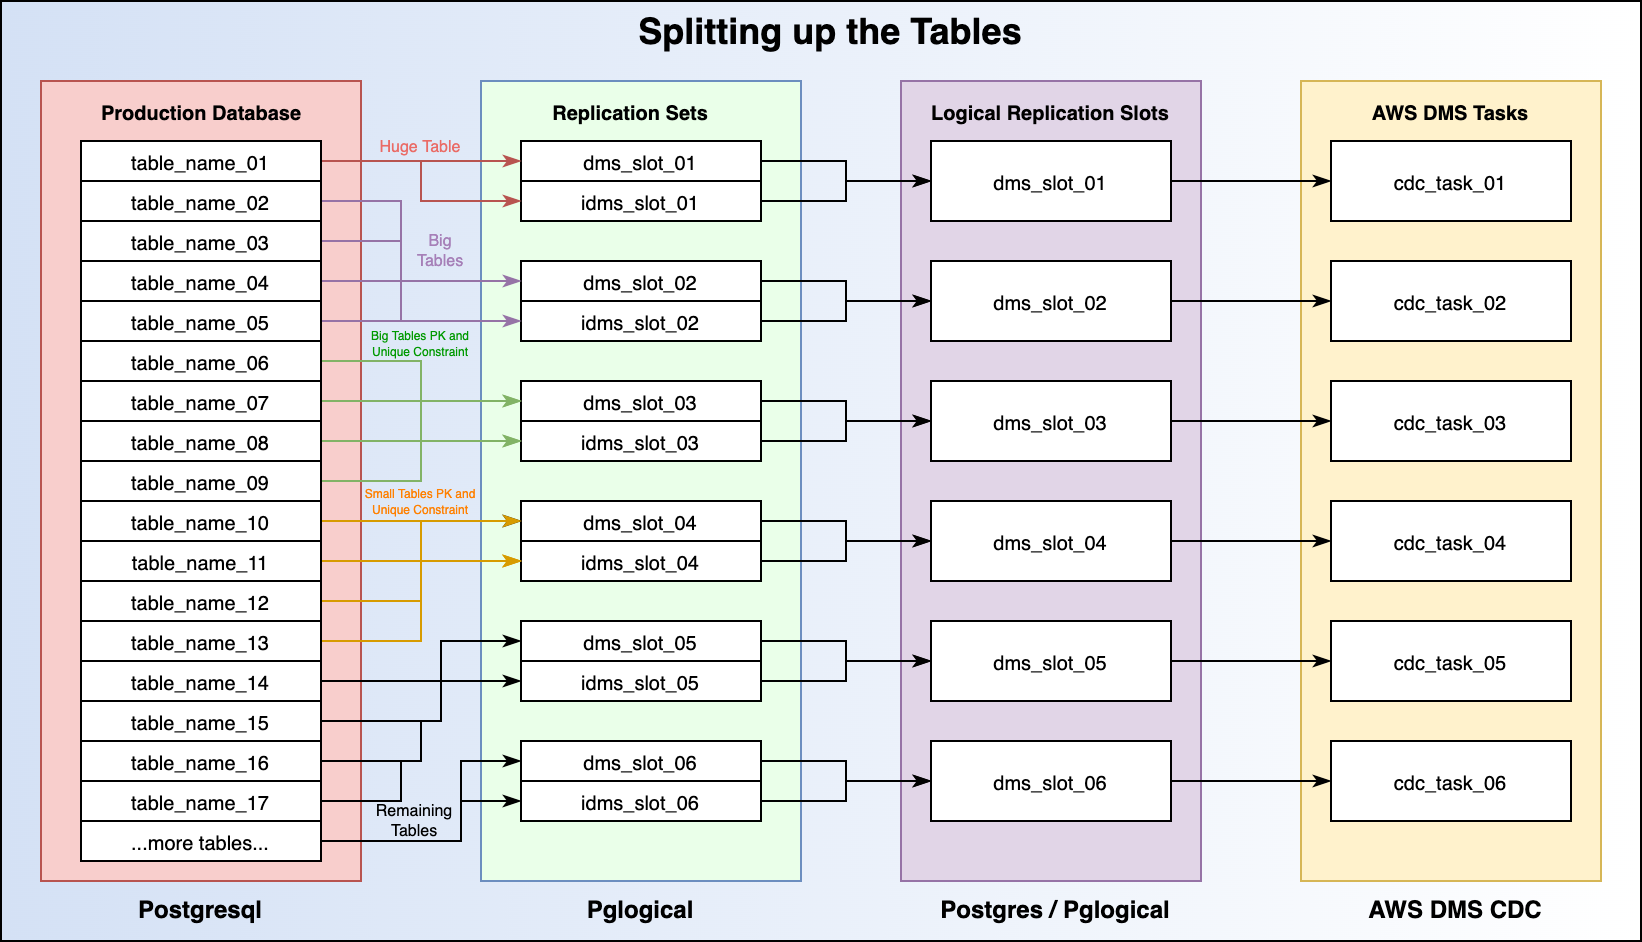
This diagram shows an overview of the logical separation between tables, replication sets, replication slots, and future DMS Tasks.
Step 5 - Pause the Maintenance Read Replica
Now that all of your database tables have been added to their respective replication sets, it's time to pause the Maintenance Read Replica and verify the existence of a usable restart_lsn (restart log sequence number). You can think of the log sequence number as a mile marker on the highway. You need this number to be able to tell DMS where to pick up replication.
Pause the Maintenance Read Replica - more info on postgresql administrative functions here.
--On the Maintenance Read Replica
select pg_xlog_replay_pause();
select pg_is_xlog_replay_paused(); --Should return true if replication is paused.
Note: if you are using a newer version of Postgresql (v10 or higher) for the Source database, the command may look more like this:
select pg_wal_replay_pause();
select pg_is_wal_replay_paused();
In earlier versions of Postgres, the write-ahead log was called the xlog, which loosely means "transaction log". Version 10 of postgresql saw the name changed to the wal_log. The wal_log stands for write-ahead log and is a core concept in database replication, not just for postgresql either. I highly recommend reading up on the wal_log as it is pivotal to understanding how and why this migration method works and the underlying mechanism behind it. More information regarding the write-ahead log and postgresql internal operations can be found in the docs.
Note: Now that the read replica is paused, it will begin storing xlogs or wal_logs on disk. Be sure to monitor your database system to ensure that storage does not run out! If you start to run out of storage space, you can change where the logs are stored by editing the postgresql.conf file and performing a config reload. If you are facing a disaster scenario and just need to free up space as fast as possible, then proceed to drop the logical replication slots on the source database. This will cause you to have to start back from step 1 if you are following this guide.
Step 6 - Capture the Log Sequence Number
With the Maintenance Read Replica paused, we are ready to capture our log sequence number.
The command to do so is as follows:
--On the Maintenance Read Replica
select pg_last_xlog_replay_location();
On postgresql version 10 and higher the command is:
select pg_last_wal_replay_lsn();
More information regarding this command can be found in the docs.
Sample return value:
postgresql_db=# select pg_last_xlog_replay_location(); pg_last_xlog_replay_location
------------------------------
 35FE3/B63D4718 (1 row)
In the above sample output, 35FE3/B63D4718 is called a log sequence number. This is the value that we will be passing to DMS to specify a CDC Start position. Make sure to mark this down for the next step. It will also be used to verify that the "pause" position that we have on the Maintenance Read Replica exists inside the Logical Replication Slots that we created on our Source Database.
Step 7 - Verify Pause Point on the Primary
Take the log sequence number you wrote down from the previous step and keep it handy. We are going to log into to Source Database (the Primary Production Database) and run a few non-intrusive commands.
Using psql on the source database, run this command:
SELECT location,xid, jsonb_pretty(data::jsonb) FROM pg_logical_slot_peek_changes('dms_slot_01',null, null, 'min_proto_version', '1', 'max_proto_version', '1', 'startup_params_format', '1', 'proto_format', 'json', 'pglogical.replication_set_names', 'dms_slot_01,idms_slot_01') where location='{LSN_FROM_MAINTENANCE_READ_REPLICA}';
For Postgresql version 10 or higher, the command is:
SELECT lsn,xid, jsonb_pretty(data::jsonb) FROM pg_logical_slot_peek_changes('dms_slot_01',null, null, 'min_proto_version', '1', 'max_proto_version', '1', 'startup_params_format', '1', 'proto_format', 'json', 'pglogical.replication_set_names', 'dms_slot_01,idms_slot_01') where location='{LSN_FROM_MAINTENANCE_READ_REPLICA}';
Be sure to replace dms_slot_01, idms_slot_01 with whatever you named your replication slots and replication sets. Replace {LSN_FROM_MAINTENANCE_READ_REPLICA} with the log sequence number. Run this command for each Logical Replication Slot and its respective replication sets. We are simply looking for the command to not return an error. Here is a sample successful return value:
location | xid | jsonb_pretty ----------------+------------+----------------------------------- 354AD/3811D1C8 | 1504600818 | { + | | "action": "C", + | | "end_lsn": "354AD/3811D1C8", + | | "final_lsn": "354AD/3811D198"+ | | } (1 row)
If it returns 0 rows or says anything at all about a change, then the Log Sequence Number is valid and we are safe to proceed! If you would like to understand better the Postgresql Internals surrounding the Write Ahead Log, check out chapter 9 of this E-Book.
Step 8 - Prep Target for Full Load
In the pre-migration steps, we compiled a list of indexes that were unique and lived on tables that also had primary keys. Before we kick off the Full Load process, we need to log in to the RDS instance and remove these Unique Indexes. This will ensure that the full load process can insert all of the data required without erroring out. This step will catch a very sneaky bug that can arise and cause data integrity issues.
Here is a sample script that will be copied and pasted into the psql command prompt:
--On Target RDS Instance
DROP INDEX index_table_name_01_on_table_06_field_id;
DROP INDEX index_table_name_02_on_table_03_field_id;
DROP INDEX index_table_name_05_on_some_other_field_id;
If the database you are attempting to migrate is rather large then this list is probably gonna be pretty huge!
Step 9 - Perform Phase I - Full Load
In the "Pre Migration Steps" you will have installed the version of the psql tool that matches the Target Database version of PostgreSQL. This will ensure that when we "dump" the data from our paused maintenance read replica, we are getting an output that is compatible with our target database.
This step is where Phase I truly kicks off. The "Full Load" portion of this migration is less complicated and less error-prone than Phase II - CDC, but still has a few gotchas. In order to make the full load operation run as fast as possible, we want to do it in parallel. This means once again figuring out the proper "split" for the tables. I recommend taking your 5 largest tables and doing them each in a separate screen session. Then put all of the remaining "smaller" tables into a 6th screen session and kick them all off at the same time.
The reason we use screen sessions is some of these full load operations can take days to finish. If you use a screen session, then it won't matter if you get logged out of the terminal. The operations will continue to run and you will be able to "reattach" to the sessions and check on the operation. I also recommend turning on "performance insights" in your RDS monitoring settings so that you can see which SQL commands are running and how far along the Full Load process is.
Here are the commands, including the screen session creations:
screen -S table_name_01
This will land you in a fresh new screen session, now run the commands to perform the full load operation:
echo START TIME is: `date +"%Y-%m-%d %T"` &&
/usr/lib/postgresql/12/bin/pg_dump {database_name} -p 5432 -U {database_user} -t {big_table_name_01} | psql -d {database_name} -h {RDS_host_endpoint} -p 5432 -U {database_user} &&
echo END TIME is: `date +"%Y-%m-%d %T"`
Okay, a few things to note:
- This command will start by printing the "START TIME" and will end by printing the "END TIME". This information is invaluable for subsequent migration attempts when it comes to planning time frames, be sure to record the start and stop time once the dump and load are complete.
- Note the use of the PATH to the
psqlbinary that we installed in the pre-migration steps. Be sure to verify the location and the version of yourpsqlbinary. - This command may prompt you for a database password - enter your database password to continue.
- All of the large tables will use the
-t table_namesyntax. This just tellspg_dumpthat we want to only dump this one single table
To exit the screen session and create the next one, simply press[ctrl]-aand then pressd. To list all existing screen sessions, typescreen -ls. Kick-off screen sessions andpg_dumpfor the remaining large tables.
Now we need to pg_dump the remaining small tables. This command differs slightly, so make sure to double-check what you are typing into the command prompt!
screen -S small_tables
then:
echo START TIME is: `date +"%Y-%m-%d %T"` &&
/usr/lib/postgresql/12/bin/pg_dump {database_name} -p 5432 -U {database_user} -T {big_table_name_01} -T {big_table_name_02} -T {big_table_name_03} -T {big_table_name_04} -T {big_table_name_05} | psql -d {database_name} -h {RDS_Host_string} -p 5432 -U {database_user} &&
echo END TIME is: `date +"%Y-%m-%d %T"`
Notice how we use a Capital T and list out the big tables that we have already started dumping? The big T tells pg_dump to exclude these tables. If we get the command just right, it means that it will dump all of the tables in the database with the exception of the ones listed. You can read more about pg_dump and the different flags here.
The pg_dump process will add back the indexes that were removed in the previous step, though it's a good idea to make sure you have a good way to verify that all of the indexes were correctly added back to the Target Database.
Step 10 - Quick QA
Before moving on to Phase II of the migration, take some time after a full load has been completed to spot-check a few tables. This is simply to ensure that the full load process indeed moved all the data from the paused Maintenance Read Replica into the target RDS instance.
Sample spot check:
--Run on both Paused Maintenance Read Replica and Target RDS Instance
SELECT
date_trunc('month', created_at) as created_by_month,
count (*)
FROM
{table_name}
WHERE
created_at BETWEEN '01-01-2020 0:00:00.000000' AND '07-01-2023 23:59:99.999999'
GROUP BY
date_trunc('month', created_at)
ORDER BY
created_by_month;
Adjust the above query to something that makes sense for your data and then compare the month-over-month row count between the two databases. Do this for every large table that you transferred and also a random sampling of the smaller tables too!
If everything looks good, move on to the next step.
Step 11 - Resume Maintenance Read Replica
Once Full Load has been completed, and you can verify that all of the screen sessions have completed their respective pg_dump commands, it is time to resume the Maintenance Read Replica. This will achieve two things. First and foremost, it will allow the read replica to catch back up to the primary database, therefore making it ready for any subsequent migration attempts. Secondly, it will stop any wal_log or x_log build-up on the primary. There are still other logical replication slots in play that will be causing said log files to build up, but at least this will take care of one of the causes of the build-up.
To resume replication on the Maintenance Read Replica, simply log into the database using psql and run this command:
--On the Maintenance Read Replica
select pg_xlog_replay_resume();
select pg_is_xlog_replay_paused(); -- should return false if replication is resumed
For Postgresql version 10 or higher:
select pg_wal_replay_resume();
select pg_is_wal_replay_paused();
You can now log out of the Maintenance Read Replica, its job is done and it has served its purpose. Do not decommission this server until the migration has been successfully completed. If you have to do the migration again, you will once again need this replica.
Conclusion
In Part 1 of this series, we handled several pre-migration setup tasks and installed some new software on our Source and Target Databases. We planned, tested, and completed Phase I of the database migration - Full Load. Next, head over to Part 2 of the series to configure and run AWS DMS Change Data Capture tasks to move the rest of the data over to RDS.
If you get stuck or overwhelmed with the migration process, we have professionals standing by ready to provide assistance. Drop us a line at sales@ipponusa.com.

.png?width=520&height=294&name=Ippon%20(2).png)


Comments