


JHipster is a wonderful trending Open Source development platform for creating high-quality Java Spring Boot + Angular/React applications, but unfortunately some developers tend to only use the initial project generation feature and neglect entity generation and other tooling available for continued development, deployment and maintenance. In this tutorial series we will explore those tools, starting with generating applications with various configurations to creating complex entities, generating frontend components, monitoring our applications, and finally deploying both monolithic and microservice applications to the cloud with Amazon Web Services.
Getting Started
First, we need to generate an application before we can get our hands dirty creating entities and exploring what more JHipster has to offer. Under the hood, JHipster uses a custom Yeoman generator to scaffold a Spring Boot application with choices of frontend framework, database, build tool, authentication type, testing framework and more. There are also several community-created modules that can be included during initial setup or imported later.
"Why should organizations use JHipster?" by Mallik Sambaraju
There are a few ways to create a JHipster application: with an online tool, with a locally-installed command line interface (CLI), with the CLI inside a Docker container, and inside a Vagrant virtual development environment. The most popular option is local installation with Yarn.
JHipster Online is a Web tool to generate one without the need to install JHipster on your computer; Java and Yarn must still be installed on your computer to run the application unless Docker or Vagrant are used. By filling out a Web form which closely resembles the options given in the command line interface (as we will see later), an application will be generated and can be downloaded in a zip file or committed to a linked GitHub repository.
Next we will look at the various options in JHipster's application generator. Note that unless development is done inside a Docker or Vagrant container (not highly recommended), you will need to have installed Java, Git, Node.js, Yarn (or NPM) and Yeoman, in addition to the database you will choose. Optionally, install Docker for running the database inside of a container instead of on your operating system (I personally prefer managing my databases inside containers).
Generator Options
There are several choices to make when generating a new application. Using the Web form or typing the command yo jhipster or now simply jhipster, we are presented with a series of options. Some options when selected will prompt you for additional choices, such as specifying which languages to support for internationalization. Here are the list of options presented for generating a monolithic application, with most answers omitted for clarity:
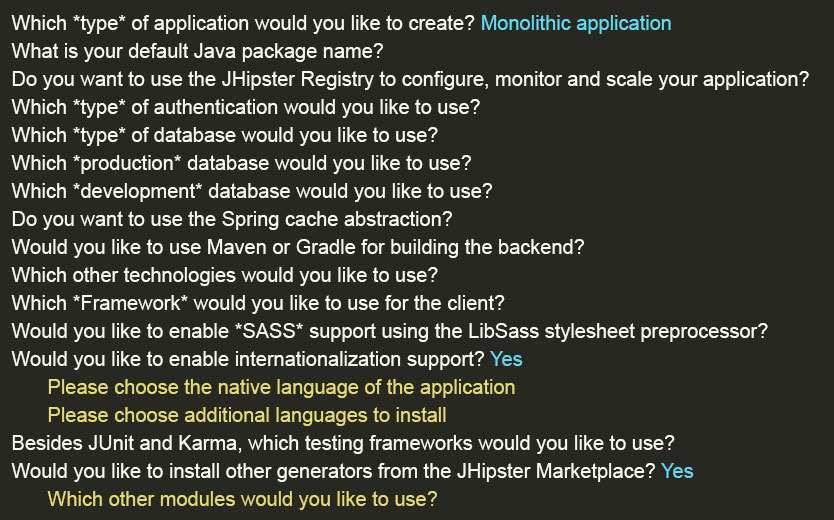
There are also several command-line options when running jhipster to generate your application; executing jhipster --skip-server will generate just the front-end code and skip the server-side part of the application, jhipster --jhi-prefix abc will change the prefix on generated services and components from the default jhi to abc, and many more. Learn more about each generator option here.
JHipster Registry
Included in all microservice applications and optionally included in monolithic applications is the JHipster Registry, a tool that provides several runtime monitoring dashboards for the application(s) and with which all microservices registers and get their configurations from.
As an administration server, it serves dashboards for logs, configuration, health checks (with Spring Boot Actuator), and performance metrics (for the JVM, HTTP requests, database connection pool, and Spring Beans methods with the @Timed annotation).
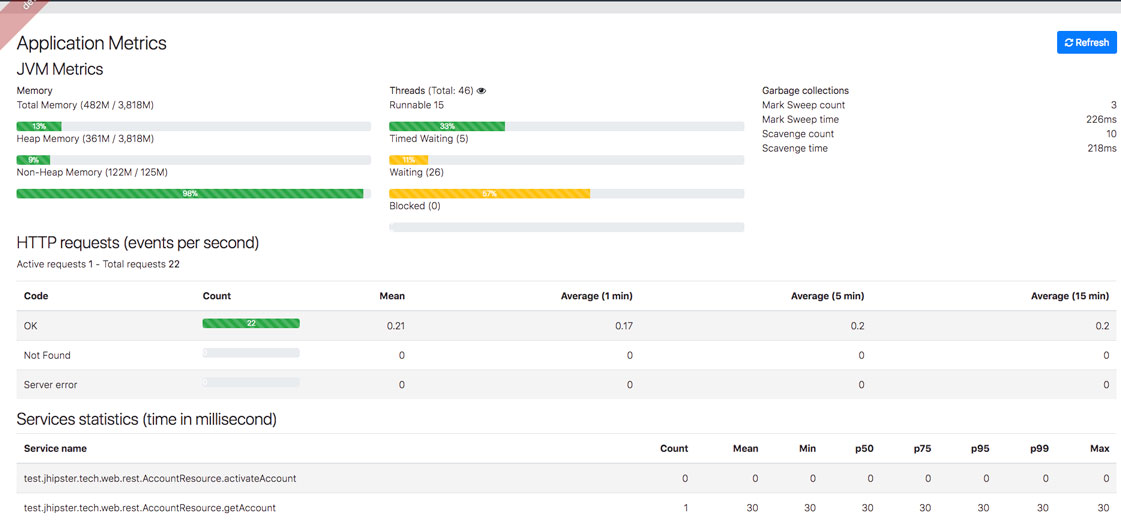
Metrics Dashboard
For microservice applications, the JHipster Registry is a Netflix Eureka service discovery server to handle routing, load balancing and scalability. It is also a Spring Cloud Config server that provides runtime configuration to all applications once they are launched. Note that the JHipster Registry only works for applications using JWT authentication. For more information on the JHipster registry, see the official documentation.
Authentication
Another awesome feature of JHipster is that it provides account management out-of-the-box. Default users are created with separate roles, such as admin and user, that restrict access to pages and features on your application. New users can be created, deleted, and modified (password and other account information), and login, logout and error views are also provided for you. However, there are multiple authentication technologies to choose from: JWT authentication (stateless, with a token), OAuth 2.0 / OIDC Authentication (stateful, works with Keycloak and Okta), and HTTP Session Authentication (stateful, default Spring Security mechanism).
Each option has its strengths and weaknesses concerning how tokens and sessions are managed, and more. For example, plain JWT authentication uses sessionstorage, which has a side-effect of its tokens not persisting across tabs or windows, but OAuth2's localstorage method does maintain login states across tabs. There is also JHipster User Account and Authentication (UAA), which is a complex service for microservice OAuth2 authentication. Read more about each authentication method technology here.
Databases
Most applications need to store data somewhere. JHipster provides several options for both production and development databases. The most popular choice is SQL for production and H2 for local development (an in-memory or on-disk SQL database written in Java). MongoDB is a very popular NoSQL database that is chosen for specific non-relational reasons. Unlike H2, other databases need to run in a container or terminal window. Docker makes this easy: simply run docker-compose -f src/main/docker/mongodb.yml up -d in the project's root directory. Without Docker you must install Mongo and start an instance with the mongod command. Find instructions for installing Mongo here.
Unsure of which type of database to use for your own project? Check out this article written by Jeannine Stark.
Another SQL database can be chosen for local development as well instead of using H2. The command to start a Docker container for MySQL is similar to that of Mongo: docker-compose -f src/main/docker/mysql.yml up -d. Without Docker you must install MySQL (or your chosen SQL database) on your machine and set up proper configurations to connect with the JHipster application.
Testing Frameworks
By default, JHipster applications come bundled with two testing frameworks, JUnit and Karma.js, for Java unit tests and Javascript unit tests, respectively. Three other options are available to add for testing other aspects of your application; Gatling for performance tests, Cucumber for behavior-driven tests, and Protractor for Angular/React integration tests which simulate using the application like a real user.
Once the application is generated, test files are placed in the src/test directory and are ran by executing ./mvnw clean test (or ./gradlew test for Gradle projects).
Modules
Modules are other generators and plugins made by the community that offer integrations with third-party services or provide some other functionality to JHipster applications. A few of the popular modules include adding the Ionic framework, PrimeNG user interface, and React, which will be officially supported in the main JHipster generator in version 5.
For a complete list of modules visit the marketplace. You can also create and contribute your own module! Find the instructions for creating a module here and check out this article by Théo Lebrun where he explains how to create a module to customize JHipster to fit your needs.
Finishing Up
Once you've finished picking your options, either in the command line interface or Web form, the scaffolded application will be generated. If the online Web form was used, simply extract the zip file to your chosen directory or pull the code from the linked GitHub repository. Run yarn install (or npm install if npm was chosen) to install dependencies; once completed, execute ./mvnw for Maven projects or ./gradlew for Gradle projects to build and run the backend, and in another terminal window in the same directory execute yarn start (or npm start) to run the frontend.
Thanks for reading, I hope you found this information useful. If you have any questions about the generator options or anything related to JHipster, check out the documentation and ask the community a question on Stack Overflow with the tag jhipster. In the next post we will dive deep into JHipster's default tools and generating several entities with relationships of various complexities.
At the time of this writing, the current version of JHipster is v4.14.4 and the next major version, v5.0, is in beta. Version 5 will bring official support for another frontend framework React among many improvements. A follow-up post will be written for JHipster 5's release. This series is written using a MacBook Pro running High Sierra; some steps will be different for other operating systems.


Comments