
This article is part of a series of three articles about Docker:
- Docker and permissions management
- Set up a reverse proxy Nginx and Docker-gen (Bonus: Let's Encrypt)
- Tips and reminders for using Docker daily
Today, we continue our blog post series about Docker and I would like to show you how to access your containers through your domain.
A little bonus is waiting for you at the end of this article with HTTPS configuration called “Let's Encrypt”.
To illustrate this, I will set up three containers:
- Owncloud
- Mysql
- nginx-proxy (the reverse proxy)
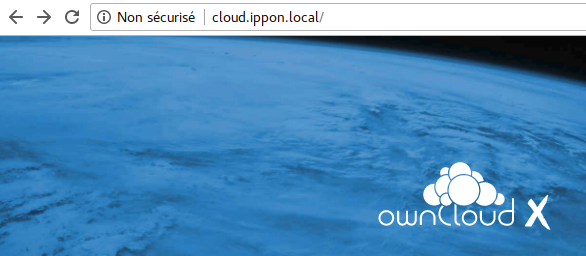
We will see how to use the subdomain ‘cloud.ippon.local' to access an Owncloud listening on port 8080. Furthermore this is a great use case for Docker Compose:
version: "3"

services:

  mysql:
    image: mysql:8.0.3
    hostname: mysql
    ports:
        - 3306:3306
    environment:
      MYSQL_ROOT_PASSWORD: root
      MYSQL_DATABASE: owncloud
      MYSQL_USER: ippon
      MYSQL_PASSWORD: ippon
    networks:
      - ippon

  owncloud:
    image: owncloud:10.0.3
    hostname: owncloud
    ports:
      - "8080:80"
    networks:
      - ippon

networks:
  ippon:
This is the minimal configuration allowing you to set up a Mysql database with an ‘owncloud' table and the Owncloud application.
Currently, you can access the database with:
$ mysql -h 127.0.0.1 -u ippon -p
Enter password: ippon
and to access Owncloud: http://localhost:8080
For this example, we would like to use the ‘cloud.ippon.local' subdomain.
We will register it in your ‘/etc/hosts' file but in a real case, you would have to register it in the DNS zone of your favorite domain manager.
In /etc/hosts:
127.0.0.1 cloud.ippon.local
Configuration example of the DNS zone in Online.net's console:

Let's move to the heart of the solution: nginx-proxy. Nginx-proxy is a Docker image based on the famous web server Nginx and docker-gen, a tool using the container's environment variables to generate virtual host configurations and automatically apply them to Nginx.
First of all, add to our ‘docker-compose.yml' the nginx-proxy service:
nginx-proxy:
    image: jwilder/nginx-proxy
    ports:
      - "80:80"
    volumes:
      - /var/run/docker.sock:/tmp/docker.sock:ro
      - /apps/docker-articles/nginx/vhost.d:/etc/nginx/vhost.d
    networks:
      - ippon
So that docker-gen receives the Docker daemon's events, we have to add a volume for the socket. The second volume allows you to add your own configurations to the generated virtual hosts.
The last step is to add some environment variables to our Owncloud container. With them, docker-gen knows it has to generate a virtual host linked to our subdomain:
owncloud:
    image: owncloud:10.0.3
    hostname: owncloud
    ports:
      - "8080:80"
    networks:
      - ippon
    environment:
      VIRTUAL_HOST: cloud.ippon.local
      VIRTUAL_PORT: 8080
The two environment variables used here are ‘VIRTUAL_HOST' which sets the desired subdomain and ‘VIRTUAL_PORT' which sets which port to use. When only one port is exposed, like in our case, docker-gen does not need this last variable but when multiple ports are exposed and ‘VIRTUAL_PORT' is not set, port 80 is used by default.
I will let you start the stack and appreciate the result:
$ docker-compose up
To finish Owncloud's configuration, you can use the Mysql service's hostname which will be automatically resolved by Docker's DNS: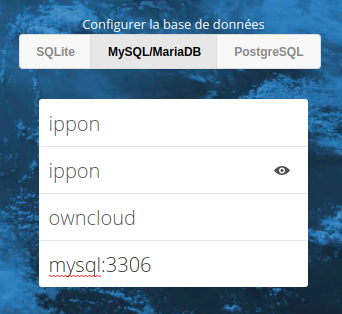
As we saw, Nginx-proxy with Docker-gen is a nice solution for a reverse proxy for your containers. Its strength comes from its simplicity combined with Nginx's robustness. You are now able to bootstrap a simple Docker architecture with Docker Compose and use it with your own domain. If you plan to use this solution, keep in mind that you can customize generated Nginx configurations, and if you prefer to have a UI, you might be interested in Træfik.
Sources:
- https://hub.docker.com/r/jwilder/nginx-proxy/
- https://hub.docker.com/_/mysql/
- https://hub.docker.com/_/owncloud/
Bonus: HTTPS with *Let's Encrypt
A really useful thing with nginx-proxy, is that it supports automatic HTTPS configuration with Let's Encrypt. With the help of the letsencrypt-nginx-proxy-companion image, your certificates will be automatically created and renewed. Nginx-proxy will use the certificates and its configuration will be updated to also serve HTTPS.
Important details:
To work, Let's Encrypt needs to have access to your domain (http://[domain]/.well-known/acme-challenge). You will not be able to continue to test with a domain registered in /etc/hosts but you will need to use a real domain. Let's Encrypt uses a per week rate limit on generated certificates and, for that reason, you should store them in a volume so that they will not be generated at each start!
Let's start by adding to our nginx-proxy container the volumes where there will be stored files about certificates --created by letsencrypt-nginx-proxy-companion-- and a label used by letsencrypt-nginx-proxy-companion to find nginx-proxy:
nginx-proxy:
 image: jwilder/nginx-proxy
 ports:
   - "80:80"
   - "443:443"
 volumes:
   - /var/run/docker.sock:/tmp/docker.sock:ro
   - /apps/docker-articles/nginx/vhost.d:/etc/nginx/vhost.d
   - /apps/docker-articles/nginx/certs:/etc/nginx/certs:ro
   - /apps/docker-articles/nginx/html:/usr/share/nginx/html
 networks:
   - ippon
 labels:
  com.github.jrcs.letsencrypt_nginx_proxy_companion.nginx_proxy: "true"
Notice that we are, now, also exposing port 443. The subdomain will be served on both ports but, if a valid certificate is present, an automatic redirection from HTTP to HTTPS will apply.
Add to our stack the letsencrypt-nginx-proxy-companion image:
letsencrypt:
    image: jrcs/letsencrypt-nginx-proxy-companion:v1.5
    volumes:
      - /var/run/docker.sock:/var/run/docker.sock:ro
      - /apps/docker-articles/nginx/vhost.d:/etc/nginx/vhost.d
      - /apps/docker-articles/nginx/certs:/etc/nginx/certs:rw
      - /apps/docker-articles/nginx/html:/usr/share/nginx/html
We are here using the same volumes defined in the nginx-proxy service but we are allowing letsencrypt-nginx-proxy-companion to write certificates.
The last step is to add some environment variables to our Owncloud container so that letsencrypt-nginx-proxy-companion will generate the certificates and the HTTPS configuration for us:
owncloud:
    image: owncloud:10.0.3
    hostname: owncloud
    ports:
      - "8080:80"
    networks:
      - ippon
    environment:
      VIRTUAL_HOST: [your-sub-domain]
      VIRTUAL_PORT: 8080
      LETSENCRYPT_HOST: [your-sub-domain]
      LETSENCRYPT_EMAIL: apocheau@ippon.fr
Replace [your-sub-domain] by the value you would like to use then start the stack, you will then be entitled to a beautiful green https: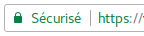
Sources:

Comments