

Before building a progressive web app (PWA), we need to understand what exactly that means. Throughout my research on progressive web apps, I found many different definitions with a common theme; web applications that provide a native experience. This means the application must be installable from the users' browser onto their device. Before a user can install the application it must meet three baseline criteria. To be considered a PWA, each application must have a service worker, a web app manifest, and to be served over HTTPS.
Turning a web application into a progressive web app makes it easier to grow engagement with existing users and increase conversions with new ones. Users are more likely to engage with your application if it were on their home screen versus navigating to your website. With JHipster I'll show that it's easy to make a progressive web app.
What is a Service Worker
A service worker is similar to other scripts running in HTML with one key difference. This javascript file has no access to the DOM and that is because service workers provide instructions to the browser that are executed before a request is ever sent. Having access to intercept all requests on a domain is dangerous, but that is why service workers also have the extra requirements of a same-origin policy and being served over HTTPS.
Progressive Web Apps in JHipster
To enable the development of PWAs, JHipster uses Workbox, a set of libraries developed by Google to remove a lot of the boilerplate to working with service workers. While the idea of building a progressive web app may sound daunting, Workbox has some great guides to walk you through the process and explain the different configuration options.
What does JHipster do for us?
Once I generate the JHipster frontend, three key components to building a PWA will have been created for me: index.html, webpack.prod.js, and manifest.webapp. Everything needed for a progressive web app will be contained in these three files. The Webpack production configuration contains the implementation of the Workbox plugin that generates our service worker.
Webpack Configuration
Within our configuration, we will find the inclusion of various plugins including our service worker generation at the bottom.
plugins: [
    ...,
    new WorkboxPlugin.GenerateSW({
        clientsClaim: true,
        skipWaiting: true,
    })
]
This configuration will essentially cache all of our files. The significance of clientsClaim coupled with skipWaiting is that once our client detects a new service worker, that one will take effect immediately instead of waiting for the lifecycle of the old one to finish.
Customization is extremely easy following the Workbox guides. In the example below, I used the networkFirst strategy to cache CSS, Javascript, and HTML files. This strategy will always try to fetch the latest items from the network, then fall back to cached content if the browser cannot establish a connection in time. For images, gif, and typography I used the staleWhileRevalidate strategy. These items are less likely to change, so I can fetch from the cache for a faster response and if they are updated the service worker will invalidate that cached item after serving it to me.
new WorkboxPlugin.GenerateSW({
    clientsClaim: true,
    skipWaiting: true,
    runtimeCaching: [{
        urlPattern: /\.(?:css|js|html)$/,
        handler: 'networkFirst',
        options: {
            cacheName: 'myCache',
            expiration: {
                maxAgeSeconds: 60*60*24
            },
            broadcastUpdate: {
                channelName: 'update-myCache'
            }
        }
    },
    {
        urlPattern: /\.(?:png|jpg|jpeg|svg|gif|eot|ttf|woff|woff2)$/,
        handler: 'staleWhileRevalidate',
        options: {
            cacheName: 'assetCache',
            broadcastUpdate: {
                channelName: 'update-assetCache'
            }
        }
    }]
})
Handler is specifying our cache strategy, which dictates how the service worker will respond to requests for this content. The chosen strategy will depend on your content, as well as, how you break up urlPattern in runtimeCaching. static assets may be alright if we update them less often, but will that be the case for all file types if the app receives frequent updates? These are the types of questions we need to think about when developing our caching strategy.
When caching content and responding to requests with those entries, we may get content faster, but we run the risk of showing users stale data. broadcastUpdate provides a standard way to notify the browser client that a cached response has received an update. In the above example, when the revalidate step of my staleWhileRevalidate strategy retrieves content that differs from what is cached, an event will be broadcasted through the channel update-assetCache. We can configure our application to listen for that event and react appropriately.
Finally, restricting the age of cached items is another strategy for invalidating old entries. Old entries will be checked and removed after each request or cache update. This means that an expired entry may be used once, then expired after.
Registering your Service Worker
When a JHipster frontend is first created, the index.html will by default have the following script commented out:
<script>
    if ('serviceWorker' in navigator) {
        window.addEventListener('load', function () {
            navigator.serviceWorker.register('/service-worker.js')
                .then(function () {
                    console.log('Service Worker Registered');
                });
        });
    }
</script>
When we run the production build for our frontend Webpack will generate our service worker in the build folder for us. However, by itself, that file will not do anything. In order to add the caching and offline support we want, we must first register the service worker on our domain.
Installing on the Home Screen
Now that we got through the hard parts, the last file is the manifest.webapp. The manifest file is metadata about our app in the form of JSON to provide details for the application installed on the home screen.
{
  "name": "MyPWA",
  "short_name": "MyPWA",
  "icons": [
      {
          "src": "./content/images/jhipster_family_member_0_head-192.png",
          "sizes": "192x192",
          "type": "image/png"
      },
      {
          "src": "./content/images/jhipster_family_member_0_head-256.png",
          "sizes": "256x256",
          "type": "image/png"
      },
      {
          "src": "./content/images/jhipster_family_member_0_head-384.png",
          "sizes": "384x384",
          "type": "image/png"
      },
      {
          "src": "./content/images/jhipster_family_member_0_head-512.png",
          "sizes": "512x512",
          "type": "image/png"
      }
  ],
  "theme_color": "#000000",
  "background_color": "#000000",
  "start_url": "/index.html",
  "display": "standalone",
  "orientation": "portrait"
}
The entire file is generated for us by JHipster and linked in the index.html. All of this specifies content on how the app will open when installed on a device, as well as, what the icon will look like to open it.
In order for a user to install a progressive web app from their browser, it must meet the following criteria:
- [X] The web app is not already installed.
- [X] Includes a web app manifest.
- [X] Has a registered service worker.
- [ ] Served over HTTPS (required for service workers).
- [ ] The user meets the engagement heuristic (The user has interacted with the domain for at least 30 seconds)
We have almost met all of the criteria for installing our app, the last two boxes to check are handled by our deployment and having users engage with the app. For my PWA, I chose to host the app in S3 and use CloudFront to deliver the content over HTTPS. Be careful if you also choose to serve your content through CloudFront. You must be sure to invalidate your index, the service worker, and your manifest files. Otherwise, users who have already visited your site will have old content delivered from Cloudfront, which will match the existing content in their cache.
After meeting all of the criteria, the browser will fire the beforeinstallprompt event. We can set the client to listen for that event and notify users that they are able to install the application. Below is an example of waiting for the beforeinstallprompt and reacting to that event by showing a button to prompt the user to add our app to their home screen.
<script async defer>
    var deferredPrompt;

    window.addEventListener('beforeinstallprompt', function (e) {
        // Prevent Chrome 67 and earlier from automatically showing the prompt
        e.preventDefault();
        // Stash the event so it can be triggered later.
        deferredPrompt = e;

        showAddToHomeScreen();
    });

    function showAddToHomeScreen() {
        var addPWABtn = document.querySelector(".add-pwa");
        addPWABtn.style.display = "block";
        addPWABtn.addEventListener("click", addToHomeScreen);
    };

    function addToHomeScreen() {
        var addPWABtn = document.querySelector(".add-pwa");  // hide our user interface that shows our A2HS button
        addPWABtn.style.display = 'none';  // Show the prompt
        deferredPrompt.prompt();  // Wait for the user to respond to the prompt
        deferredPrompt.userChoice
        .then(function (choiceResult) {
            if (choiceResult.outcome === 'accepted') {
                console.log('User accepted the prompt');
            } else {
                console.log('User dismissed the prompt');
            }
            deferredPrompt = null;
        });
    };
</script>
After deploying the above script in our index.html, users will then have the ability to click our button with the class .add-pwa. We did it! We've met all of the criteria necessary for a browser to fire the beforeinstallprompt and get our app on a user's home screen.
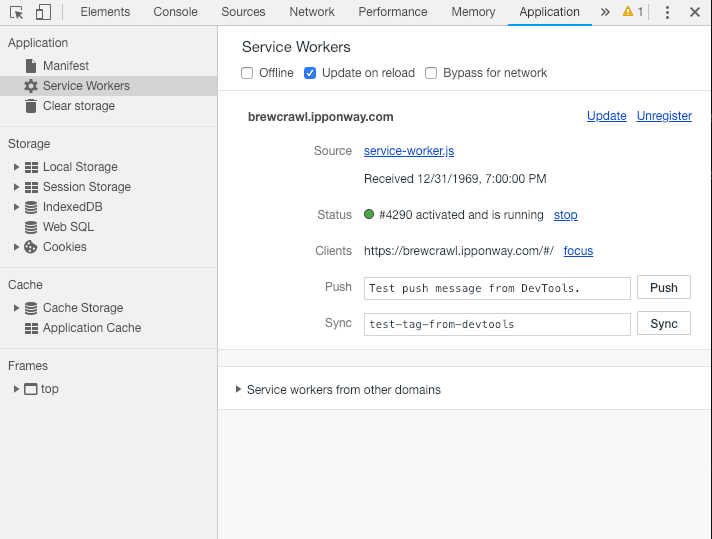
Testing In Chrome
In Chrome DevTools, under the Application tab, you can view your service worker, manifest, and cached content. This is a helpful way to check what exactly is being cached and making sure your service worker is behaving as intended. When viewing the manifest under the application tab you will see the option to add to home screen. This is a manual way to fire the beforeinstallprompt and test the reaction.
Auditing with Lighthouse
Google Lighthouse is an open-source tool that you can use to measure and improve the performance of your progressive web app. Lighthouse uses fourteen auditing criteria that you can view here, rather than the three baseline criteria for a PWA. Lighthouse is integrated with DevTools and can be found under the Audit tab. By meeting the extra auditing criteria, you can provide users with a better experience.
Conclusion
Meeting the baseline criteria for a progressive web app is made easy with JHipster. Providing users with the best experience for offline or slow networks is a little trickier depending on the type of app you are building. The biggest issue I faced was dealing with time to interactive simulated on a 3G network (one of the Lighthouse audits). There are many methods at your disposal for improving app performance, so be sure to take advantage of them. If you can, try to make your CSS footprint as small as possible. CSS is a render blocking and CSS frameworks that you are not fully utilizing may be a network cost you don't need. Be wary of importing entire Javascript libraries too. Instead, try importing only the functions you are using. For example, I love the Lodash library, but importing the entire library would be too much. Sometimes all you need in a component is one Lodash function. In that case, the preferred import method would look like this:
import { sampleSize } from 'lodash';
Instead of:
import * as _ from 'lodash';
If you are developing an app with the express purpose of it being installable on a phone, you must expect your users to sometimes have poor connections. Poor load times can be the difference between losing users or having a successful app. Remember, the point of a progressive web app is to increase user engagement by having your application installed on their home screen. The journey to having a good product doesn't stop there. Be reliable, have an experience that delights users, and above all, be worthy of being on their home screen.
Now get out there! If you weren't following along, go to the JHipster site and try it out for yourself.


Comments