
How to Migrate VMs to AWS: Rehosting Made Easy with AWS MGN


In my previous article, I delved into the Lift-and-Shift migration strategy, the reasons why, and the situations when organizations choose to go with it. I also took a close look at the AWS recommended rehosting solution called Application Migration Service (AWS MGN). I went through its features as well as compared it to other server migration options provided by AWS. This time I am going to demonstrate a step-by-step process of migrating a workload to AWS with AWS MGN. As an example, I will move Azure VMs (Windows and Linux) to AWS. The same approach can be implemented with other clouds and virtualization technologies like VMWare and Hyper-V.
Considering the news that as of April 30, 2024, VMware Cloud on AWS is no longer resold by AWS, many customers have started evaluating available alternatives, and looking into the move of VMWare VMs to EC2 instances. This article can serve as guidance for those who want to see how easy it would be to rehost the VMs with AWS MGN.
AWS MGN Service and Network Architecture
Architecture and Network Diagram
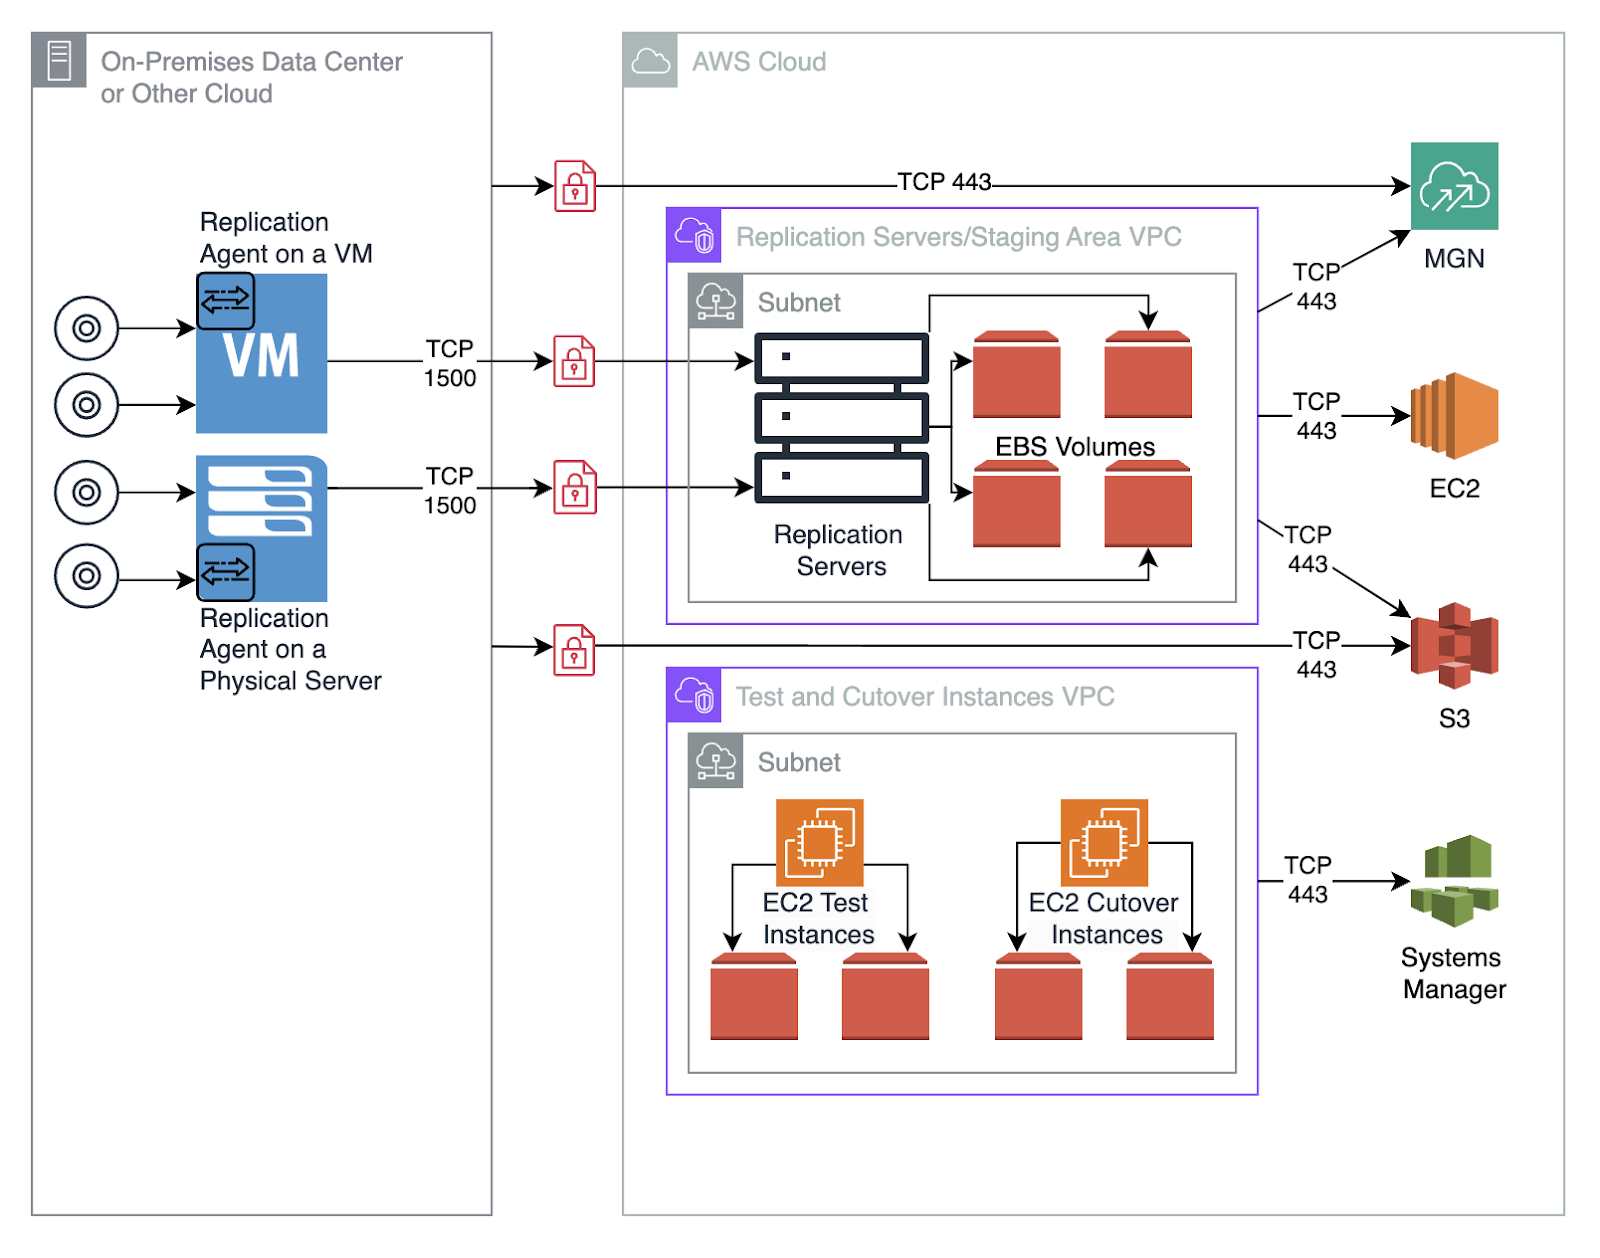
Components of the AWS MGN Service
As shown in the diagram above, the main components of AWS MGN Service are replication agents, replication and conversion servers, along with test and cutover instances.
- A replication agent is software installed on each compute resource that needs to be migrated. It could be either a physical or a virtual server as shown on the diagram above. These resources can be located in a data center or in other clouds. The agent can replicate up to 50 disks from a single server. The data coming from this replication agent is compressed, encrypted, and replicated asynchronously.
- A replication server is a server instance that AWS MGN spins up automatically once the connection between the replication agent and the AWS MGN service is established. The default instance type is currently t3.small but it can be updated if needed. It is recommended to keep the default replication server instance type unless required by the business as this upgrade will incur additional charges. There is no effect on the ongoing data replication in case the replication server instance type is changed. It automatically resumes using the new instance type. The replication server settings are configured in the AWS MGN console within the Replication Template submenu. AWS offers a default replication template as well as the ability to re-adjust it as necessary.
- A conversion server is the only element excluded from the diagram above. It is a temporary resource created to convert the disks to boot and run on AWS. It makes bootloader re-configurations, injects hypervisor drivers, and sets up the required tools for the new environment. It installs EC2Config, which then automatically installs the SSM agent. For the conversion to happen AWS MGN automatically brings up a vanilla Windows conversion instance in the same subnet with the replication server as part of the launch job.
- A test instance is the VM created and configured with the help of the conversion server. To ensure adequate testing it is created with the same launch settings as for the future cutover instance. These launch configurations are dictated by the Launch Template which can also be customized as per customer’s requirements. Testing workloads for at least two weeks before finalizing the cutover is recommended. Once the test instance is provisioned, either SSH or RDP is used to connect to it and to ensure that everything works as expected.
- A cutover instance is the server launched to finalize the migration of the source server. In case something goes wrong and there is a need to launch a new cutover instance, you can revert the migration status to ’Ready for cutover’. This allows you to start from scratch. Once you are satisfied with the migration and consider the cutover to be successful you can ‘Finalize cutover’.
Server Migration Walkthrough
Source Environment Setup (Azure, VMWare, etc)
Networking
The following ports need to be open:
- Outbound TCP port 443 to grant access to AWS MGN and Amazon S3
- Outbound TCP port 1500 to grant access from the source server to the staging area subnet of the AWS environment.
AWS Environment Setup
Networking
- Outbound TCP port 443 to grant access to the AWS MGN, Amazon EC2, and Amazon S3 Services API endpoints
- Inbound TCP port 1500 needs to be opened to the source servers’ network.
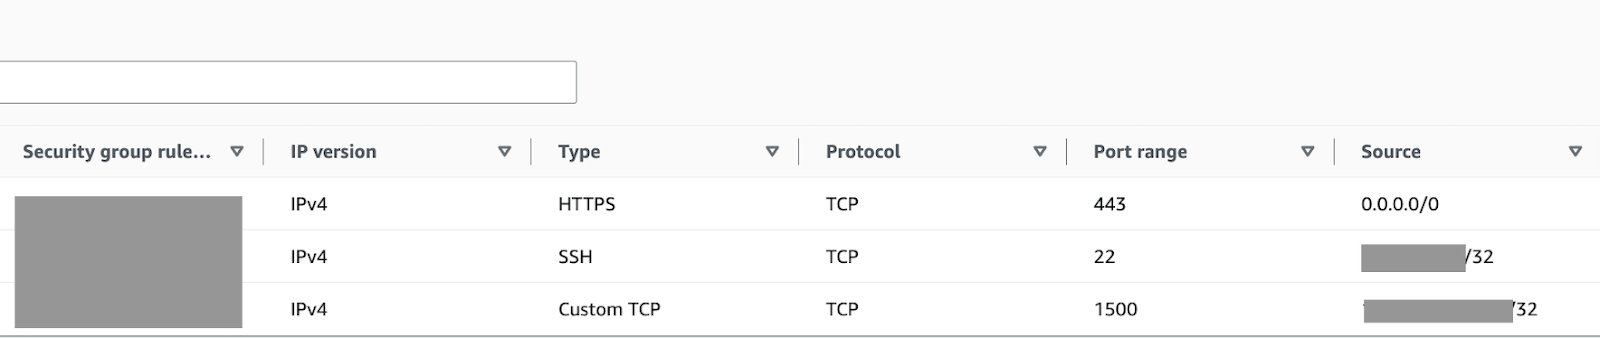
The Security Group (SG) example above also has an SSH port opened to my IP address. It was used to connect to the test instance and test it. As always, it is recommended to specify as narrow a range of IP addresses as possible in your Security Groups.
IAM setup
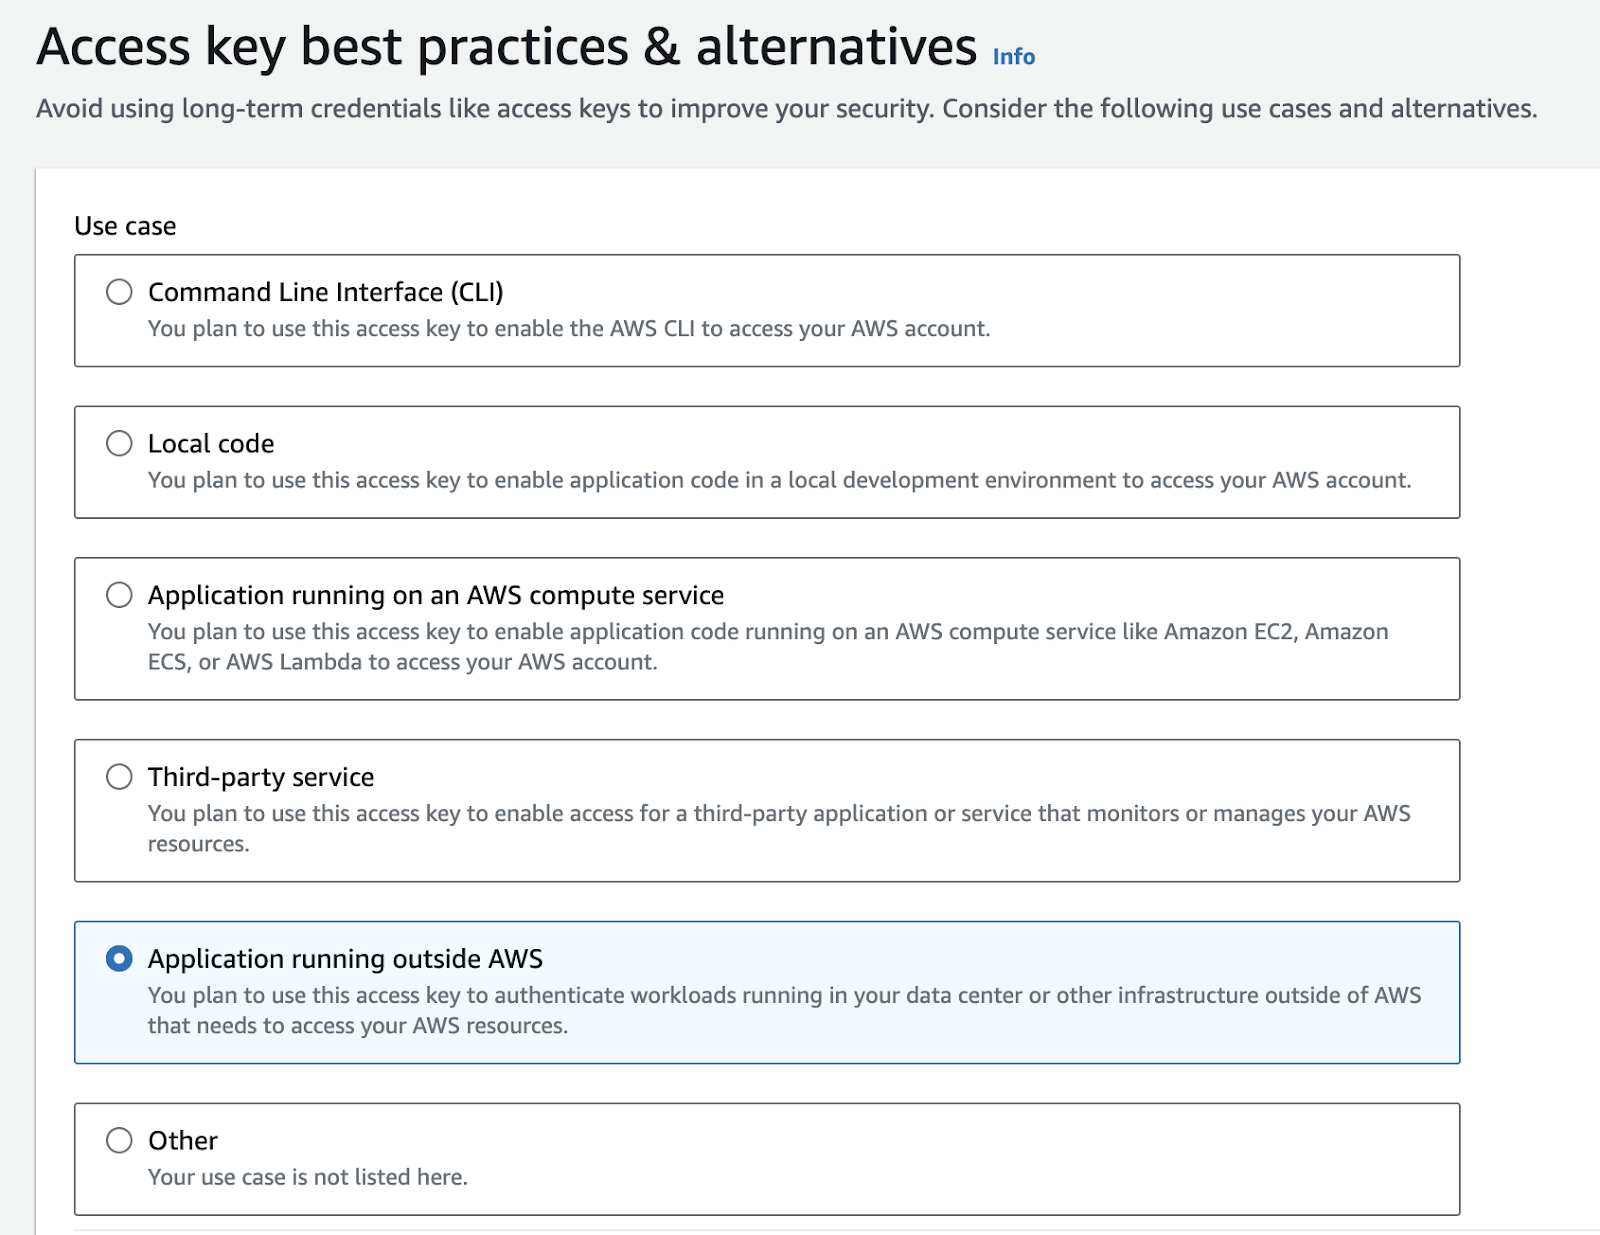
An IAM user needs to be created with predefined IAM policies that contain the necessary permissions for the replication agent to be installed on the source server and added to the AWS MGN Service.
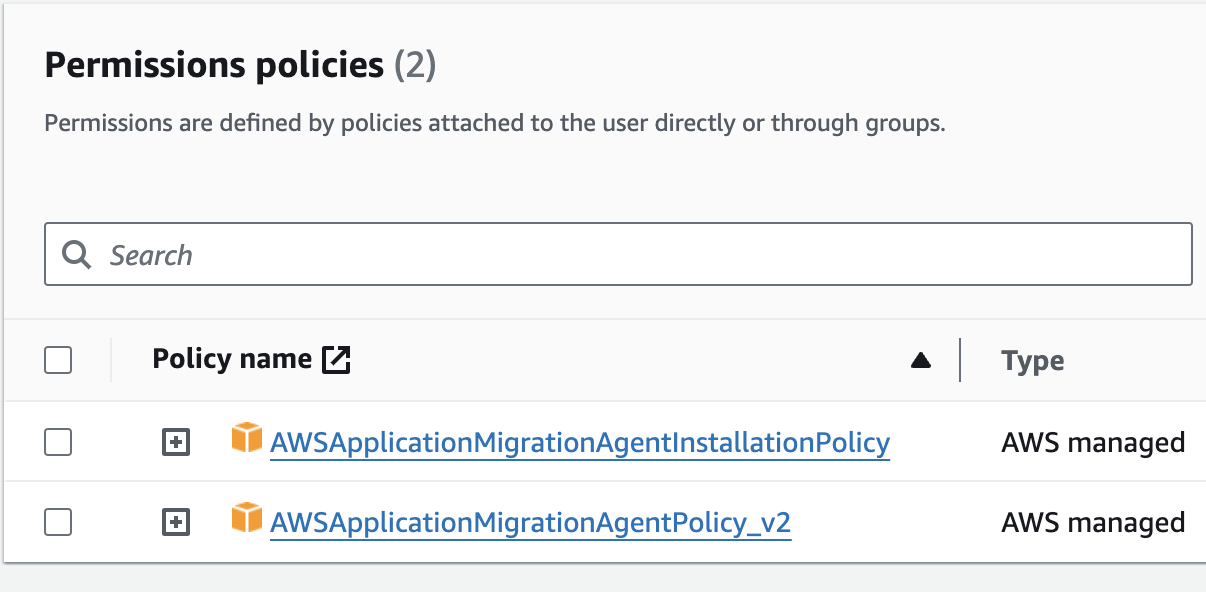
After the user is created and its policies are added, AWS credentials need to be generated. They will be used during the replication agent installation.
Adding a Source Server
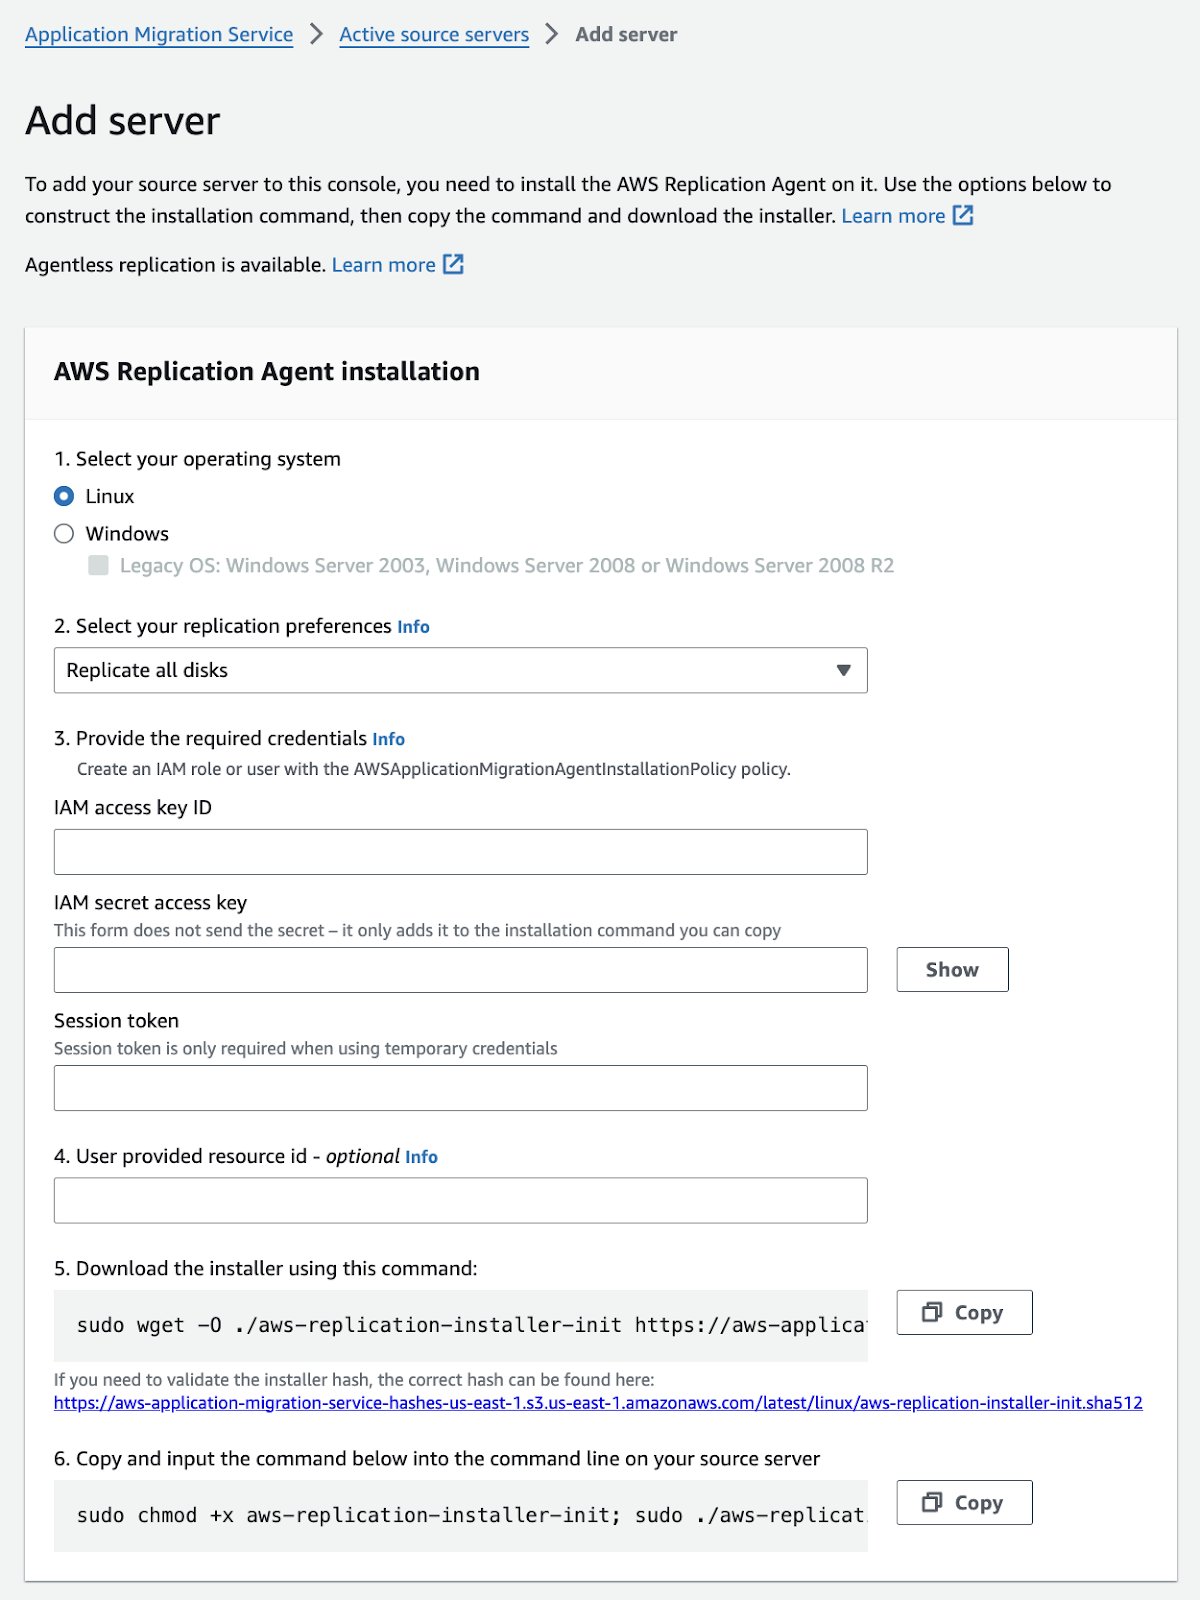
Once the prerequisites are done, you can add the source server to the AWS MGN Service. To do that we can use the AWS documentation or you can do it with an ‘Add Server’ menu from the AWS MGN Console, which makes it super easy by generating the installation command and helping you with the agent download. This menu offers guidance for Linux and Windows source servers. You only need to provide your access details and the preferred name for the source server. Here is what it looks like for Linux:
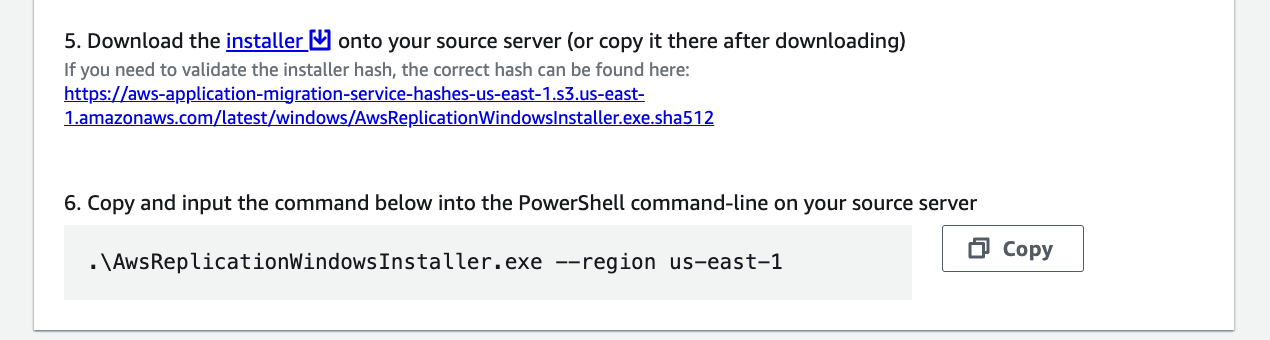
And here is how the steps 5 and 6 look like look like for Windows:
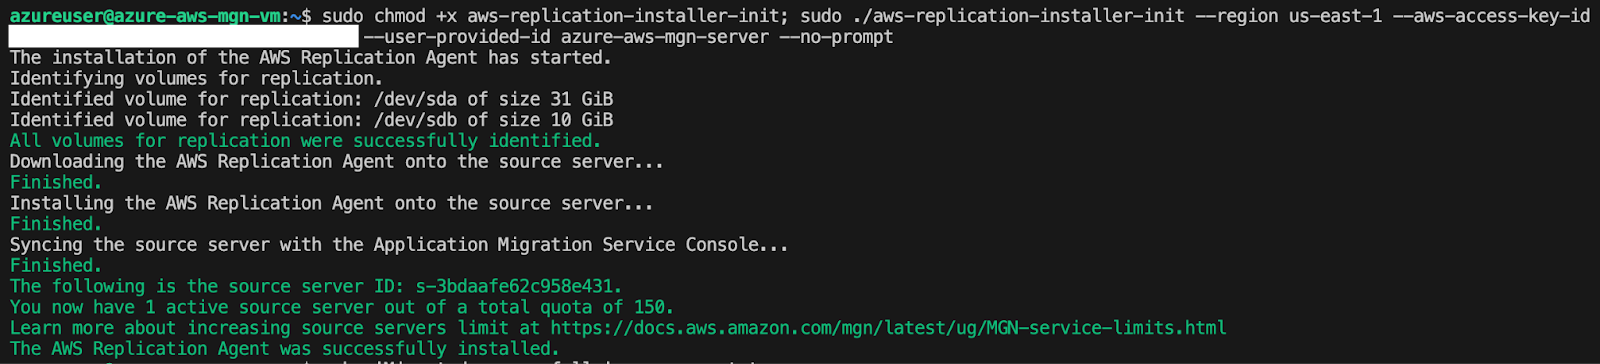
The installation process is seamless for both platforms. Here is how it is done on Linux:
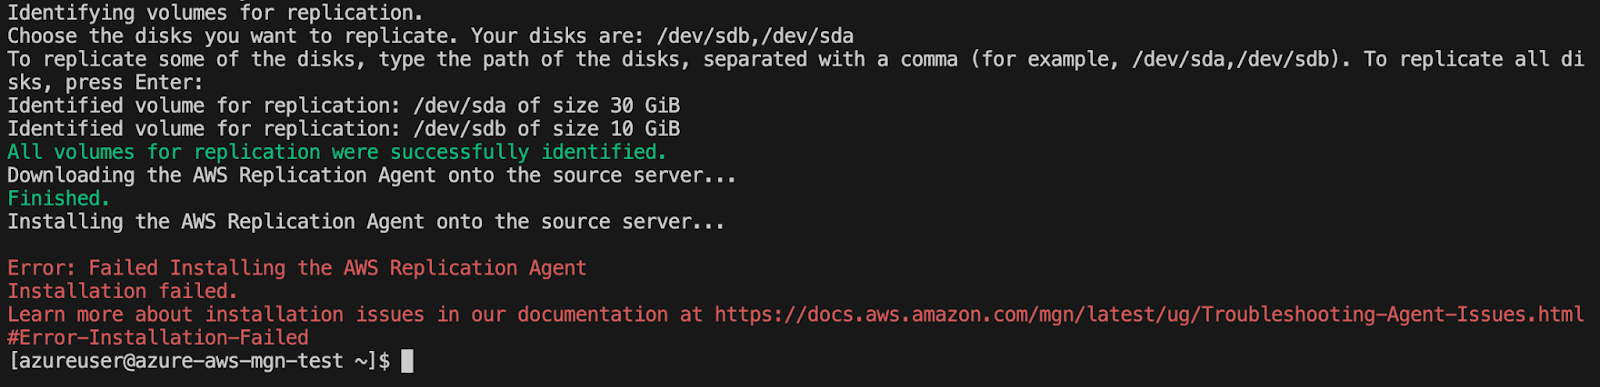
In case something goes wrong, users are redirected to the page with troubleshooting scenarios for agent installation issues. In the case below, it was one of the kernel-devel/linux-headers issues on the CentOs platform and the page it redirected to was helpful.
Here is what it looks like on Windows:
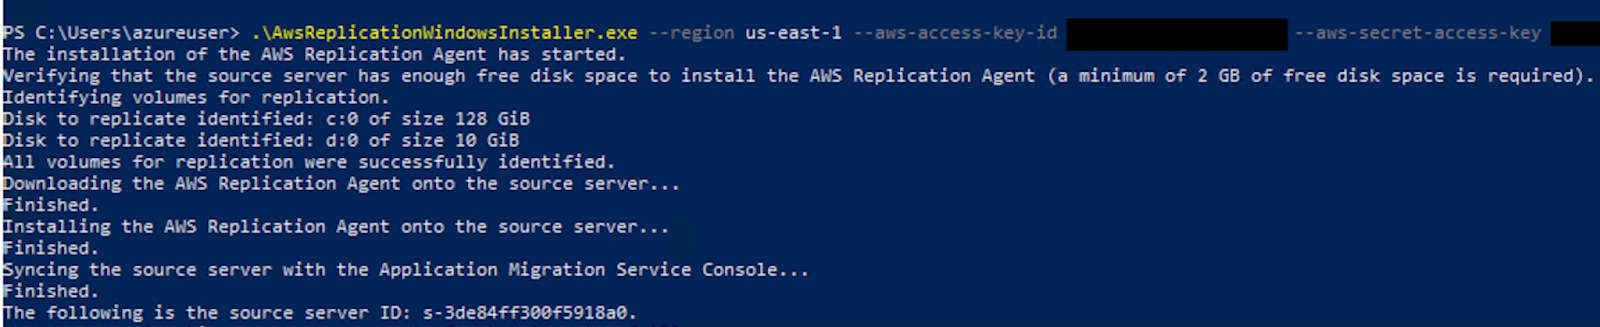
In both cases, I decided to replicate all existing disks, but there is a possibility to choose which disks you would like to replicate.
Server Replication
On the console side, you can see the steps of the initial setup that happens before the replication is started. During this stage, a replication server is started. Its configuration is based on the replication template which will be discussed later in this article.
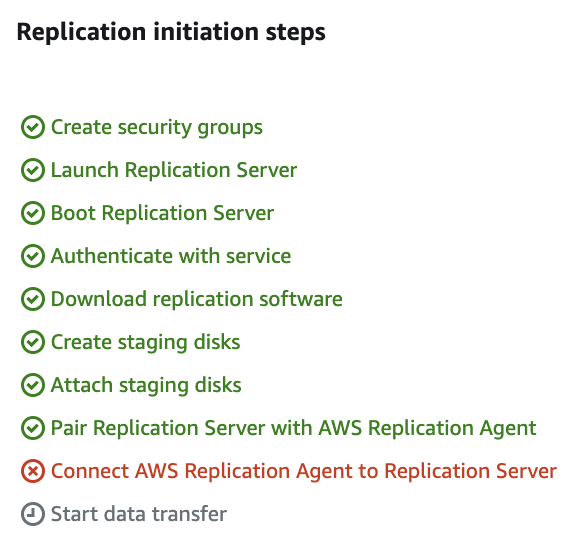
In the screenshot above the initiation step failed due to a misconfigured SG rule. If you see a similar issue make sure to check the networking setup. Once the rules are configured properly the replication starts.
Testing
After the initial replication is finished and the snapshot is created, you can launch the test instance. AWS MGN offers a lifecycle view of your migration progress which looks the following way:
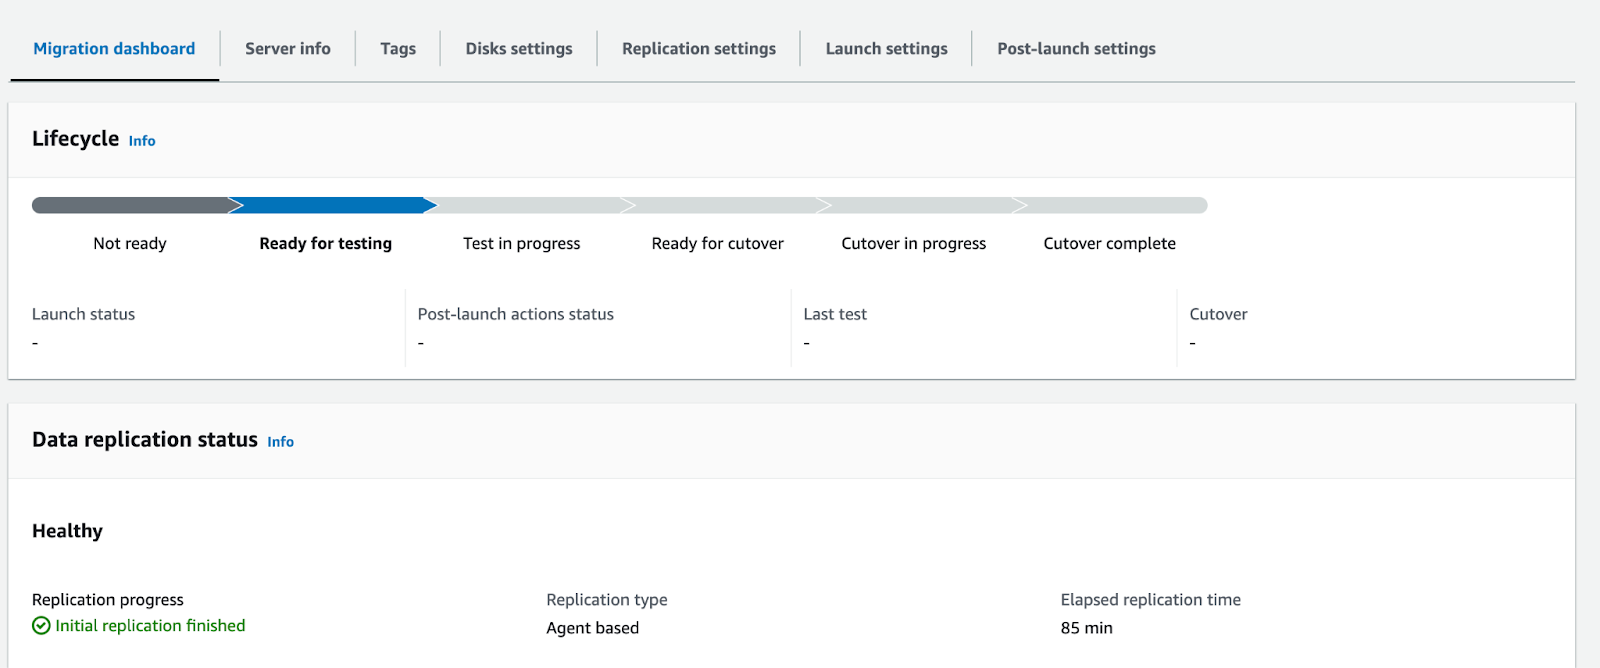
As soon as you create a test instance, a conversion server is launched. It re-configures the replicated disks to boot on AWS. When this is completed a test instance is started. When test instances are launched data is no longer kept in sync with source servers.

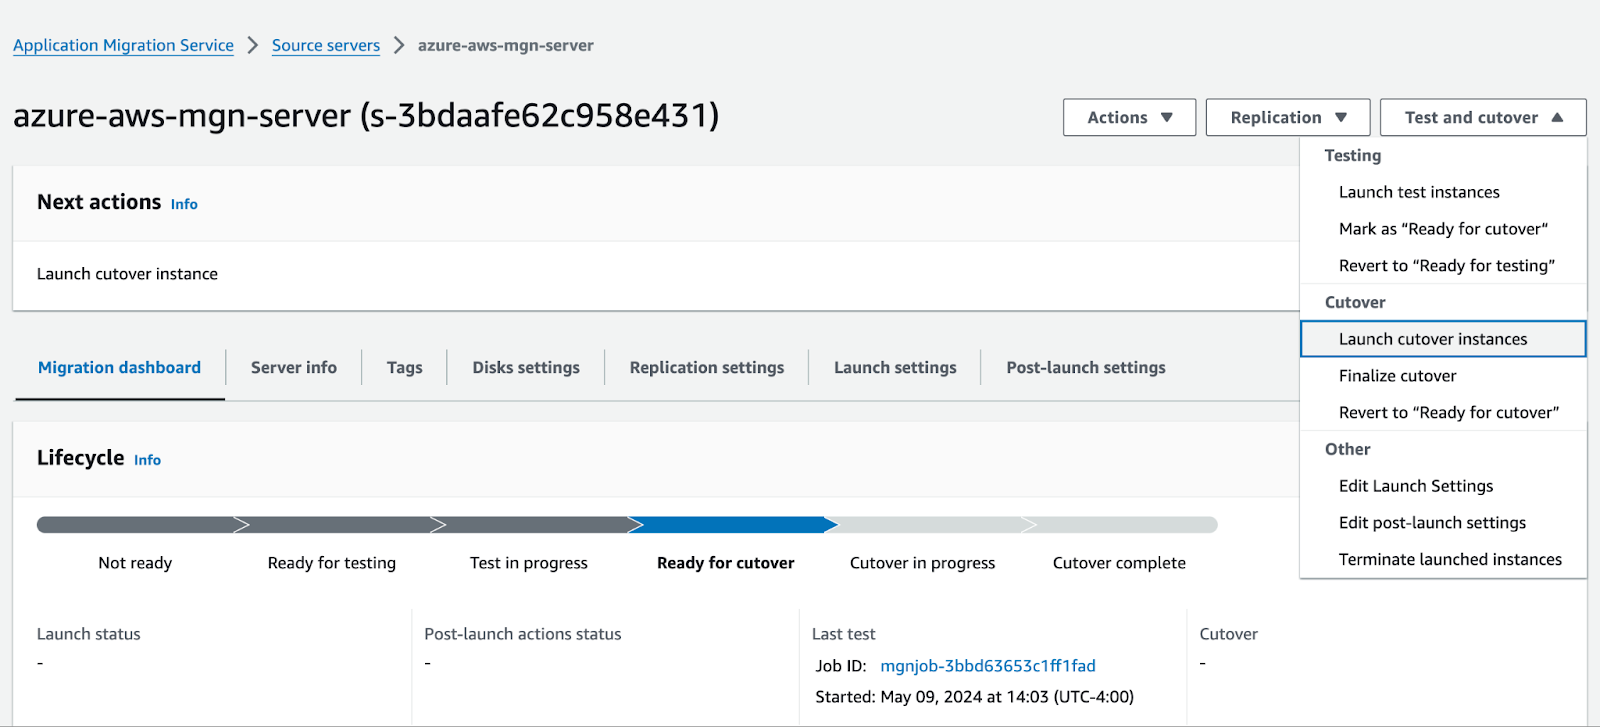
Cutover
Once all of the needed tests are completed, you are then ready to launch the cutover instance. To provision this final instance, another conversion server is started with the same purpose - to re-configure the replicated disks to run on AWS. Both the test and the cutover instances are provisioned based on the configurations specified in the launch template which will be displayed later in this article.
When the cutover is in progress, the data replication continues. However, modified data on the source server is replicated to the Staging Area Subnet as before, and not to the cutover instances that were launched during the cutover.

Clicking on the ‘Finalize cutover’ updates the status of the source servers to ‘Cutover complete’ which stops data replication and deletes all the replicated data. AWS MGN automatically terminates all AWS resources used for data replication.
Settings and Features
Replication Template
The replication template, which you can see in the screenshot below, is an important piece of the puzzle in the AWS MGN service. It allows you to specify the staging area subnet for the replication servers and the replicated disks. You can choose between custom and default encryption options for your data. You can also add tags and choose how data flows from the source servers to the replication servers (public internet, VPN, DirectConnect or VPC Peering, etc).
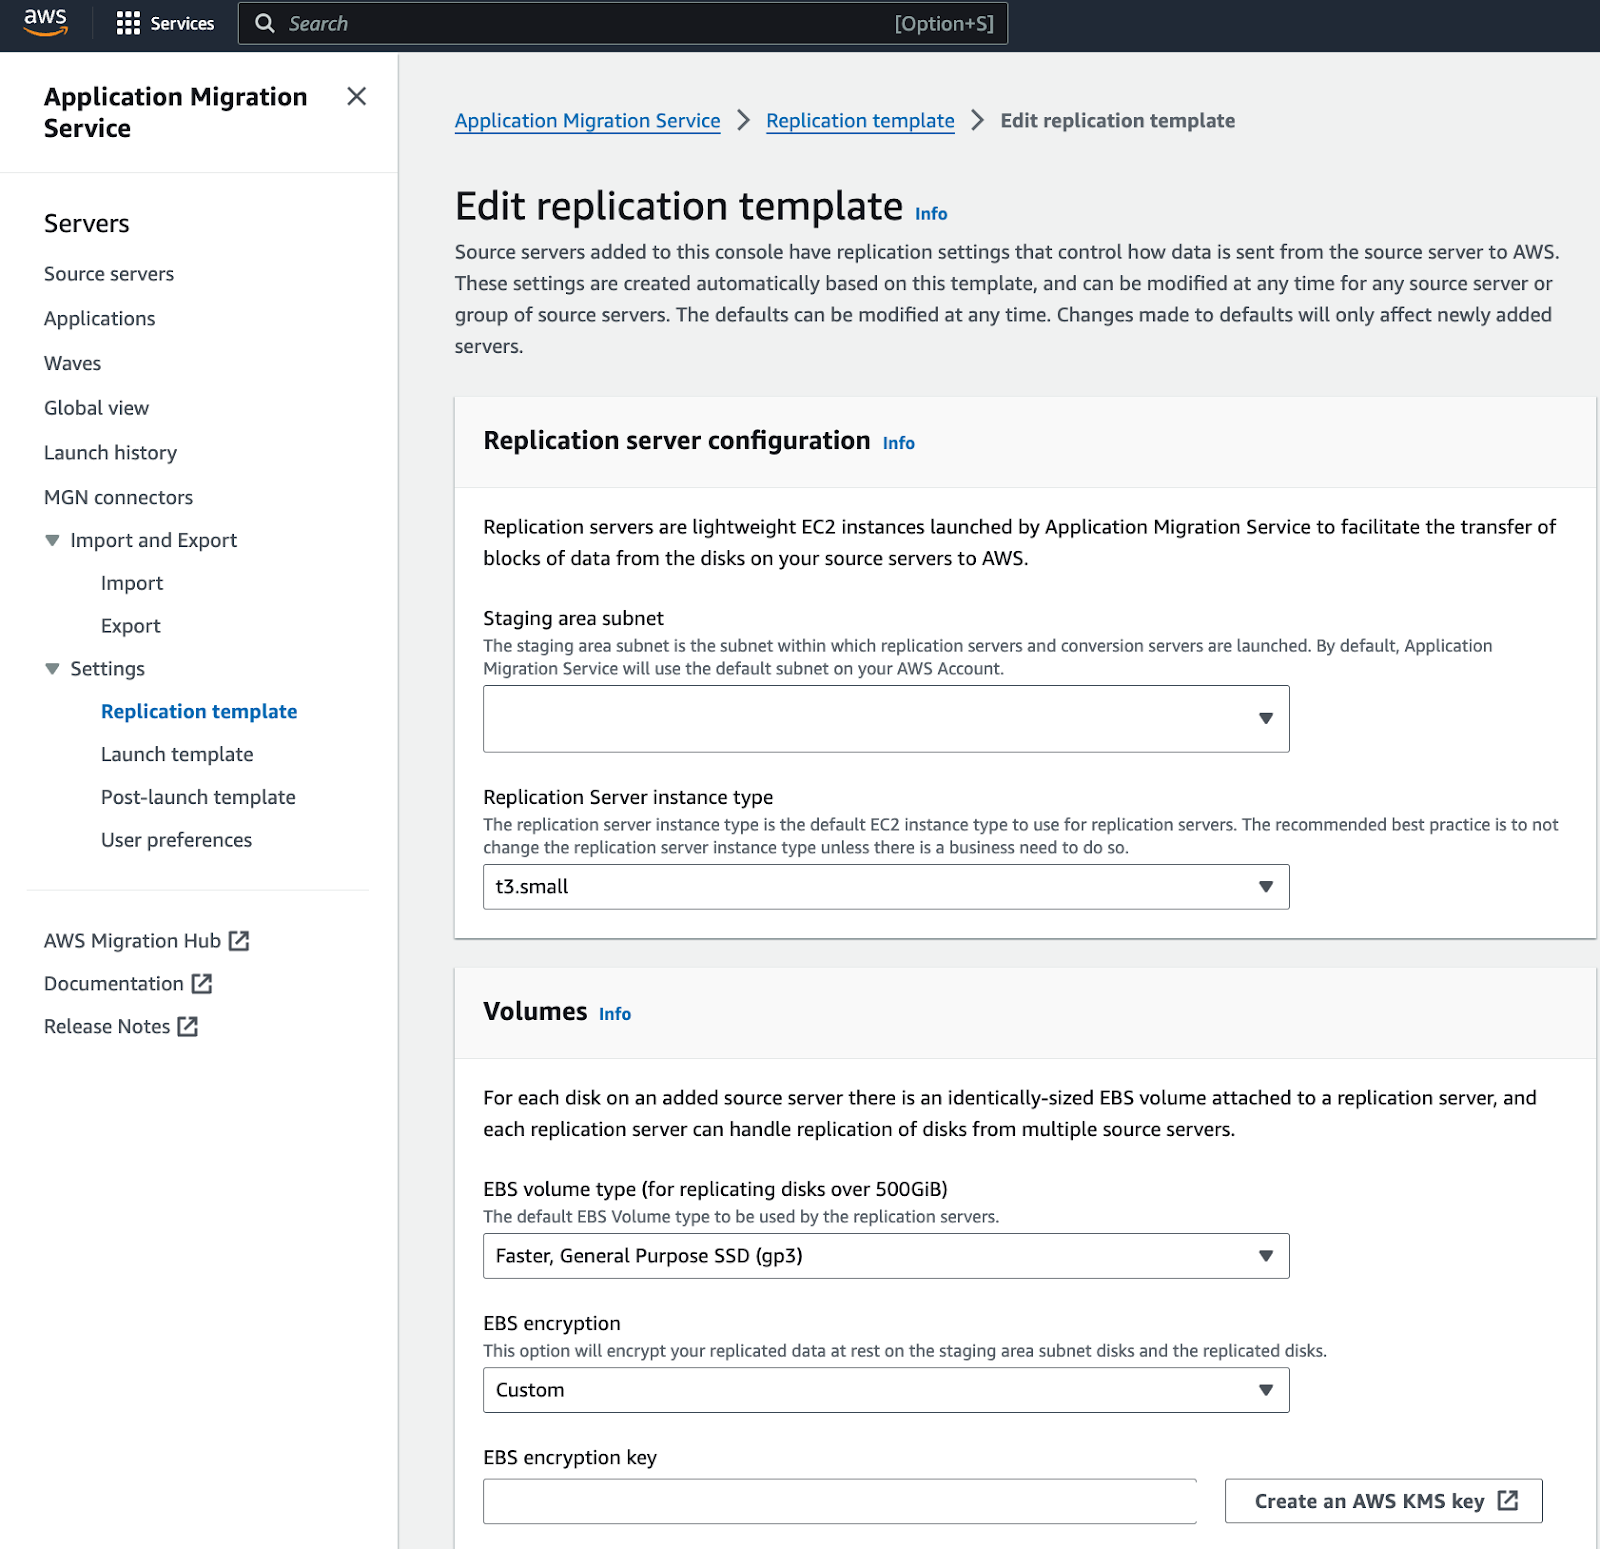
Another option that you can specify with the replication template is to either use the default AWS MGN Security Group or to use your custom one. The SGs you choose here will be used for both the replication and the conversion servers.
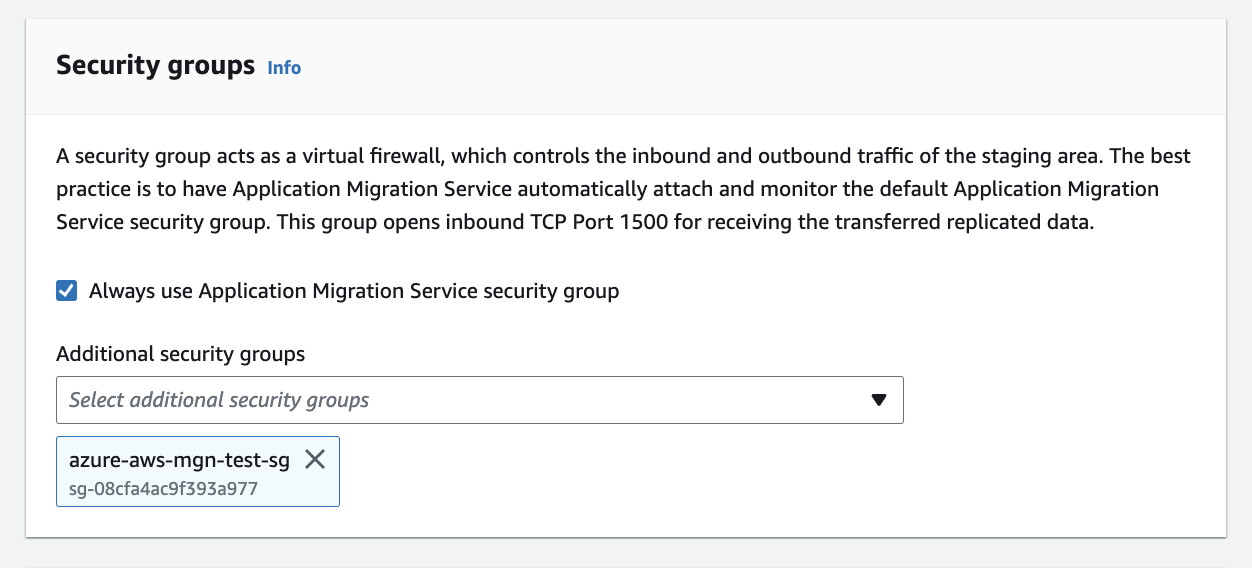
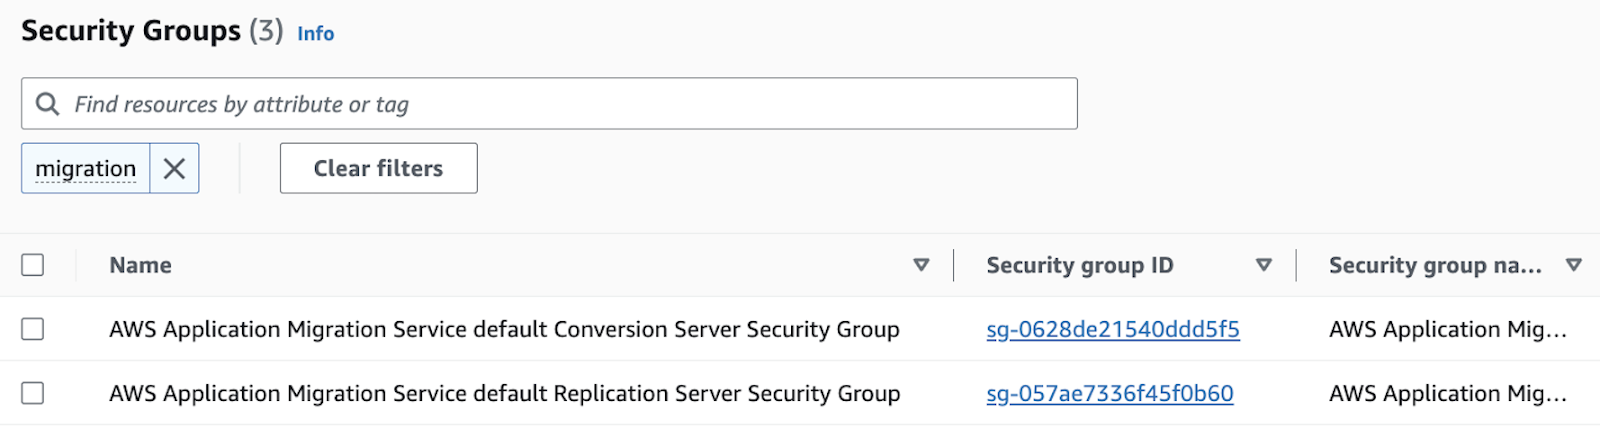
If you have the box ticked as in the screenshot above, the default temporary MGN SG will be created for you and will be automatically cleaned up once the migration is complete. Technically, both the replication and conversion servers use the same MGN Security Group as they require the same network connectivity. However, in practice, you will see two SGs created:
These Security Groups create an inbound rule that allows ingress from all IP addresses on port 1500, which might be needed for large-scale migrations. However, another approach would be to find out the networking details of the source server’s environment and specify them in the custom-created Security Group allowing access only from the trusted sources.
Creating SGs with publicly open ports could be prohibited in environments with strict security and compliance requirements, and be controlled by enforceable security rules. In such cases, the box ‘‘Always use Application Migration Service security group” could be left unchecked and a custom Security Group could be created with the port 1500 opened only to the network of the source servers. In this scenario, the organization is responsible for cleaning up this SG when it is no longer needed.
Launch Template
The Launch Template is a straightforward set of specifications for the test and cutover instances. It consists of two parts: general launch settings and default EC2 launch template, as shown in the screenshots below:
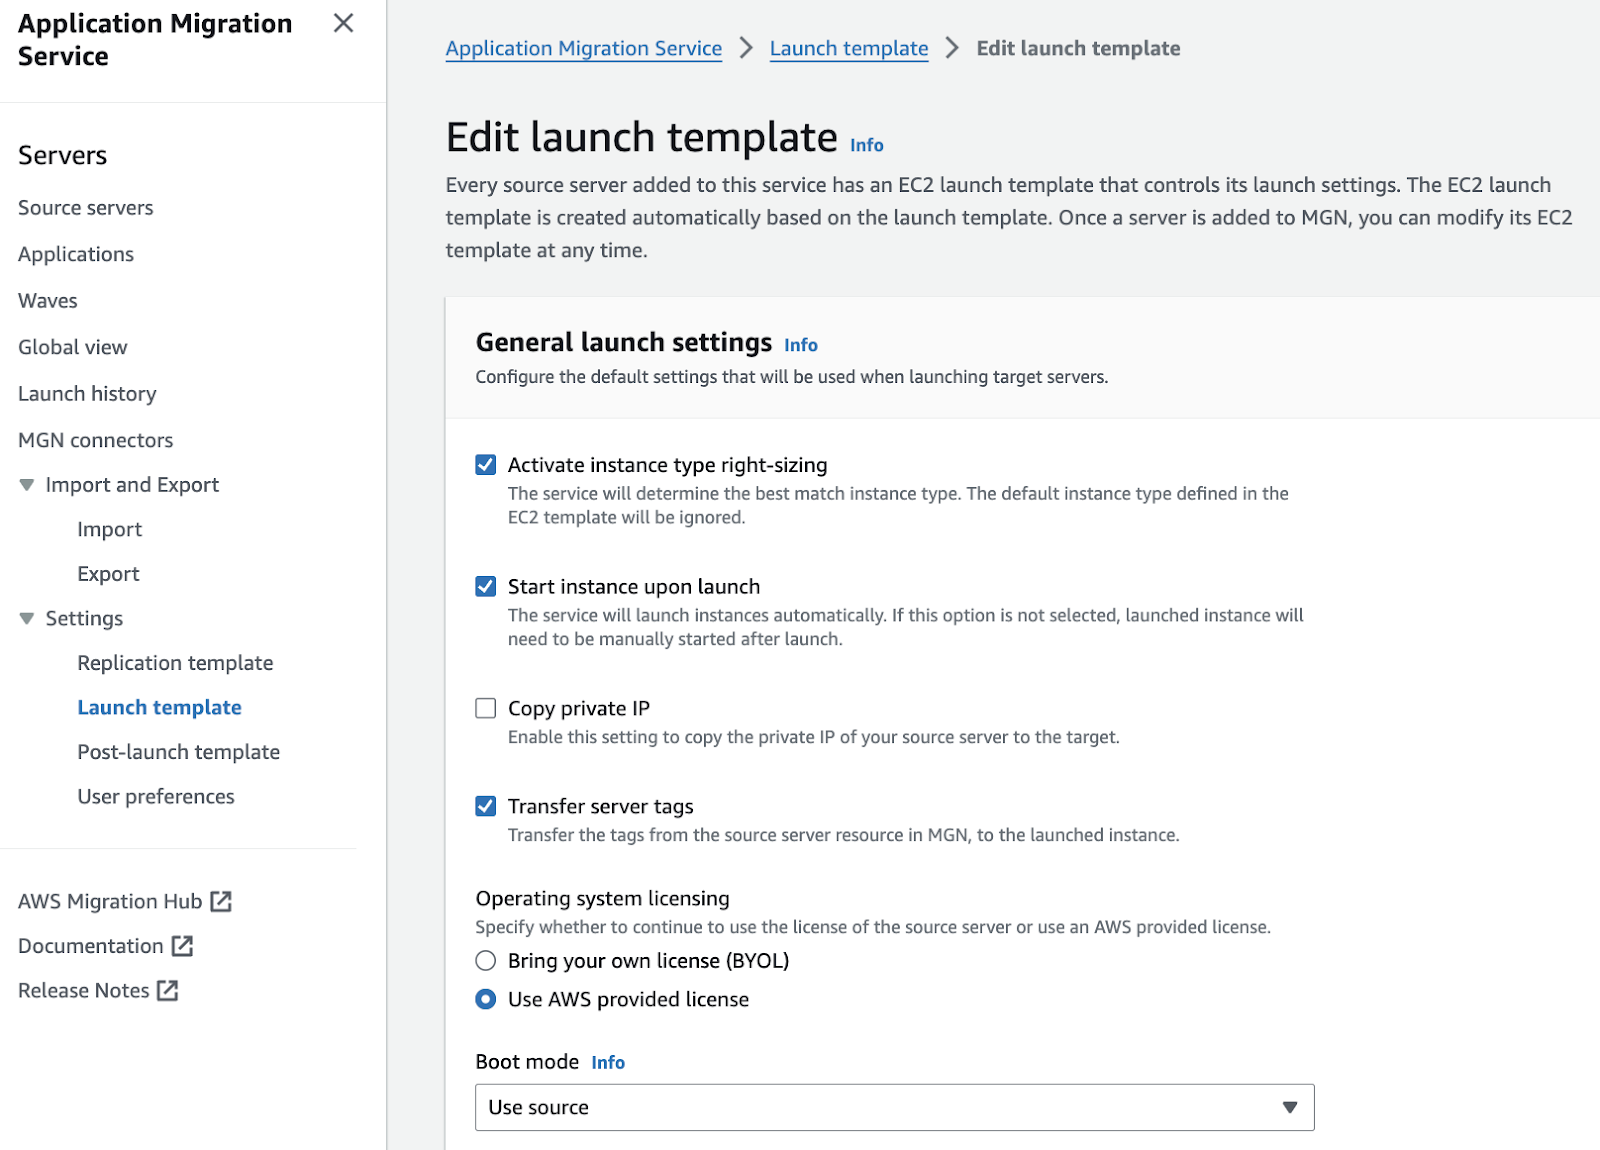
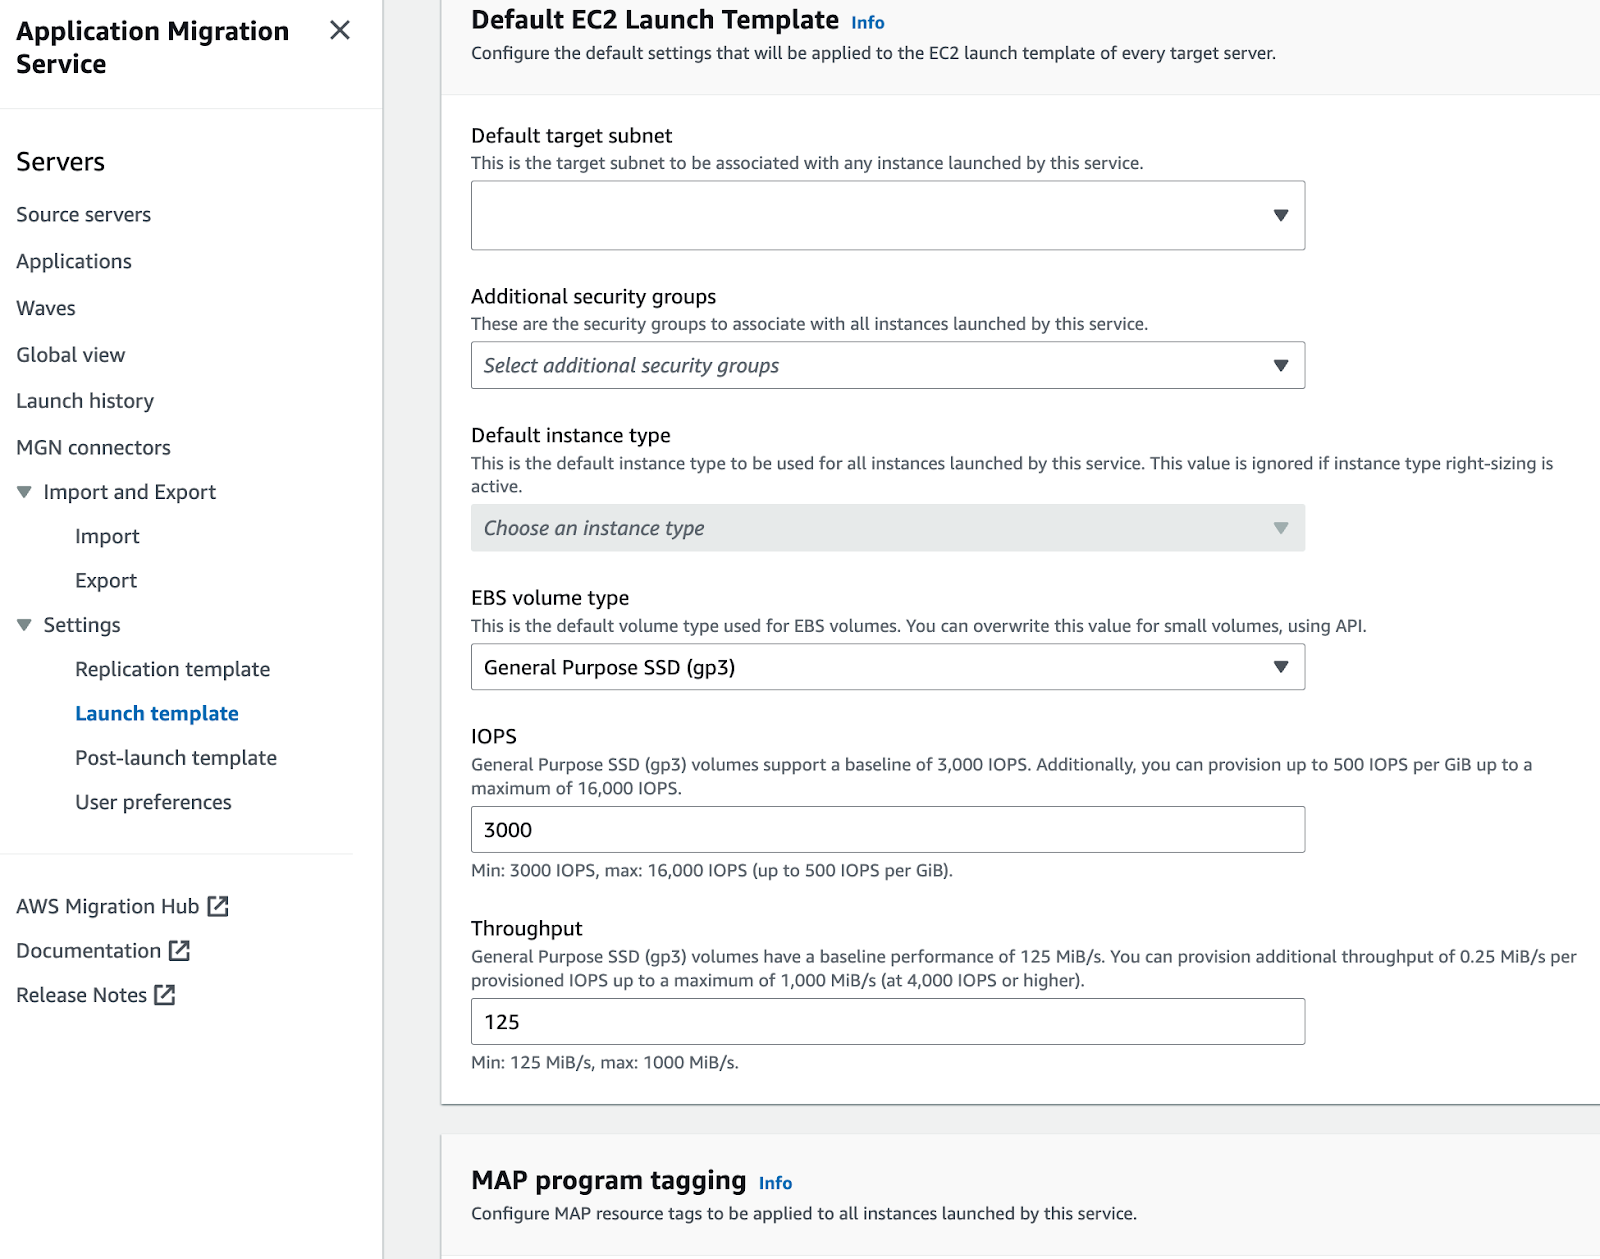
It is important to note that the changes made to the templates will only be applied to newly added source servers. If you decide to update the launch template for the already added servers, it needs to be done for each server individually.
Applications and Waves
Applications and Waves are features of the AWS MGN service that help to organize migration efforts by grouping source servers. An Application is a set of servers that needs to be migrated together because of dependencies between them. Another level of abstraction is a Wave which is a logical collection of servers or Applications that represents the migration plan over a set period of time. Both of these features allow you to monitor the migration status and progress of each Application or Wave. They also help execute various bulk operations like tagging and archiving on all of the included servers.
Post Migration Actions
As described in my previous article post-launch actions work great for multiple scenarios. You can install software with them as well as configure the DR solution after the migration. Below you can see the list of the AWS pre-created actions that are currently available from the AWS MGN post-launch template menu, which is being actively updated.
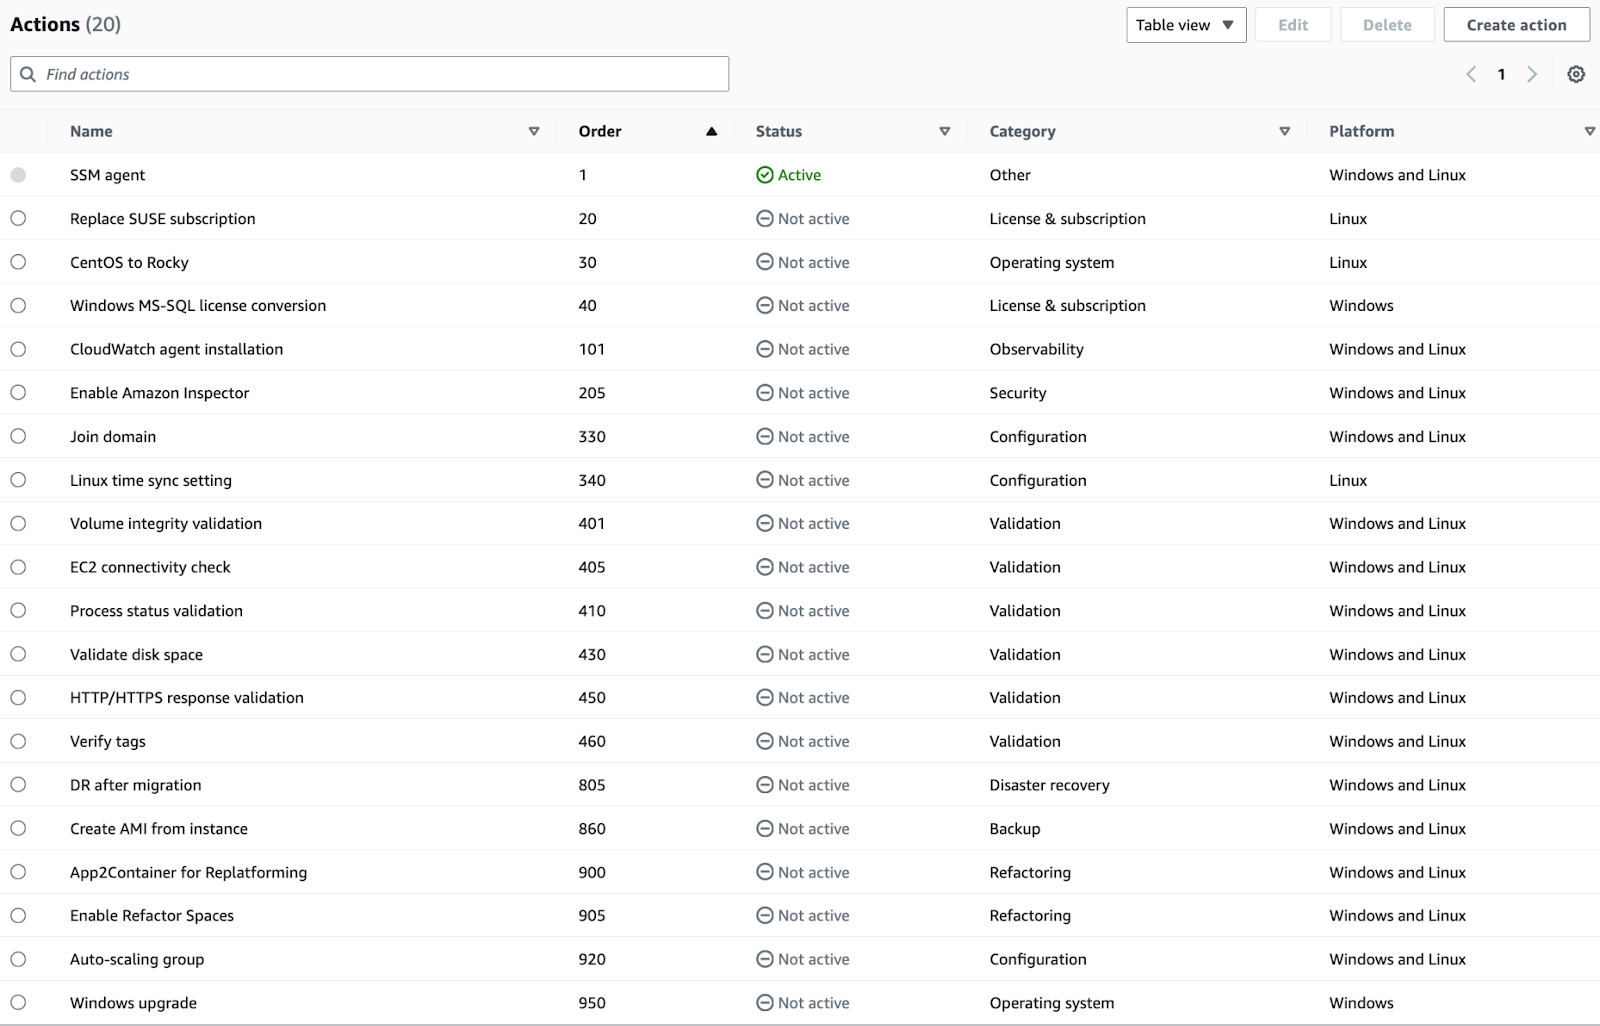
Another good way to approach customizations of the migrated server is to create custom actions. These use-case-specific configurations are written with the help of AWS Systems Manager documents that work with both Linux and Windows systems. There are more than 100 AWS SSM documents available now and you can always create your documents and then use them as custom post-launch actions.
Automation with AWS MGN
Until this point, we have been looking at the AWS Console view of the MGN service. However, same as other AWS services, the use of AWS MGN can be automated with the help of AWS MGN’s CLI commands, or by calling MGN’s API operations in one of the AWS SDKs.
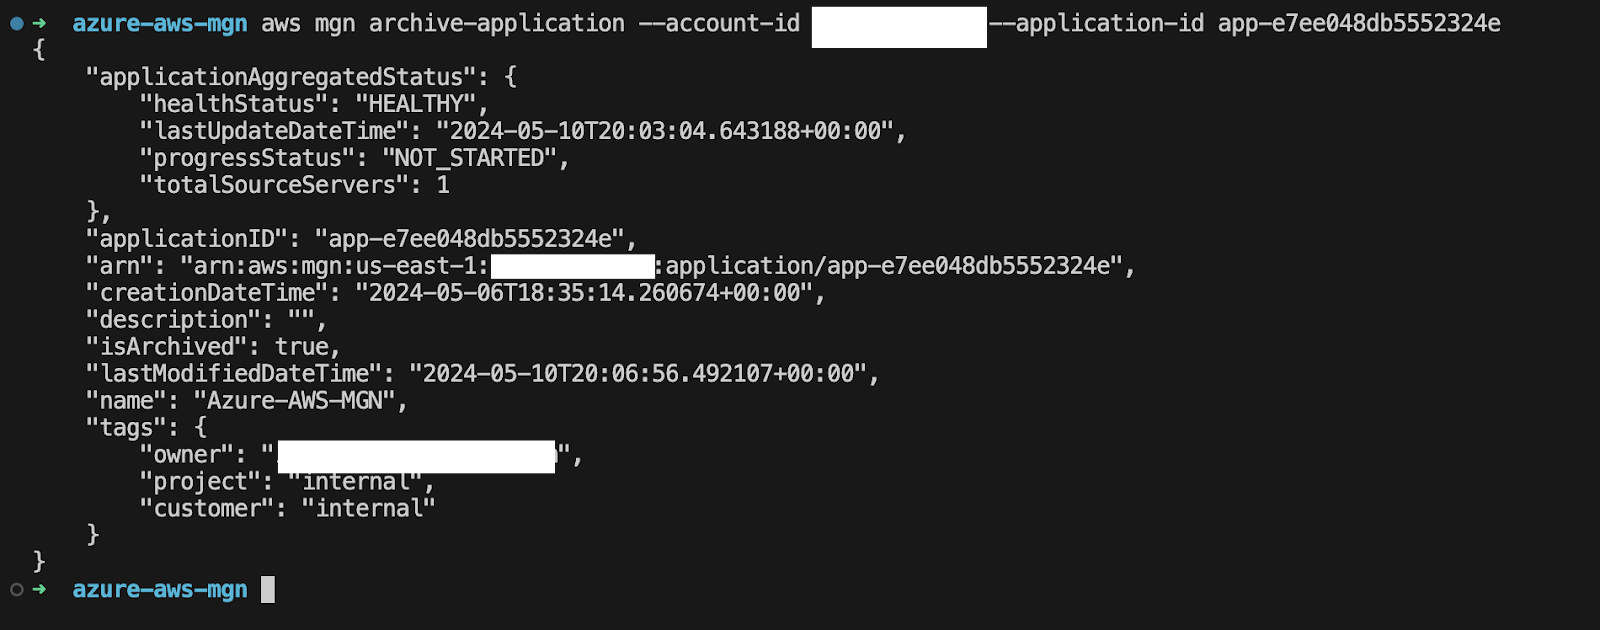
Here is how you can archive an MGN’s application with an AWS CLI:
When looking at the lifecycle of the server migration through the lens of automation, there are multiple ways of achieving it. The first stage, a replication software installation, can be orchestrated with AWS MGN Connector. The second stage, which includes replication, testing, and cutover can be automated with AWS CLI or AWS SDKs. The last stage, server re-configurations, can be covered with post-launch actions (with the help of AWS SSM documents). Other approaches can be taken here and this is only to show that there are other possibilities and that the server migration through AWS Console is just a first step in learning the capabilities of the AWS MGN’s Service. It is a good way to visually see what happens during the migration process before automating it.
Conclusion
AWS Application Migration Service is an easy-to-use solution that helps rehost servers to AWS Cloud. It has an abundant set of features and integrates seamlessly with many other AWS services. Its architecture is straightforward and built with a huge lift-and-shift experience in mind.
This article was aimed to be a quick walkthrough of the architecture and the process, viewing them from the AWS Console, however, the same setup could be achieved with AWS SDKs or AWS CLI. Hopefully, this guide will be helpful for those who are new to this service. Let me know if you have questions or comments!
Looking for a partner to help you migrate your workloads to the Cloud, be it with AWS MGN or not, feel free to contact us. Ippon is a trusted migration partner who is here to help you! To learn more about cloud migrations, read our latest eBook Assessing the Maturity of your Cloud Strategy, or check out our Cloud Migration On-Demand Webinar Series, where we discuss how to prepare an organization for a seamless transition to the cloud.
.png?width=520&height=294&name=Ippon%20(2).png)


Comments