
Authentication vs Authorization
One of the first concepts to understand when designing access control with OAuth 2.0 is the concept of Authentication vs Authorization. Authentication deals with understanding who the user or system is and Authorization deals with what that user or system has access to. Oauth 2.0 has multiple options on how to retrieve a token which would contain who our user is and sometimes what it has access to. However as our end user is a system we are down to a single option as all other options require a user to enter their credentials in a form.
Client Credentials Flow: This flow is specifically designed for when a system is requesting a resource from a different system. It uses a Client ID and a Client Secret to obtain an Access Token from the Authorization Server (Okta in our use case). You should treat your client ID and secret as passwords and never put them in source code. Use environment variables, or a secrets manager to inject them into an application. You can even use the JHipster registry for that.
Depending on the OAuth 2.0 flow you chose you will obtain an ID Token, an Access Token or both. An ID Token carries information from the end user such as name, email and can also carry a list of permissions in the form of groups or scopes. If you're followed Matt Raible's blog, you'd have already setup some groups. These groups will come in the ID Token under the attribute: groups.
The Client Credentials Flow will only provide you with an Access Token, and this token does not have any group information. In fact with Okta, when you create a system user, you cannot add that system user to a group. This limitation isn't unique to Okta as you'll find the same limitation with Cognito or AuthO.
Using Spring Security we can now limit access to our APIs based on user authorities. If you open up your SecurityConfiguration class on a JHipster application you'll find how JHipster configures access control:

This essentially limits what you can access on the application based on what your permissions are. In this example there's three levels:
permitAll()-> Allows anyone, including non authenticated requestsauthenticated()-> Allows any logged in usershasAuthority(..)-> Allows logged in users that have the required Authority
However, since Okta won't allow systems to be part of a group, we won't have any Authorities. So for now we can only access the endpoints that require authentication but not those that require a specific role. Let's solve this problem, and our first step is to setup Okta.
Okta setup
Go to https://developer.okta.com/ and setup a free developer account. This account is only limited by the amount of users you can have, and not by the features.
Next is to go to Applications tab and create two applications:
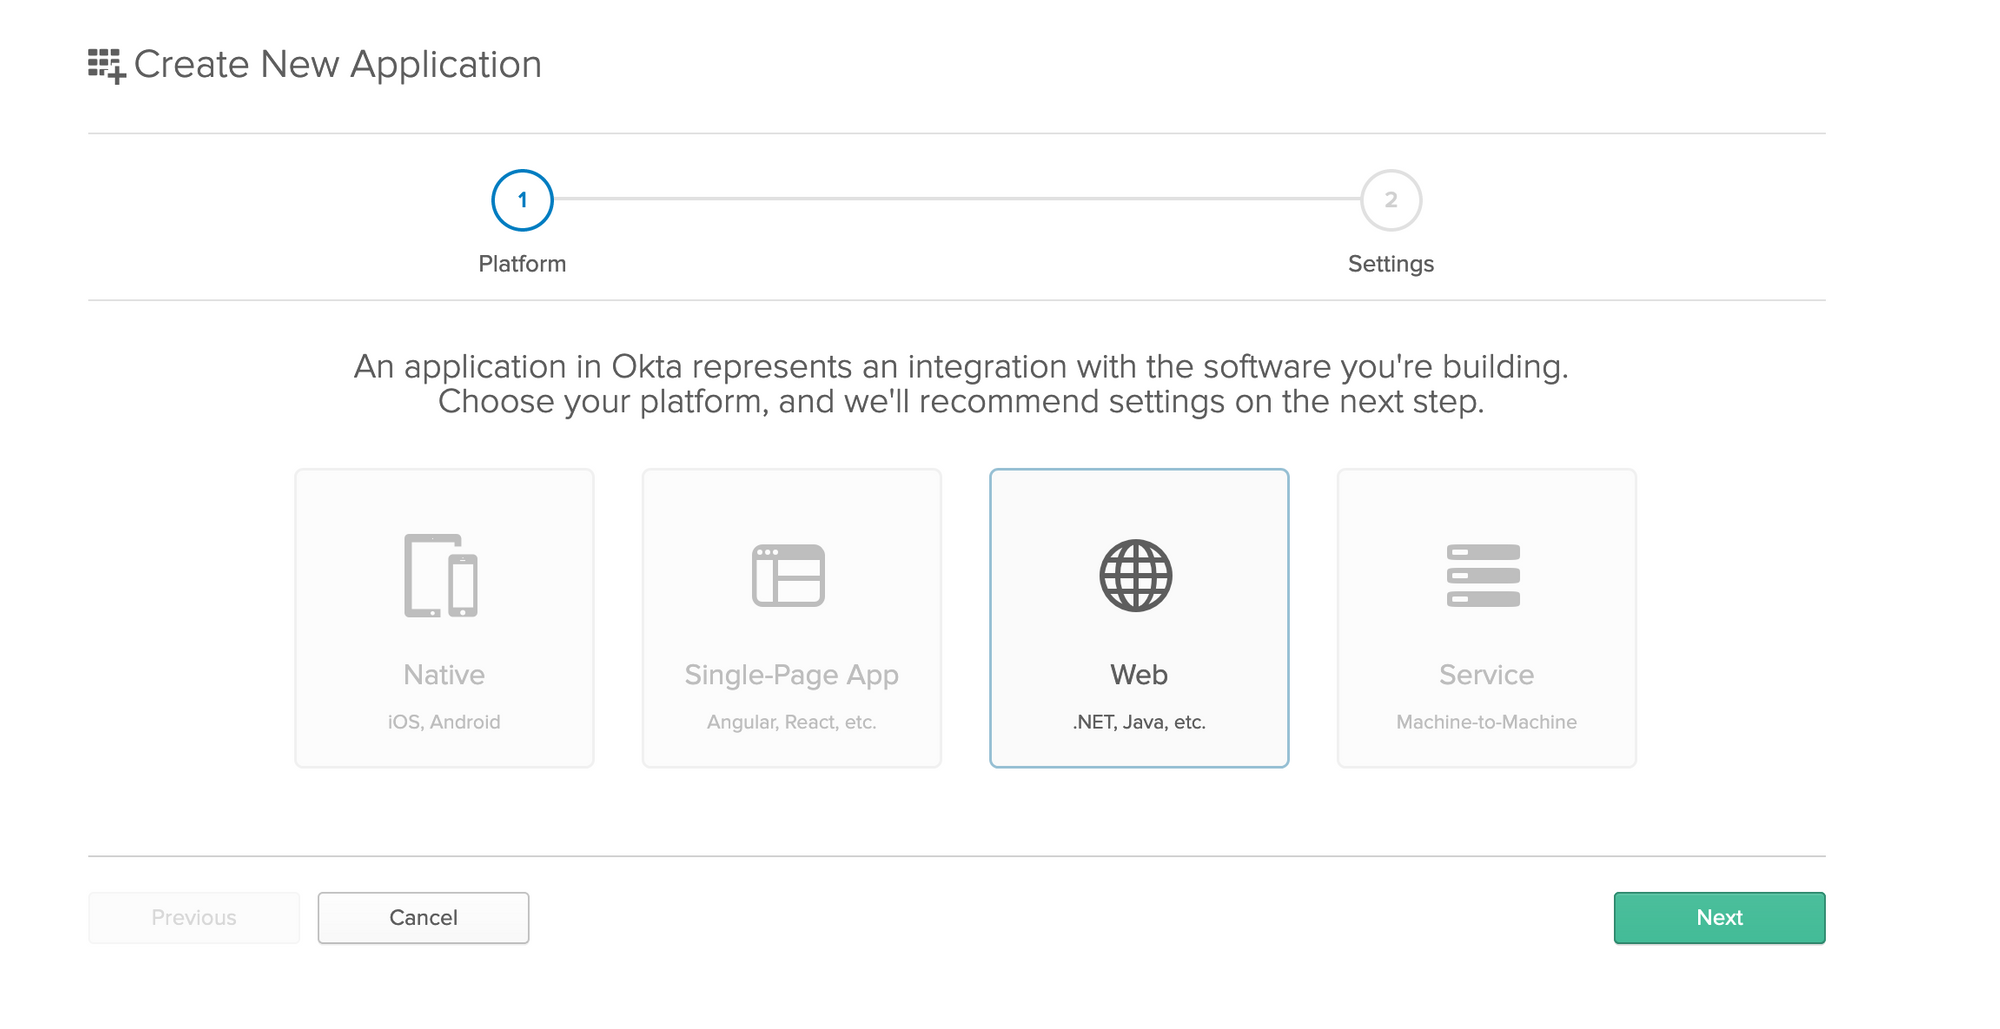
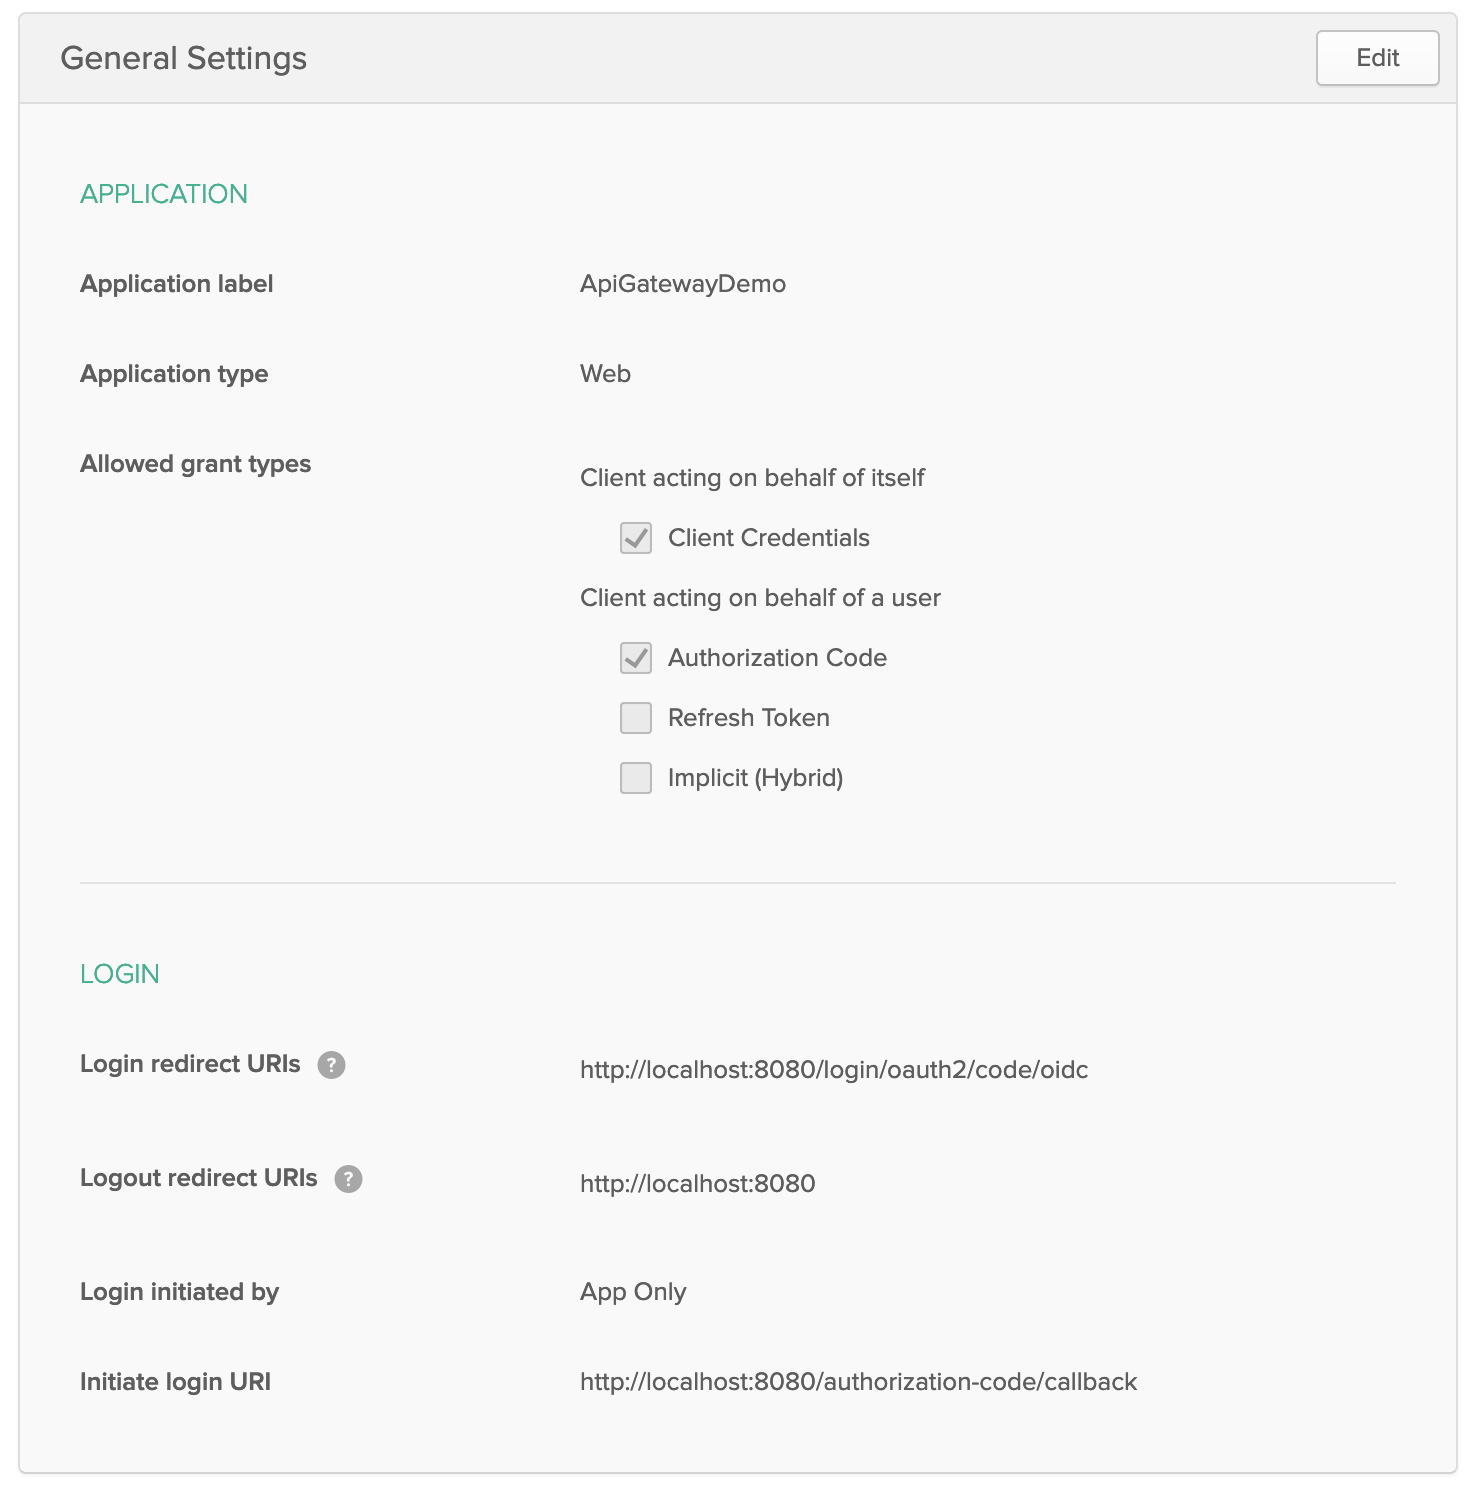
We'll create a Web application and a Service application. The service one is self explanatory as it only requires the name of the application as input. Here's what I have for my Web application:
Next is to go to Users -> Groups and create two groups: ROLE_ADMIN and ROLE_USER. These are the default roles that JHipster comes out of the box. You should also add your user to both of those roles. If you want, you may create another user and only give them ROLE_USER to see what's different when they login.
Then you'll need to setup your authorization server to pass the groups in the ID TOKEN and Access Token when a user authenticates:
Go to: API -> Authorization Server and edit the default server's claims tab so that it matches:
And note that the settings tab has your issuer URL to request tokens, you'll need that to setup your JHipster application.
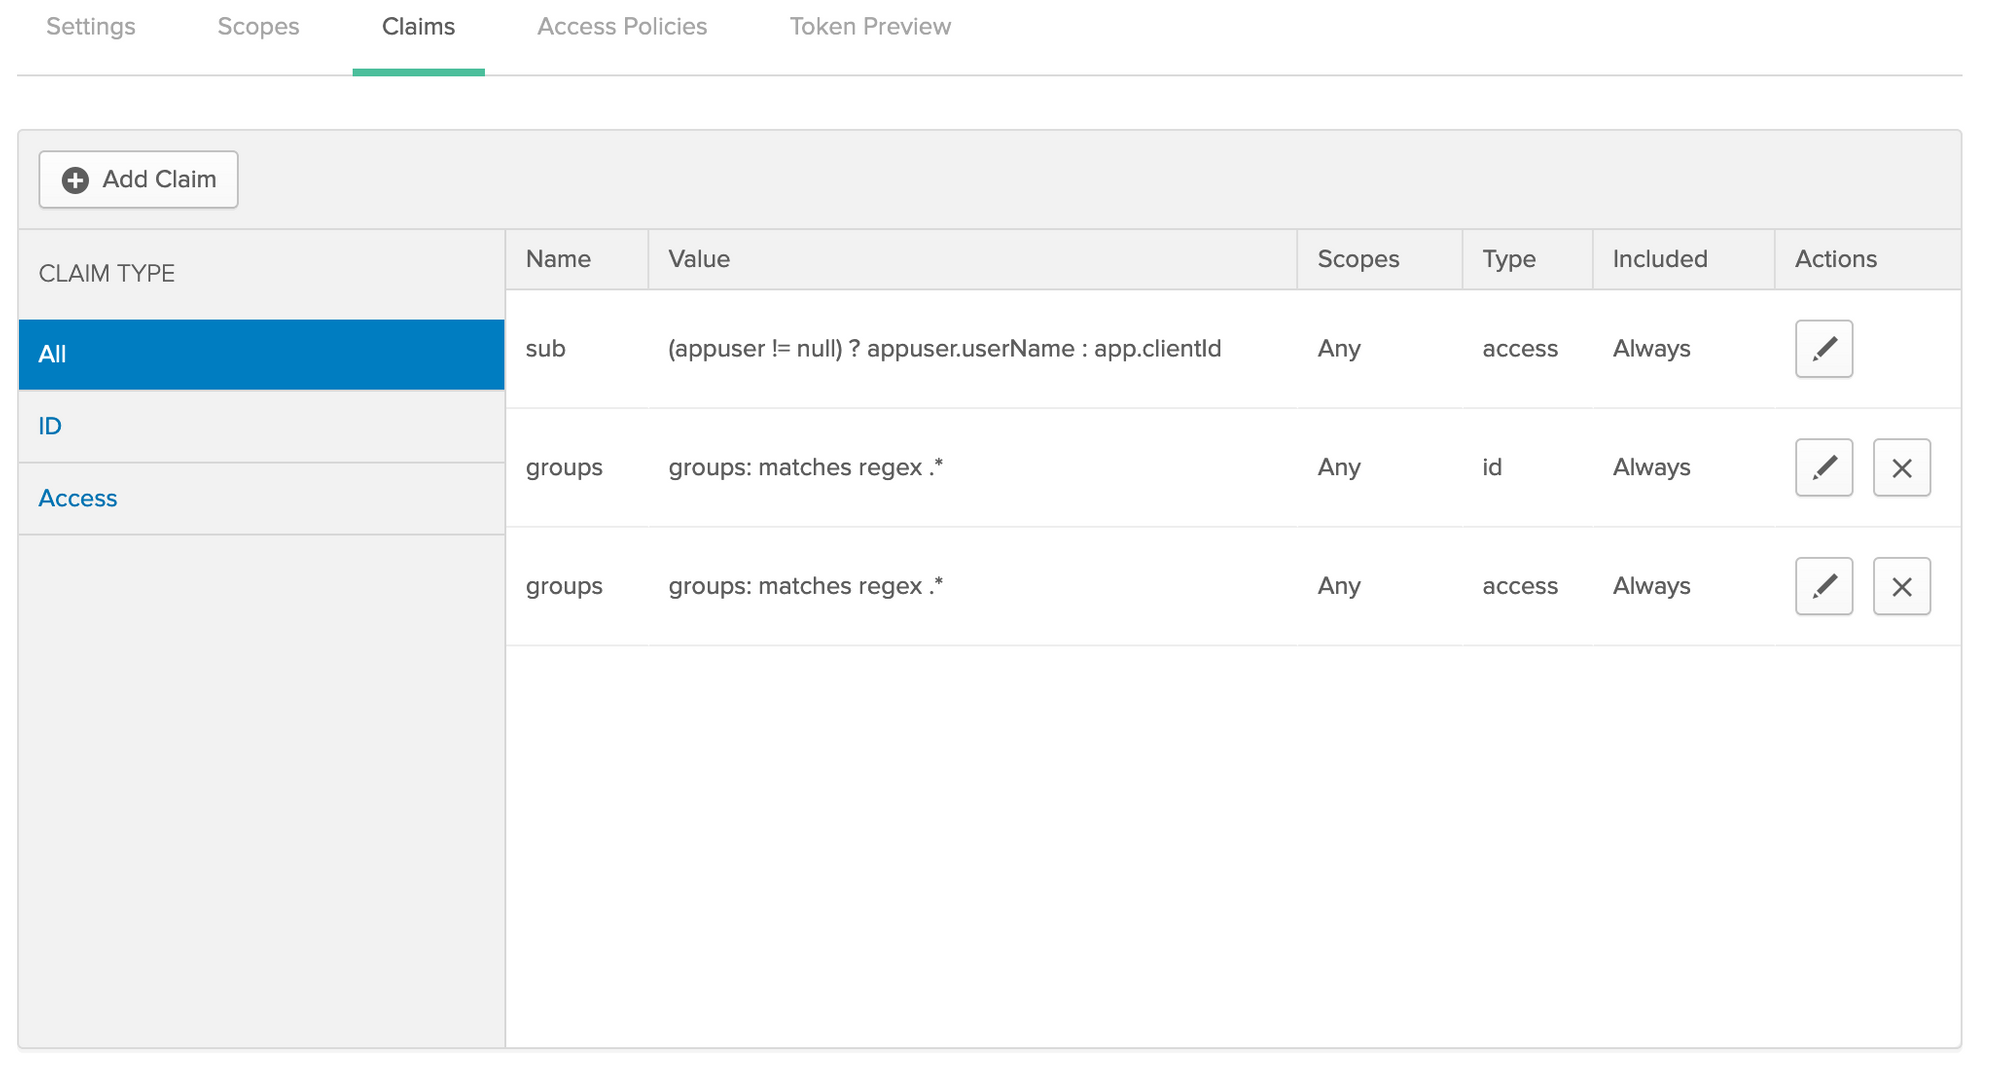
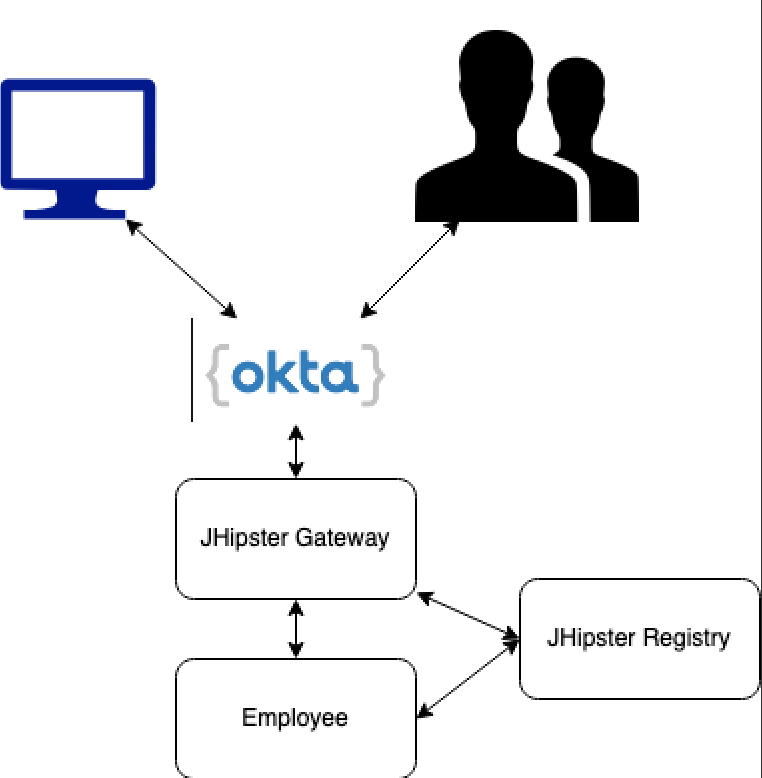
It's important to have both the ID and Access Token setup. The ID token is just for your web session, and your gateway will pass an Access Token for your user to your microservices.
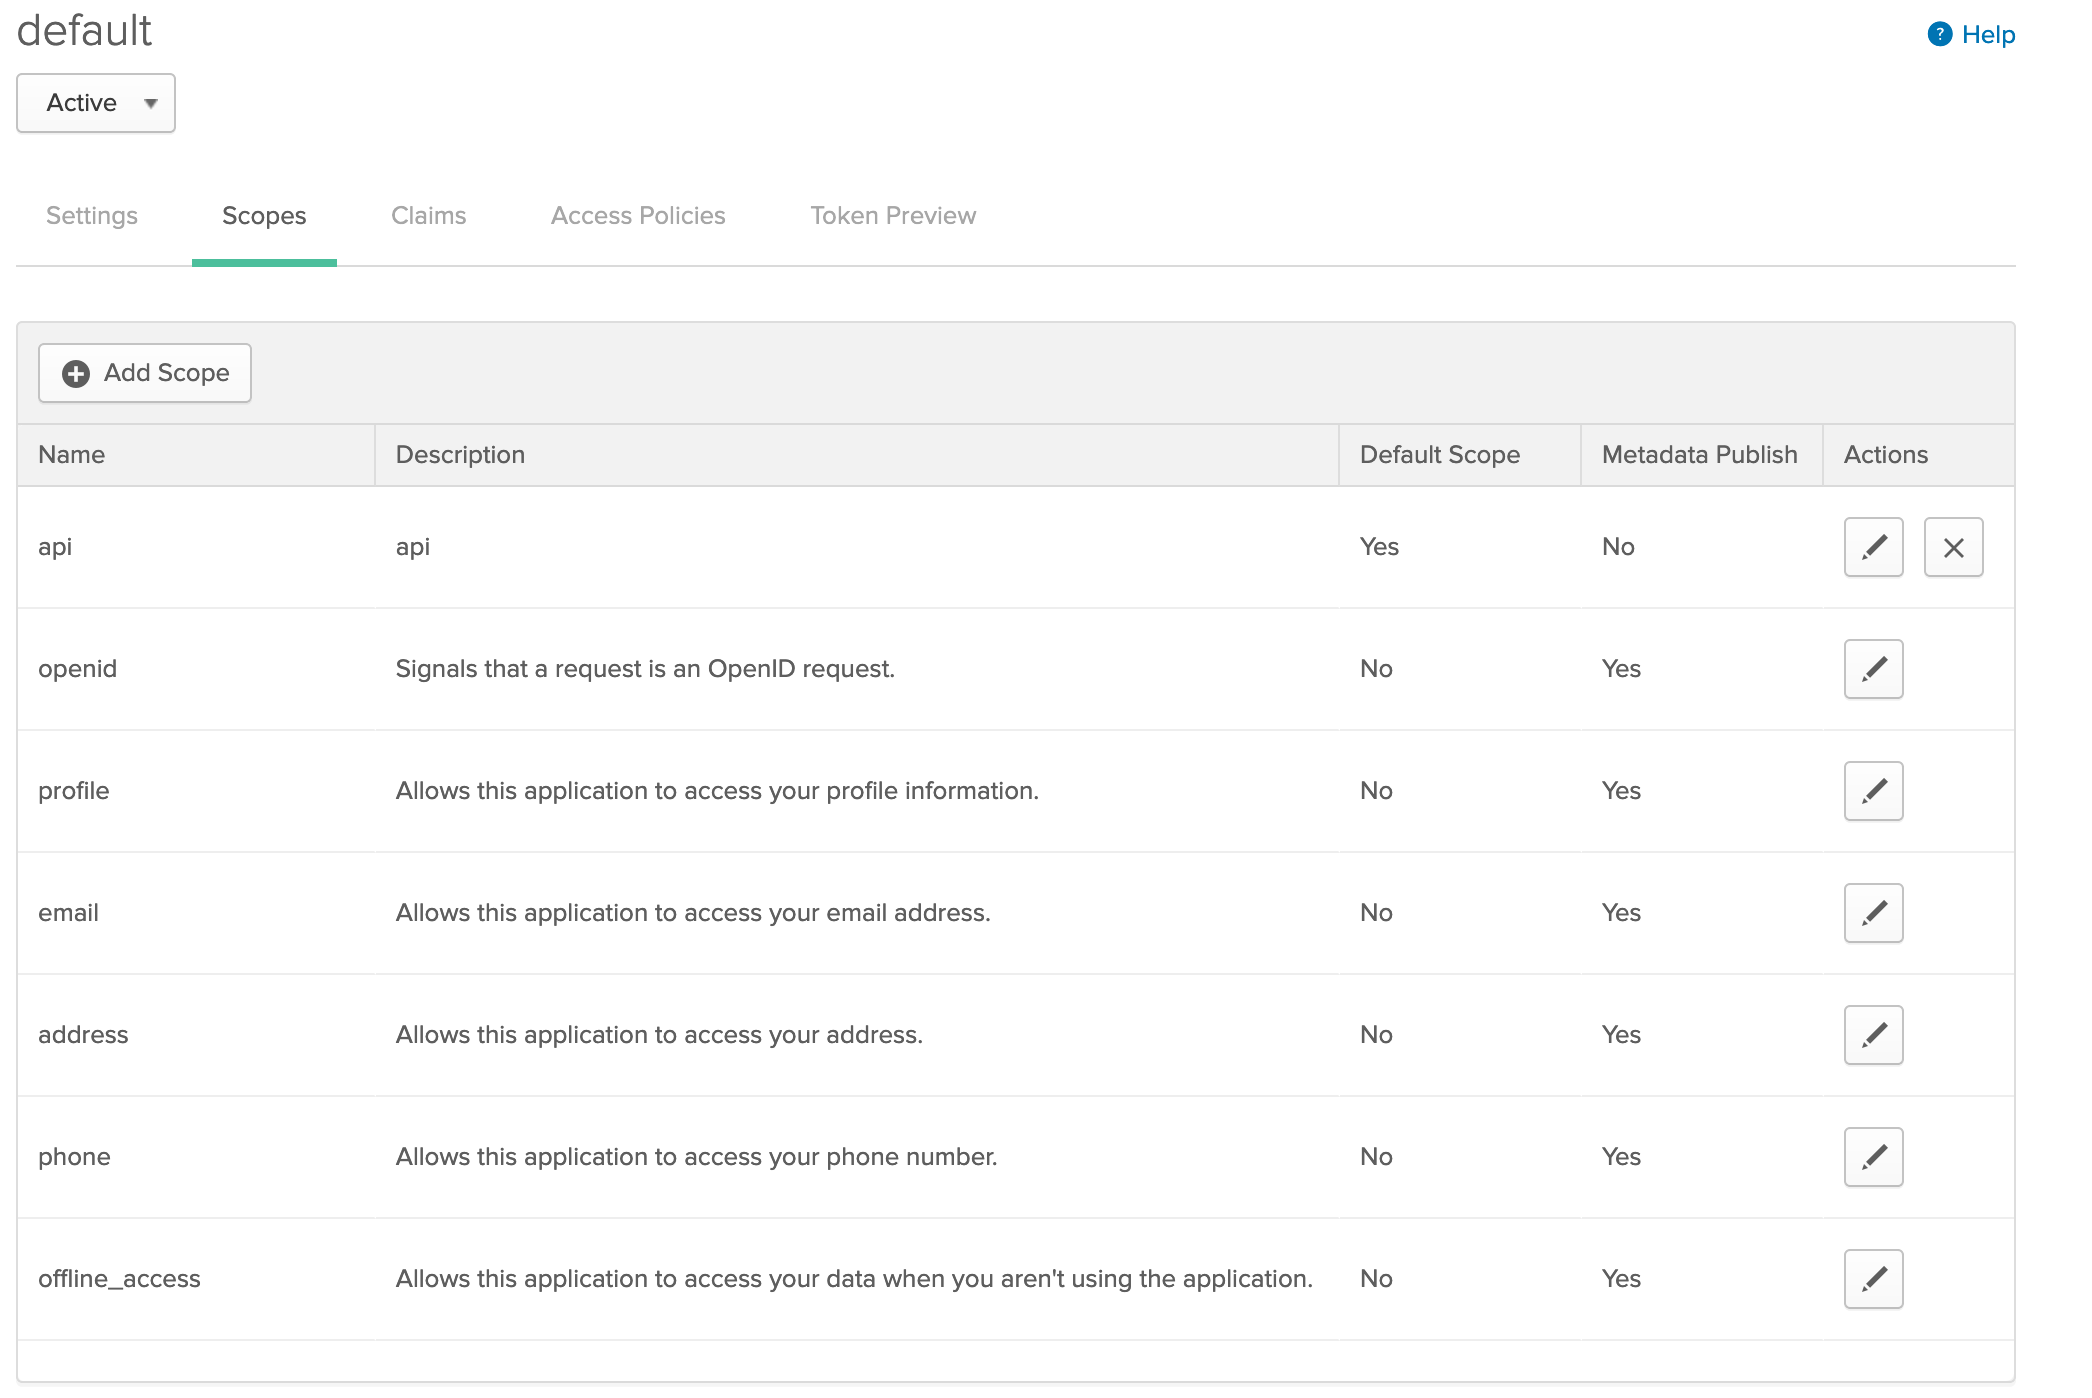
Now add a custom scope, I named mine api and make it a default scope:
JHipster setup
Assuming you have JHipster installed, create a new directory anywhere and name it api-blog so that it's consistent with this example. Copy the following JHipster JDL to jhipster.jdl in that directory:
application {
  config {
    baseName gateway,
    packageName com.ippon.gateway,
    applicationType gateway,
    authenticationType oauth2,
    databaseType sql,
    devDatabaseType h2Disk,
    prodDatabaseType postgresql,
    enableHibernateCache false,
    serviceDiscoveryType eureka,
  }
  entities Employee, ApiKey
}

application {
  config {
    baseName employee,
    packageName com.ippon.employee,
    applicationType microservice,
    authenticationType oauth2,
    databaseType sql,
    devDatabaseType h2Disk,
    prodDatabaseType postgresql,
    enableHibernateCache false,
    serverPort 8081,
    serviceDiscoveryType eureka
  }
  entities Employee
}

entity Employee {
  firstName String required,
  lastName String required,
  salary BigDecimal
}

entity ApiKey {
    description String,
    clientId String required
}

microservice Employee with employee


deployment {
  deploymentType docker-compose
  appsFolders [gateway, employee]
  monitoring no
}
Then run the following command in that directory: $ jhipster import-jdl jhipster.jdl
This will create three folders:
gatewayContains your gateway projectemployeeContains your employee microservice projectdocker-composeContains docker files to run your architecture locally
By default your applications will connect to KeyCloak, an open source alternative to Okta, which is also supported out of the box by JHipster. Let's now connect JHipster to Okta:
In both your gateway and employee projects you'll need to modify: src/main/resources/config/application.yml and look for the property: spring.security.oauth2 and modify it as such:
spring:
  security:
    oauth2:
      client:
        provider:
          oidc:
            issuer-uri: https://<YOUR_OKTA_DEV_ACCOUNT>.okta.com/oauth2/default
        registration:
          oidc:
            client-id: <YOUR_CLIENT_ID>
            client-secret: <YOUR_CLIENT_SECRET>
If you want, you can place the above in your gateway's JHipster registry configuration in:
src/main/docker/central-server-config/localhost-config-application.yml
This will also modify your registry login to become Okta based. If you don't want the registry to login via Okta, remove the oauth2 profile when starting its docker image, you'll be able to login using admin as your username and password.
Running Locally
We're ready for a quick test to make sure we have all the pieces in place to start our modifications:
- Start the JHipster registry: from the gateway application's root folder:
docker-compose -f src/main/docker/jhipster-registry.yml - run:
./mvnw -Pprod clean verifyin the root of the gateway and employee microservice - Start your employee microservice in your favorite IDE
- Start your gateway in your favorite IDE
Go to localhost:8761 in your browser to check the registry. Login with your Okta credentials:
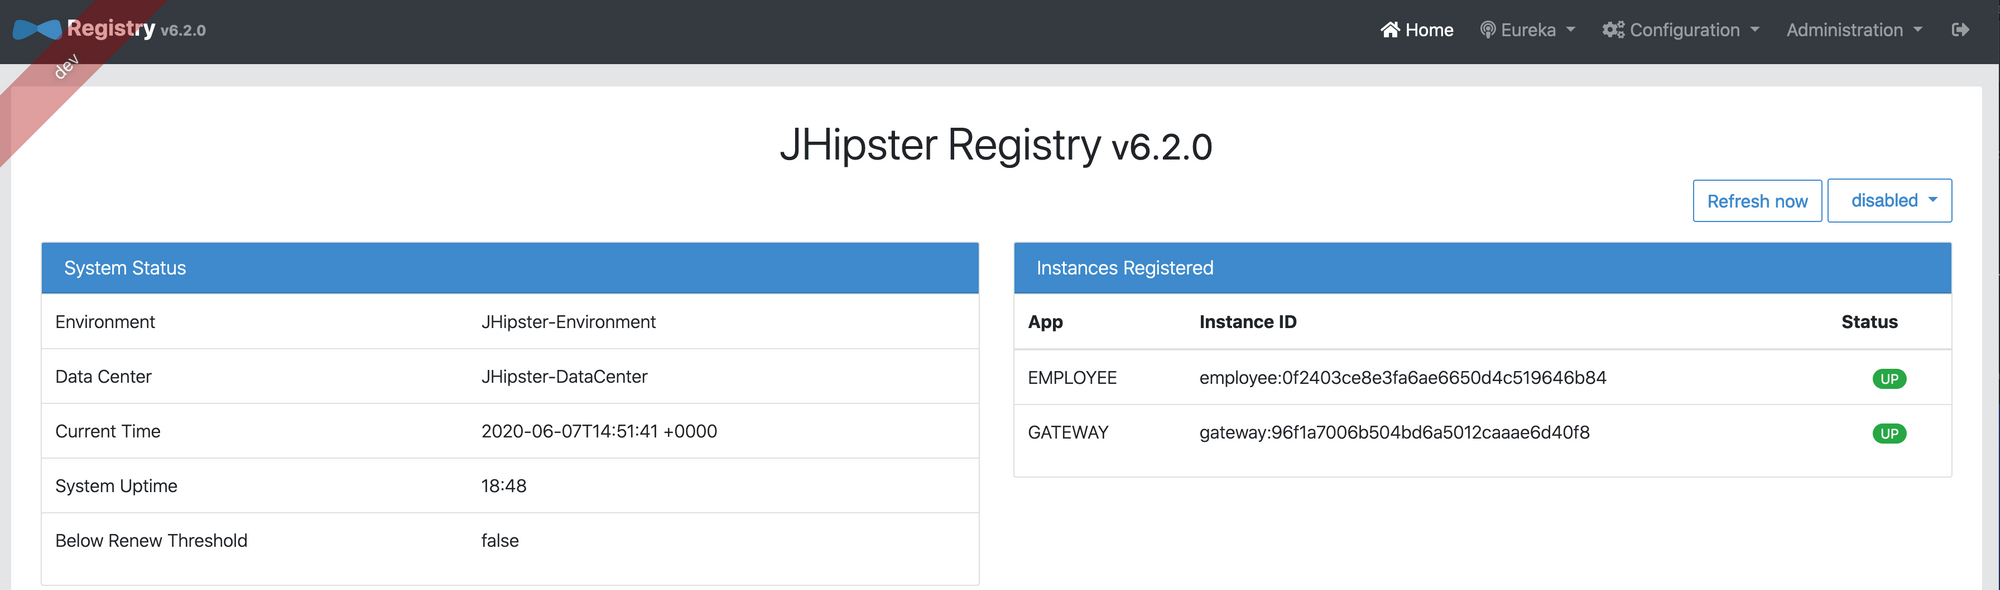
You should see both your Employee and your Gateway as up. Now go to your gateway's UI: localhost:8080, and add an employee:

Setting up a system user
Go to Okta, and find your system application and copy your Client ID and Secret. Using your favorite REST client (I use Postman) setup this request:
curl --location --request POST 'https://<YOUR_OKTA_DOMAIN>/oauth2/default/v1/token' \
--header 'Accept: application/json' \
--header 'Content-Type: application/x-www-form-urlencoded' \
--data-urlencode 'client_id=<YOUR_CLIENT_ID>' \
--data-urlencode 'client_secret=<YOUR_CLIENT_SECRET>' \
--data-urlencode 'grant_type=client_credentials'
You should get a response that looks like this:
{
    "token_type": "Bearer",
    "expires_in": 3600,
    "access_token": "eyJr******....",
    "scope": "api"
}
You should now be able to query customers via this system account by setting up a request like this:
curl --location --request GET 'localhost:8080/services/employee/api/employees/' \
--header 'Content-Type: application/json' \
--header 'Accept: application/json' \
--header 'Authorization: bearer eyJr*****......'
And get a response:
[
    {
        "id": 2151,
        "firstName": "John",
        "lastName": "Smith",
        "salary": 85000.00
    }
]
If you remove the Authorization header, you should get a 401 Unauthorized response code.
We've now successfully used our Gateway as an API gateway, however as soon as we try to limit or grant access to certain resources for our System user we'll run into issues.
On a side note, if you are getting CSRF errors when using a system account you may need to disable CSRF in your gateway by modifying your SecurityConfiguration:
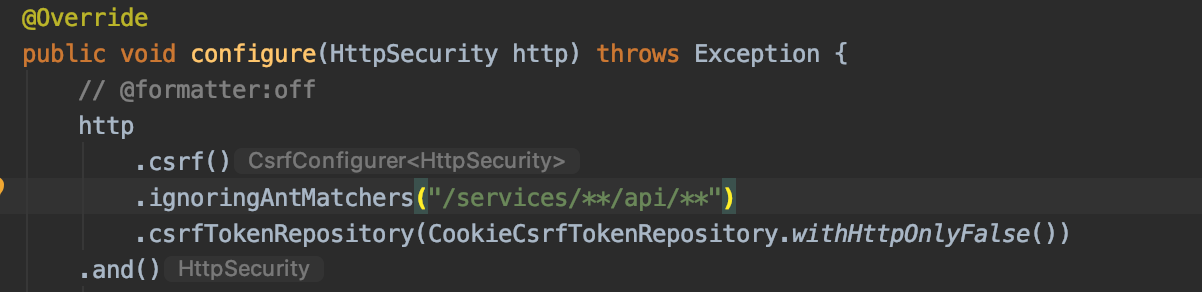
Make sure you don't completely disable it, as your UI still needs it. In this example I only disable it for requests that get routed to the microservices' APIs. Your microservice already has CSRF disabled by default.
Securing Endpoints via Roles
In the Employee microservice let's secure the Create, Edit and Delete endpoints. This can be done by adding @PreAuthorize("hasRole('ROLE_ADMIN')") to the three methods like this:
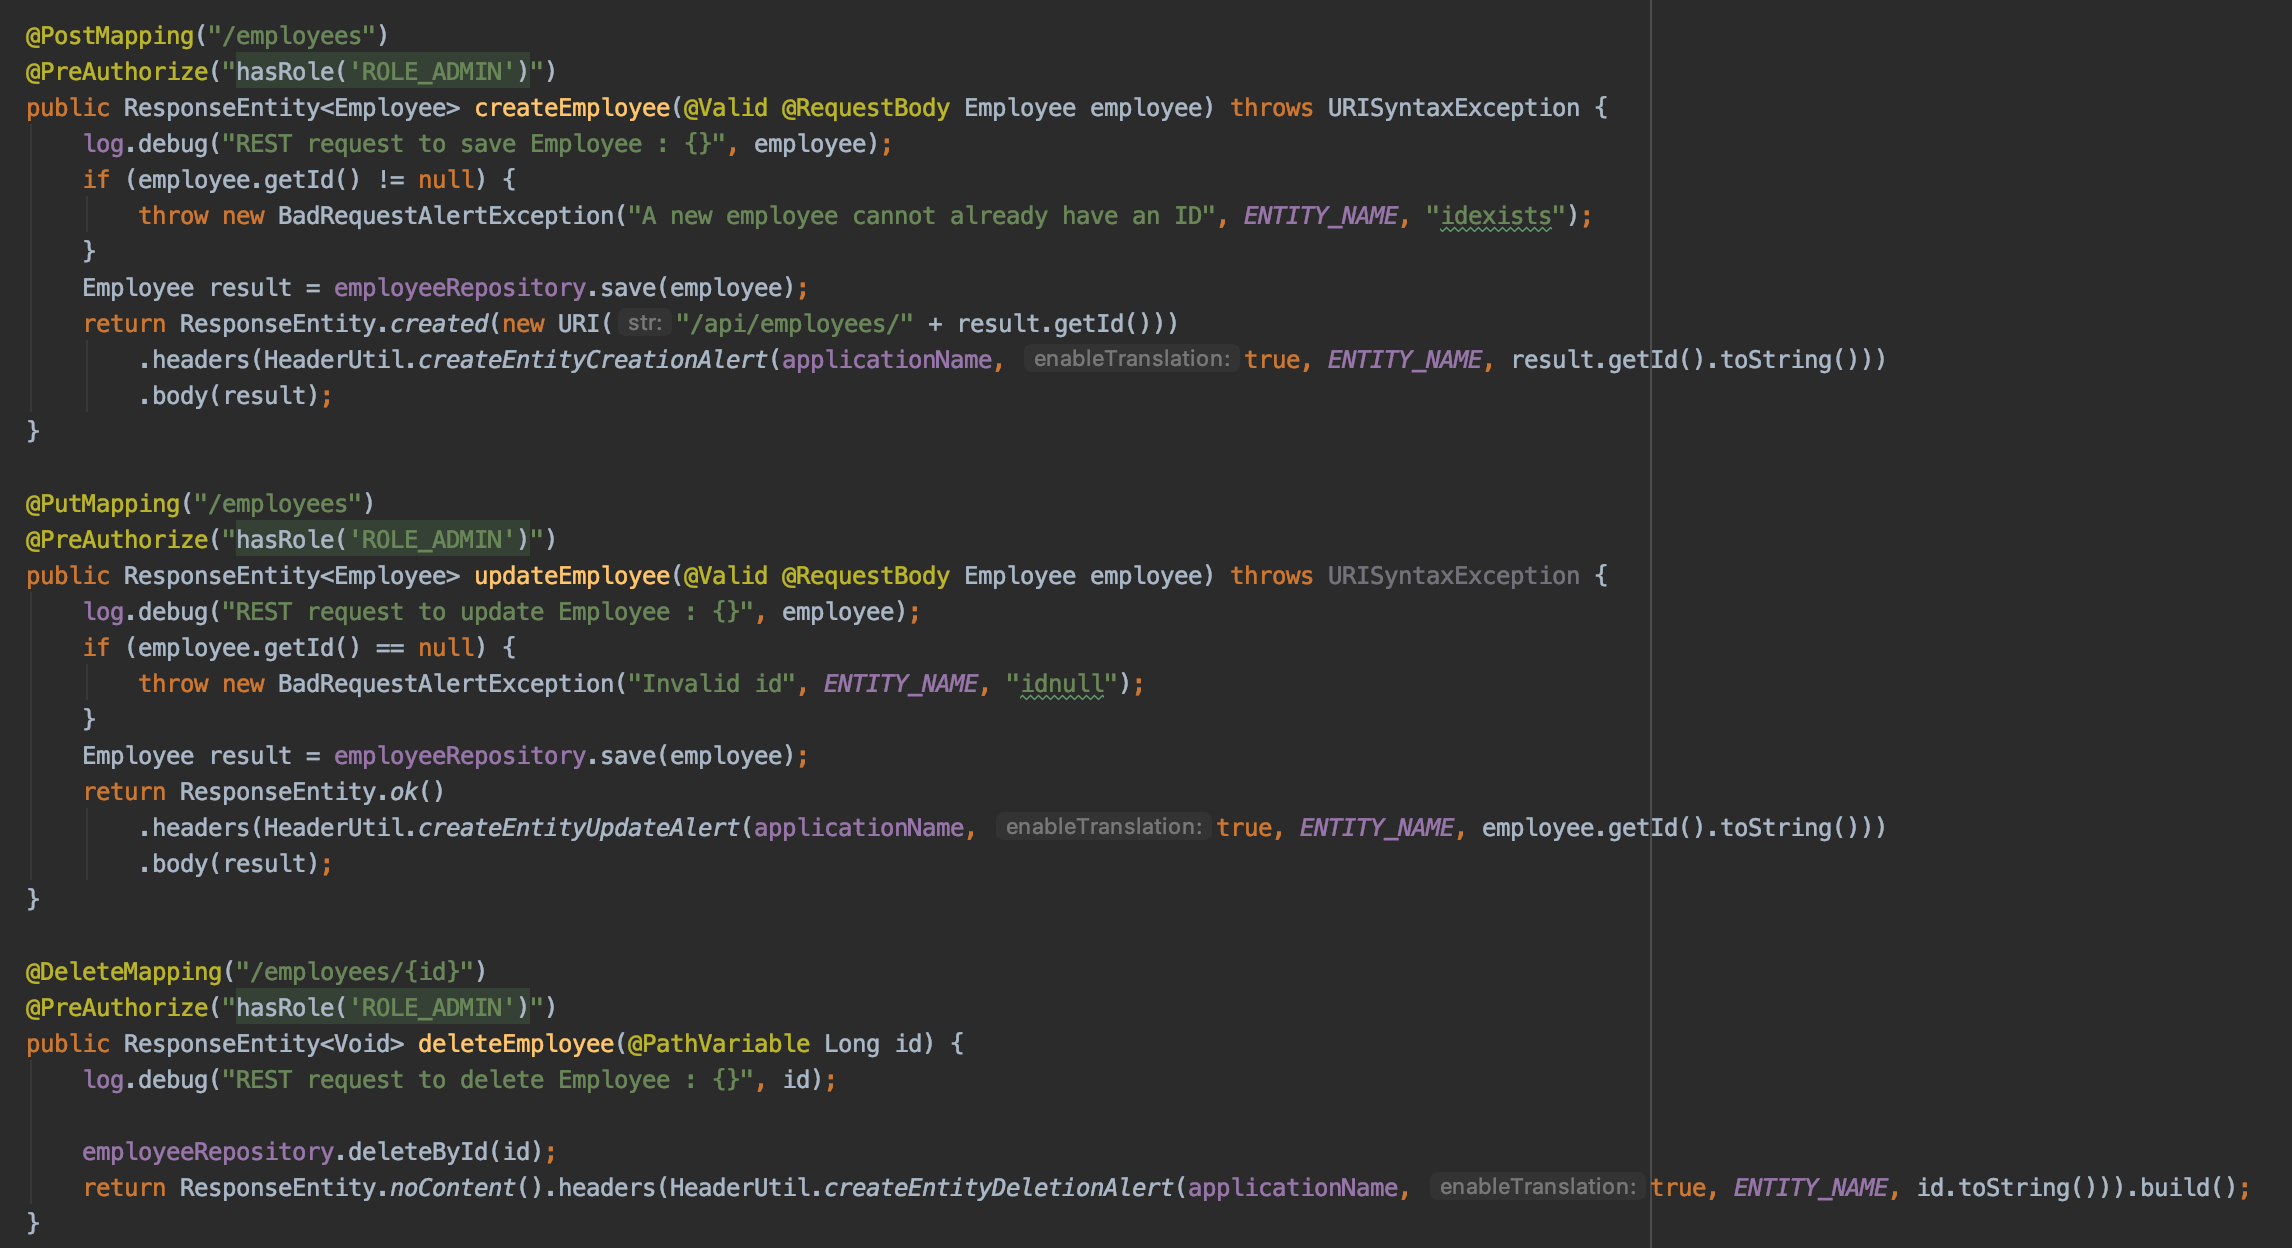
You can now attempt to delete your employee, make sure you use your employee ID instead of the one in this example as it's a generated value:
curl --location --request DELETE 'localhost:8080/services/employee/api/employees/2151' \
--header 'Content-Type: application/json' \
--header 'Accept: application/json' \
--header 'Authorization: bearer eyJr**********.......'
You should get a 403 Unauthorized error.
Adding support for roles for System Users
Gateway
As this isn't something you can do out of the box, we will be customizing our application to support this. Here are the following steps:
- Add support for storing Client IDs and adding relationships to authorities in the Gateway
- Have the Employee microservice query the Gateway with the Client ID and request the roles and add them to the SecurityContextHolder
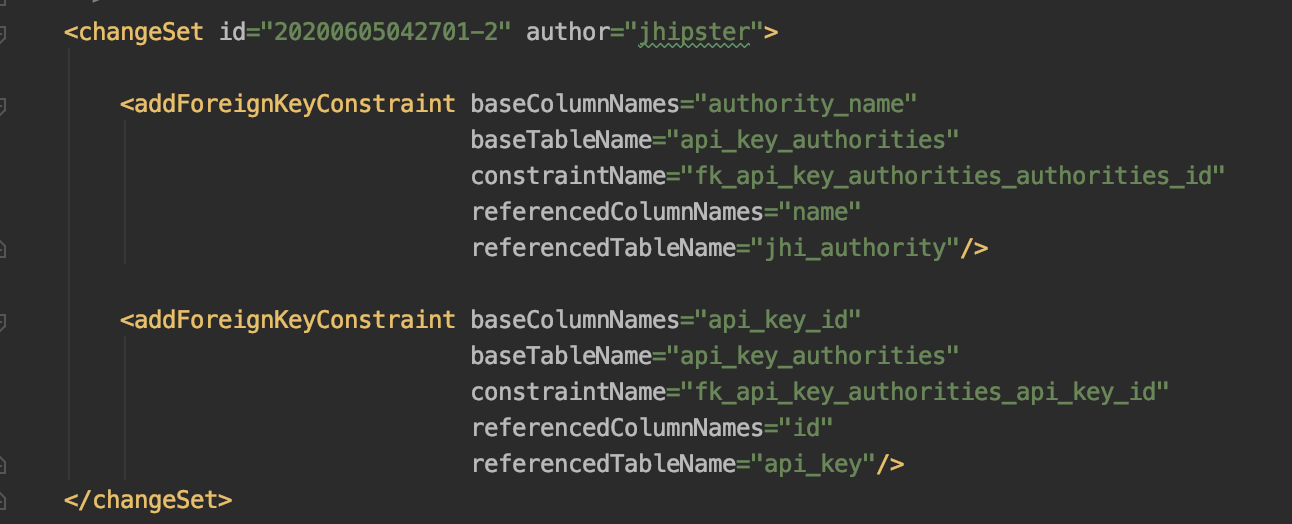
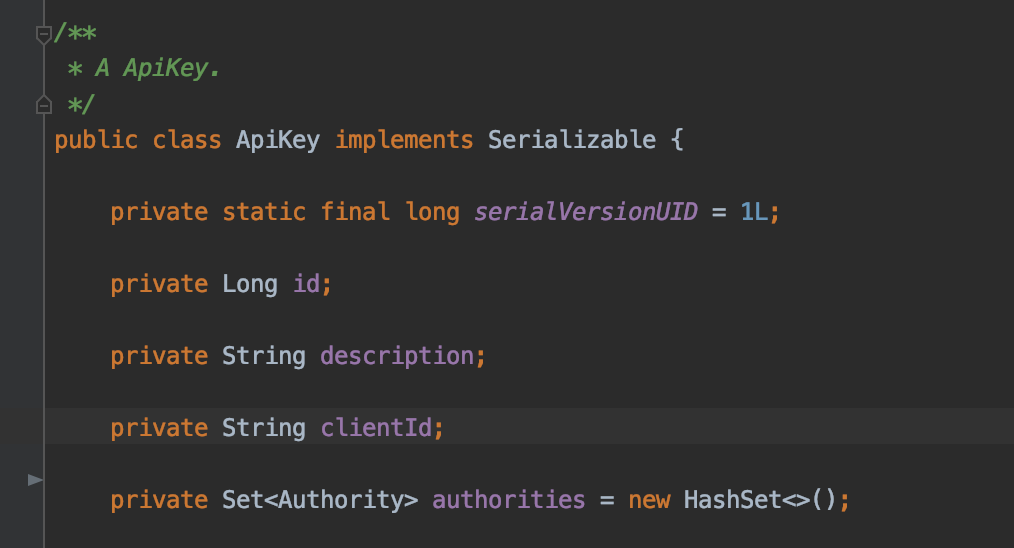
In our JDL you may have noticed the entity ApiKey, this was generated with this solution in mind. However since Authorities are already setup for Users, we'll just hook in the relationship in ApiKey. First lets add a new table:
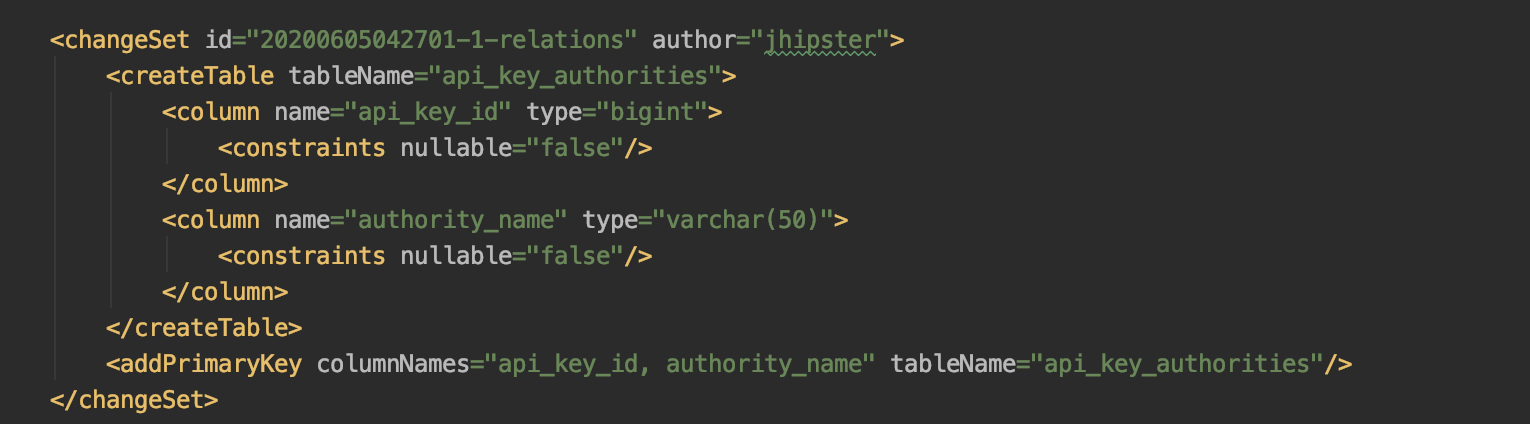
and some Foreign Key Constraints:
Then modify our ApiKey Entity class to add a Many to Many relationship:

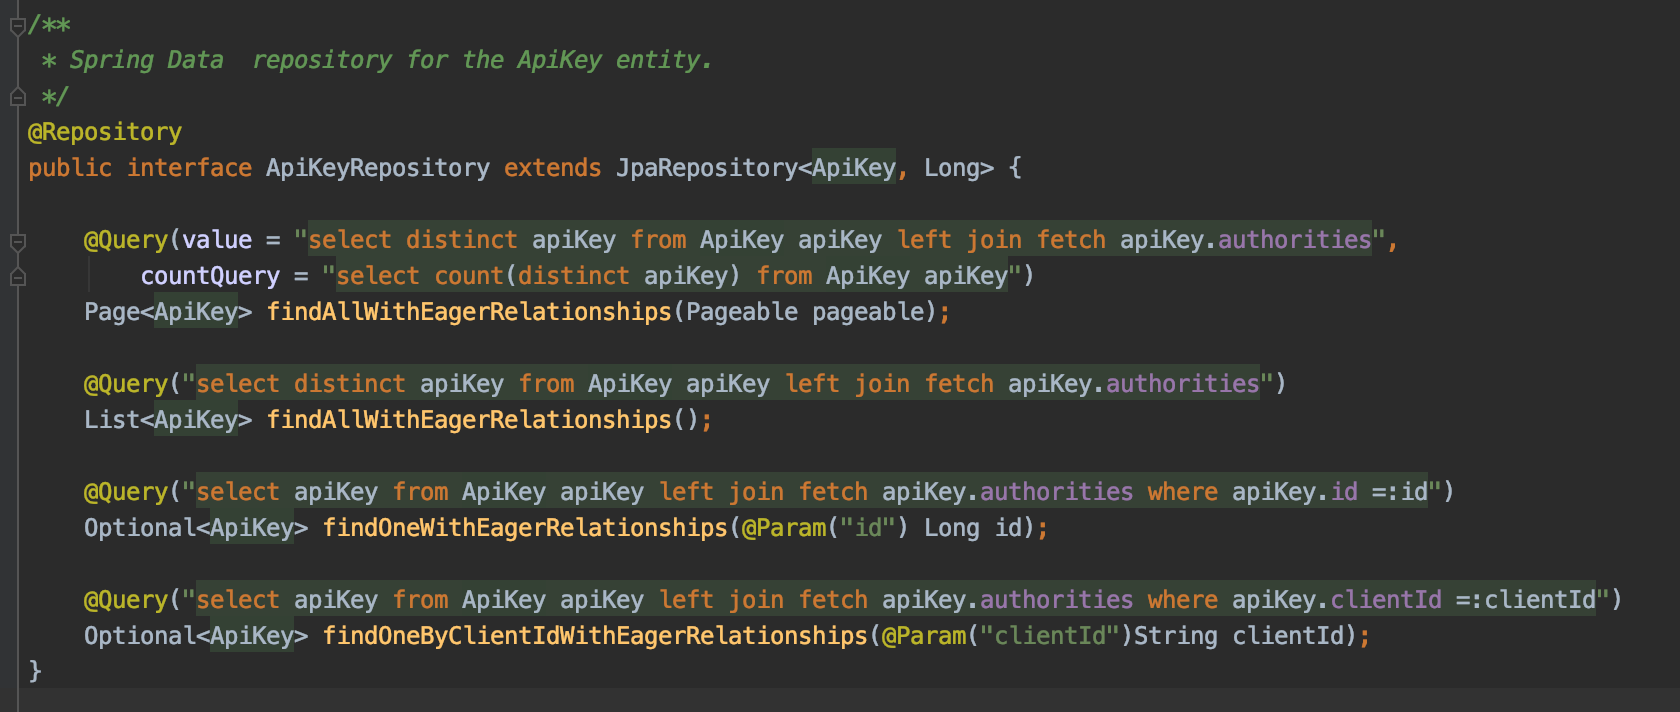
As well as our ApiKeyRepository to add the queries needed to load the relationship:
And finally a REST endpoint to query based on a Client ID:

Employee
Let's add support for Employee to query the Gateway by adding a FeignClient that will automatically work within Netflix OSS (The registry is based on Eureka):

I copied over the ApiKey from Gateway to Employee and removed the Entity annotations:
We now need to inject our GatewayFeignClient into our security configuration:

So that we can pass it to our JWTGrantedAuthenticationConverter:

And we modify our JWTGrantedAuthenticationConverter to query the Gateway for roles:
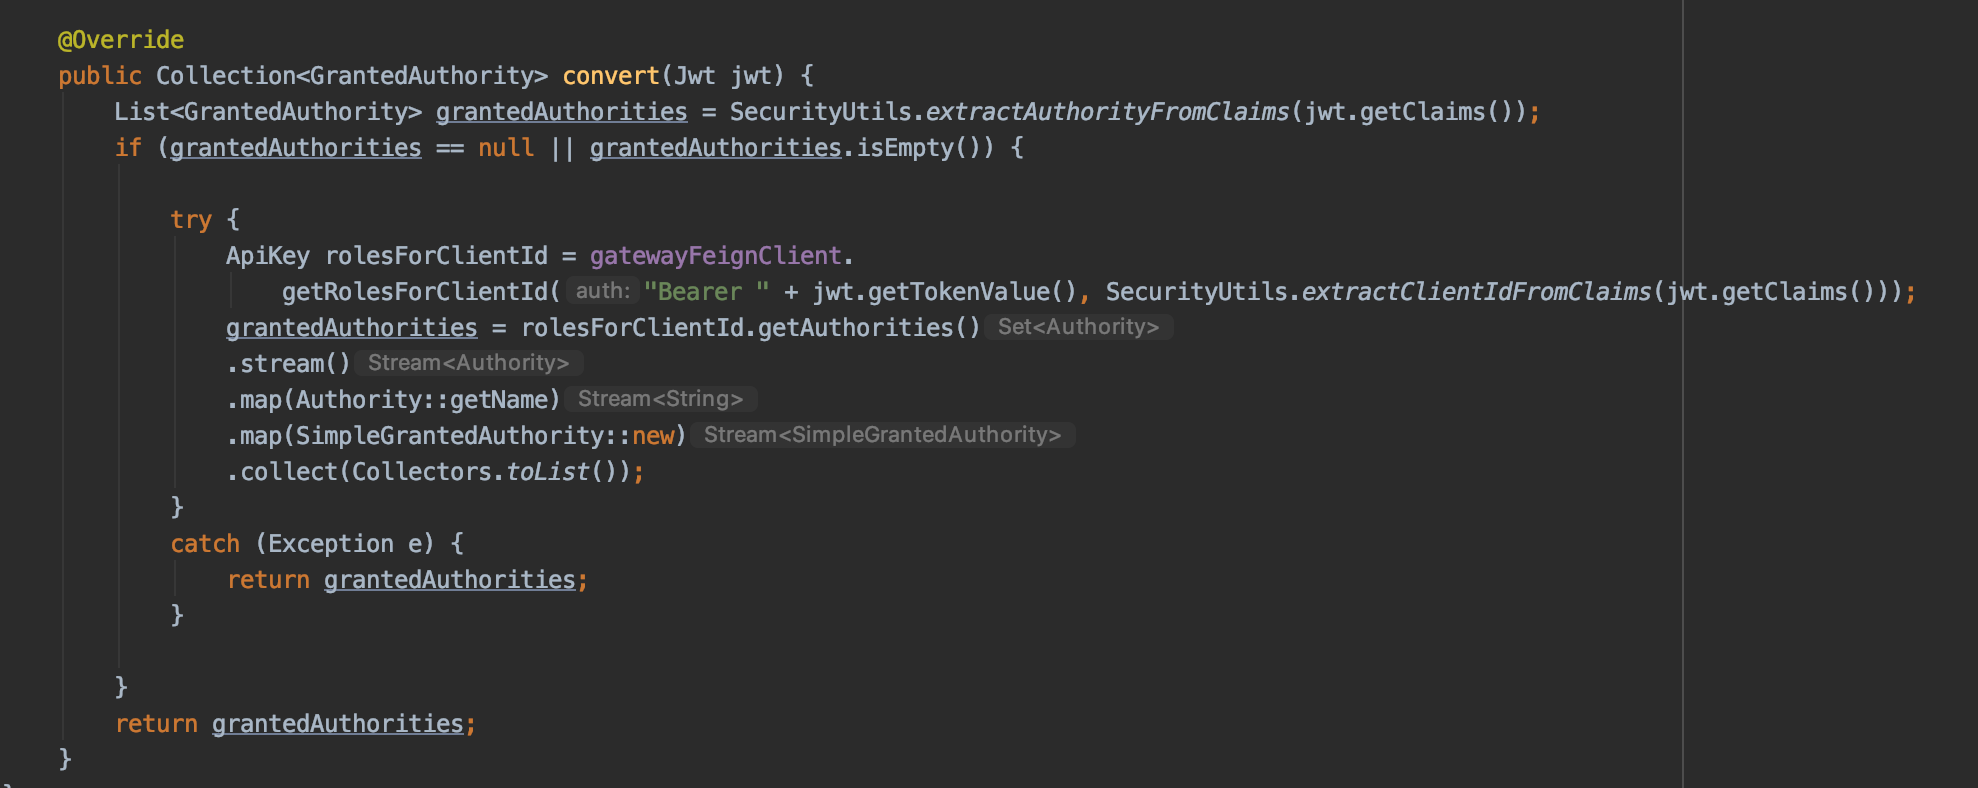
In this case, if the token contains GrantedAuthorities, then it's from a logged in User and the roles were already in the token. If there are none, it's a system user and thus the token will not have roles and we need to query the Gateway. Note that we convert the String roles into GrantedAuthorities so that our application will now work with the Spring annotations.
Let's test
Save an API key details into our gateway:
curl --location --request POST 'localhost:8080/api/api-keys/' \
--header 'Authorization: Bearer eyJraW*****......' \
--header 'Accept: application/json' \
--header 'Content-Type: application/json' \
--data-raw '{
	"description" : "API key for Admin role",
	"clientId" : "<YOUR_SYSTEM_CLIENT_ID>",
	"authorities" : [{"name": "ROLE_USER"},{"name":"ROLE_ADMIN"}]
}'
You can either create another system account with just ROLE_USER or modify this one on the fly as we test. I'll be modifying mine on the fly.
Validate that the UI still works. And next fetch a new Access Token from Okta for the system user that we just registered. And attempt to delete the user again:

Success! Let's summarize what just happened:
- We fetched an Access Token from Okta for a system user that does not have groups
- We used that Access Token as a Bearer token for a REST call that requires
ROLE_ADMIN - The Gateway routed the request to the Employee microservice
- The Employee microservice, before getting to the RestController, took that Token and inspected for ROLES and finding none, it used the same token to request what roles that client ID has from the Gateway. It then added them to the SecurityContextHolder.
- The RestController was able to validate that the Token had
ROLE_ADMINpermissions and allowed the request to pass.
Bonus material
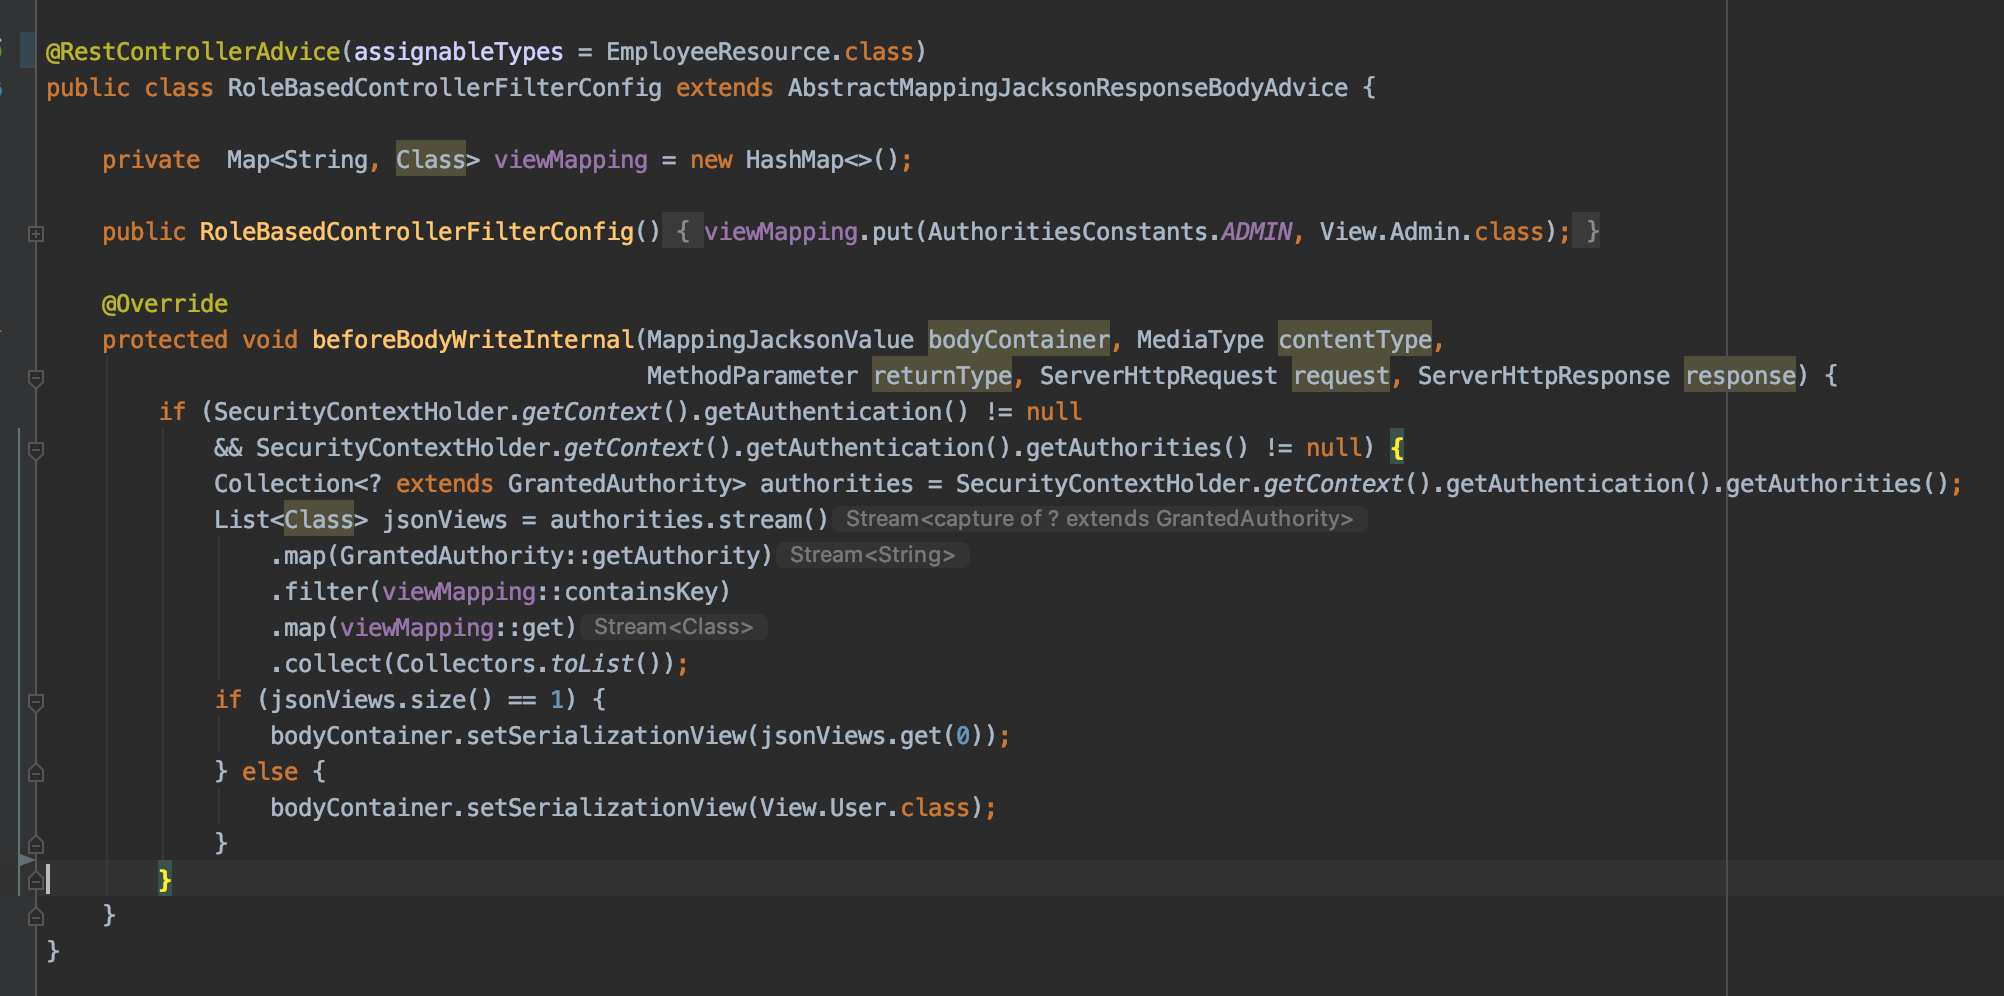
Now that we have a pattern in place to provide secure gateway to microservice calls, and be able to give roles to a System account let's also add some functionality to filter the Employee response based on roles. We want to make it so if a user has ROLE_ADMIN they can see the salary, and if they don't then it isn't returned.
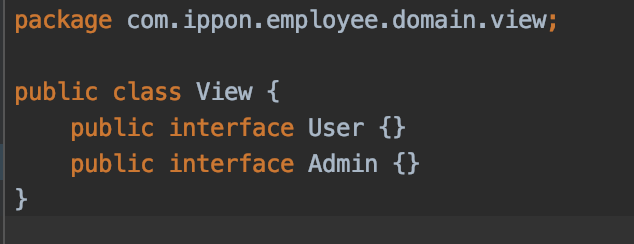
I added the following class to define my Views:
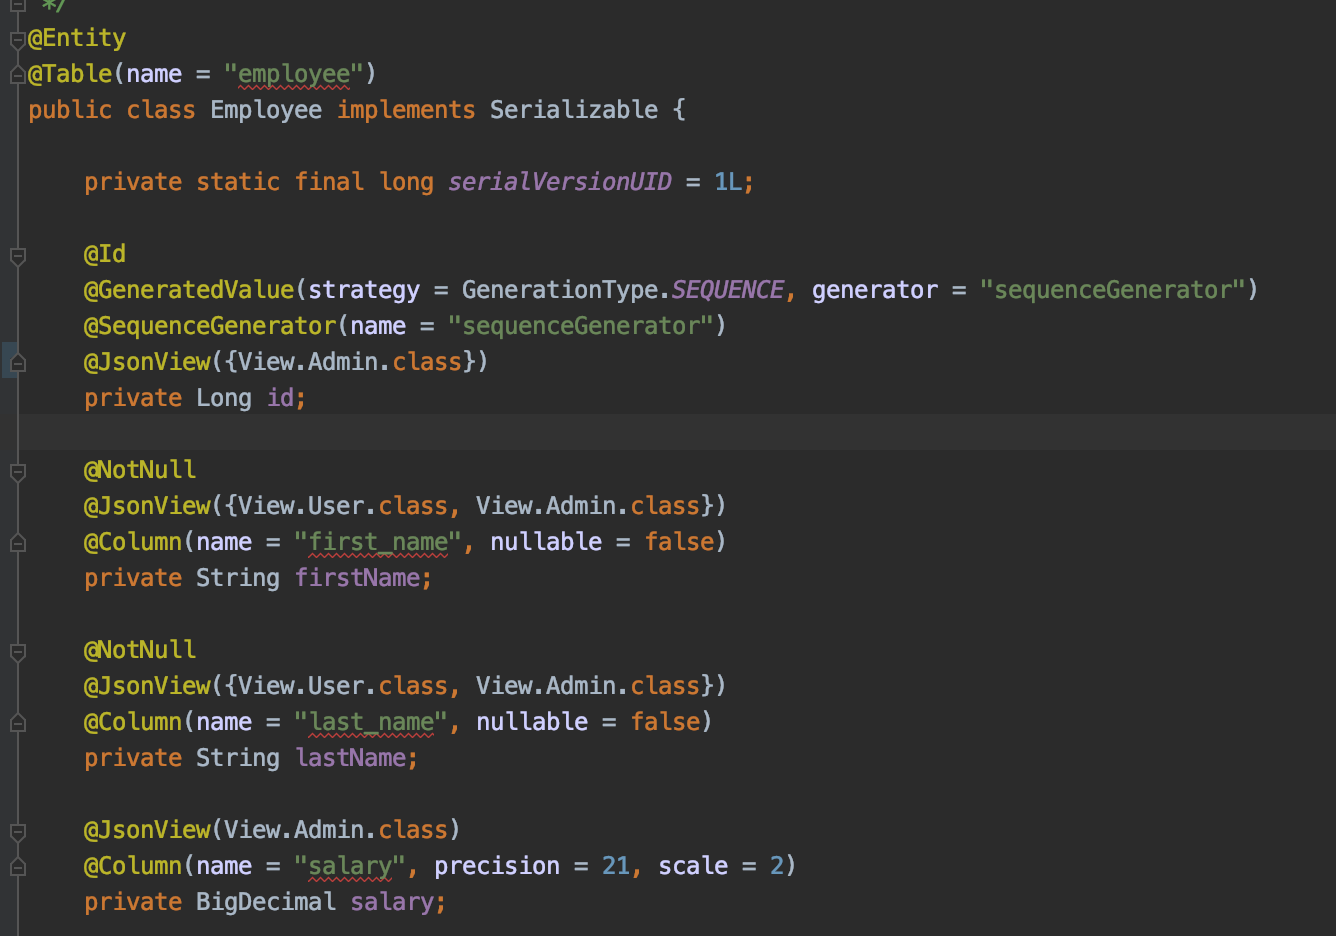
And I modified my Employee object to add JsonView:
Finally a RestControllerAdvice to tie Authorities with Views and do the filtering automatically:
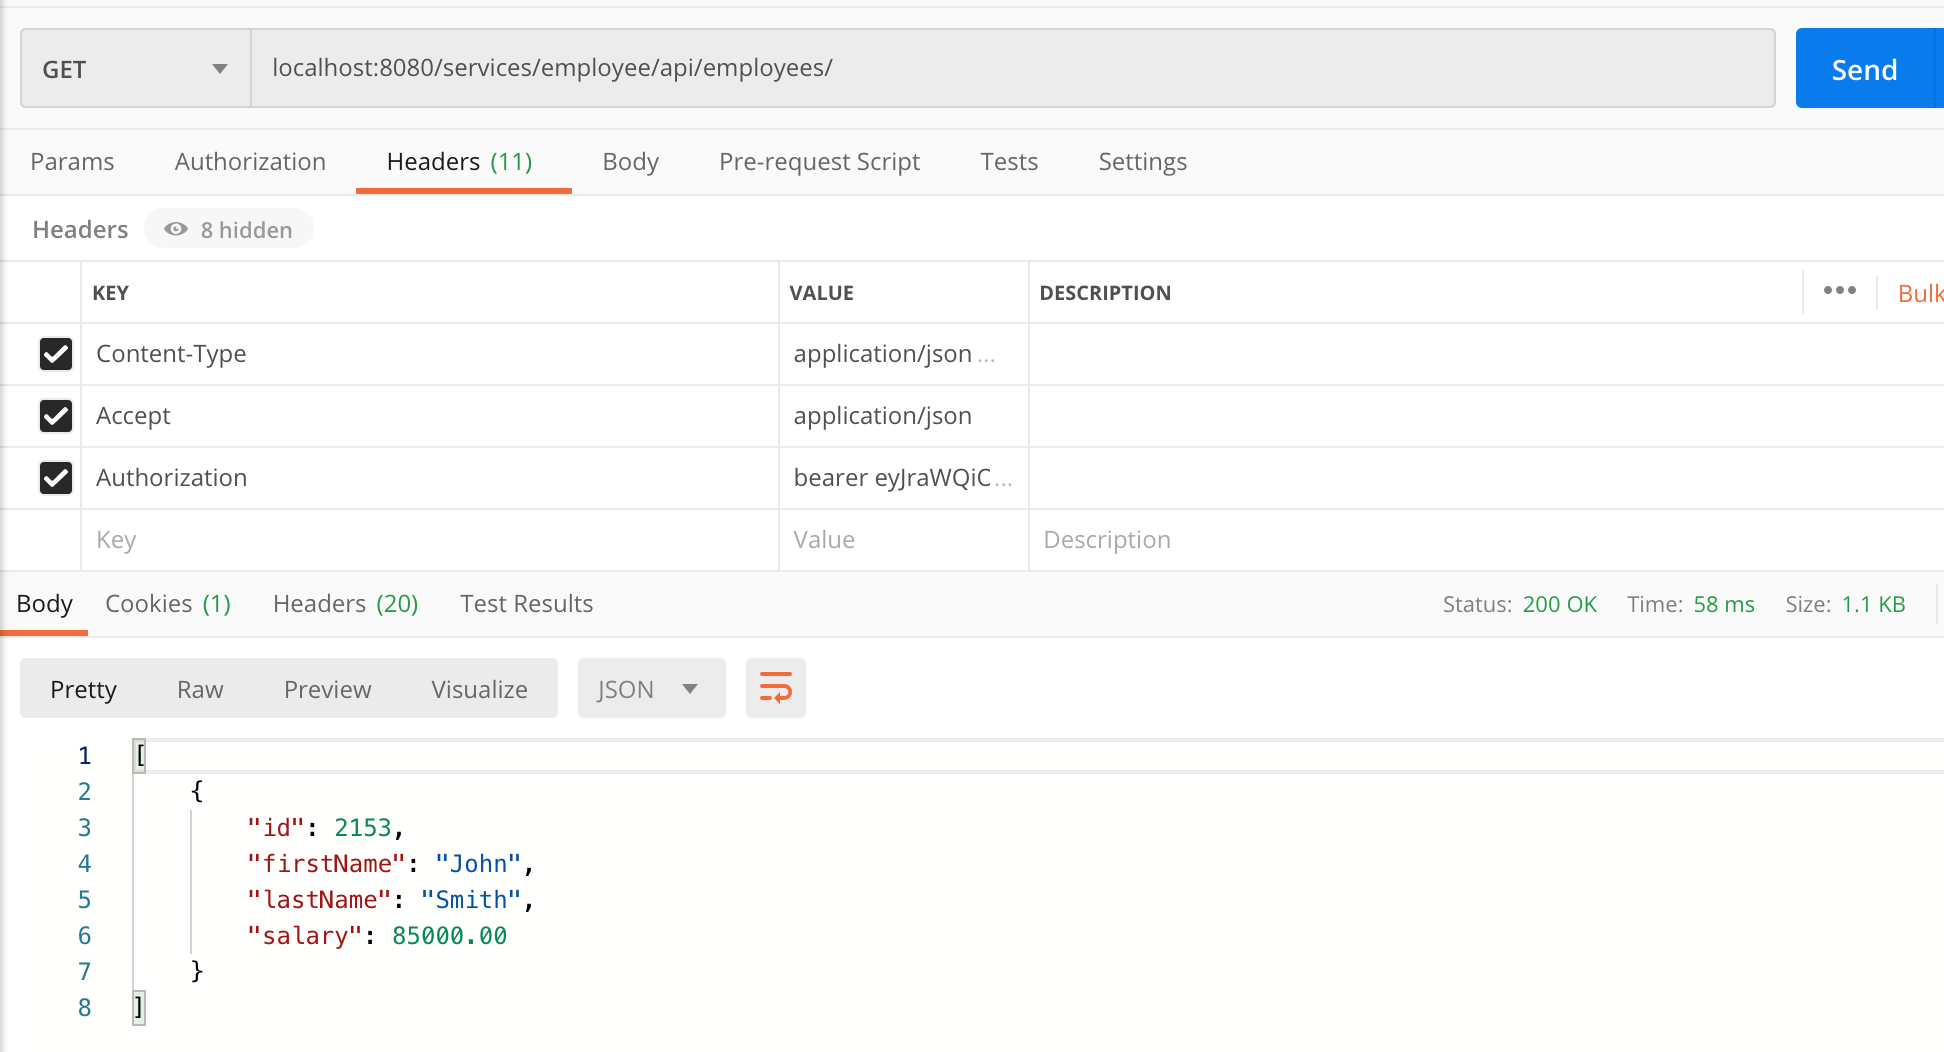
Now when a system with ROLE_ADMIN queries for customers the response looks like this:
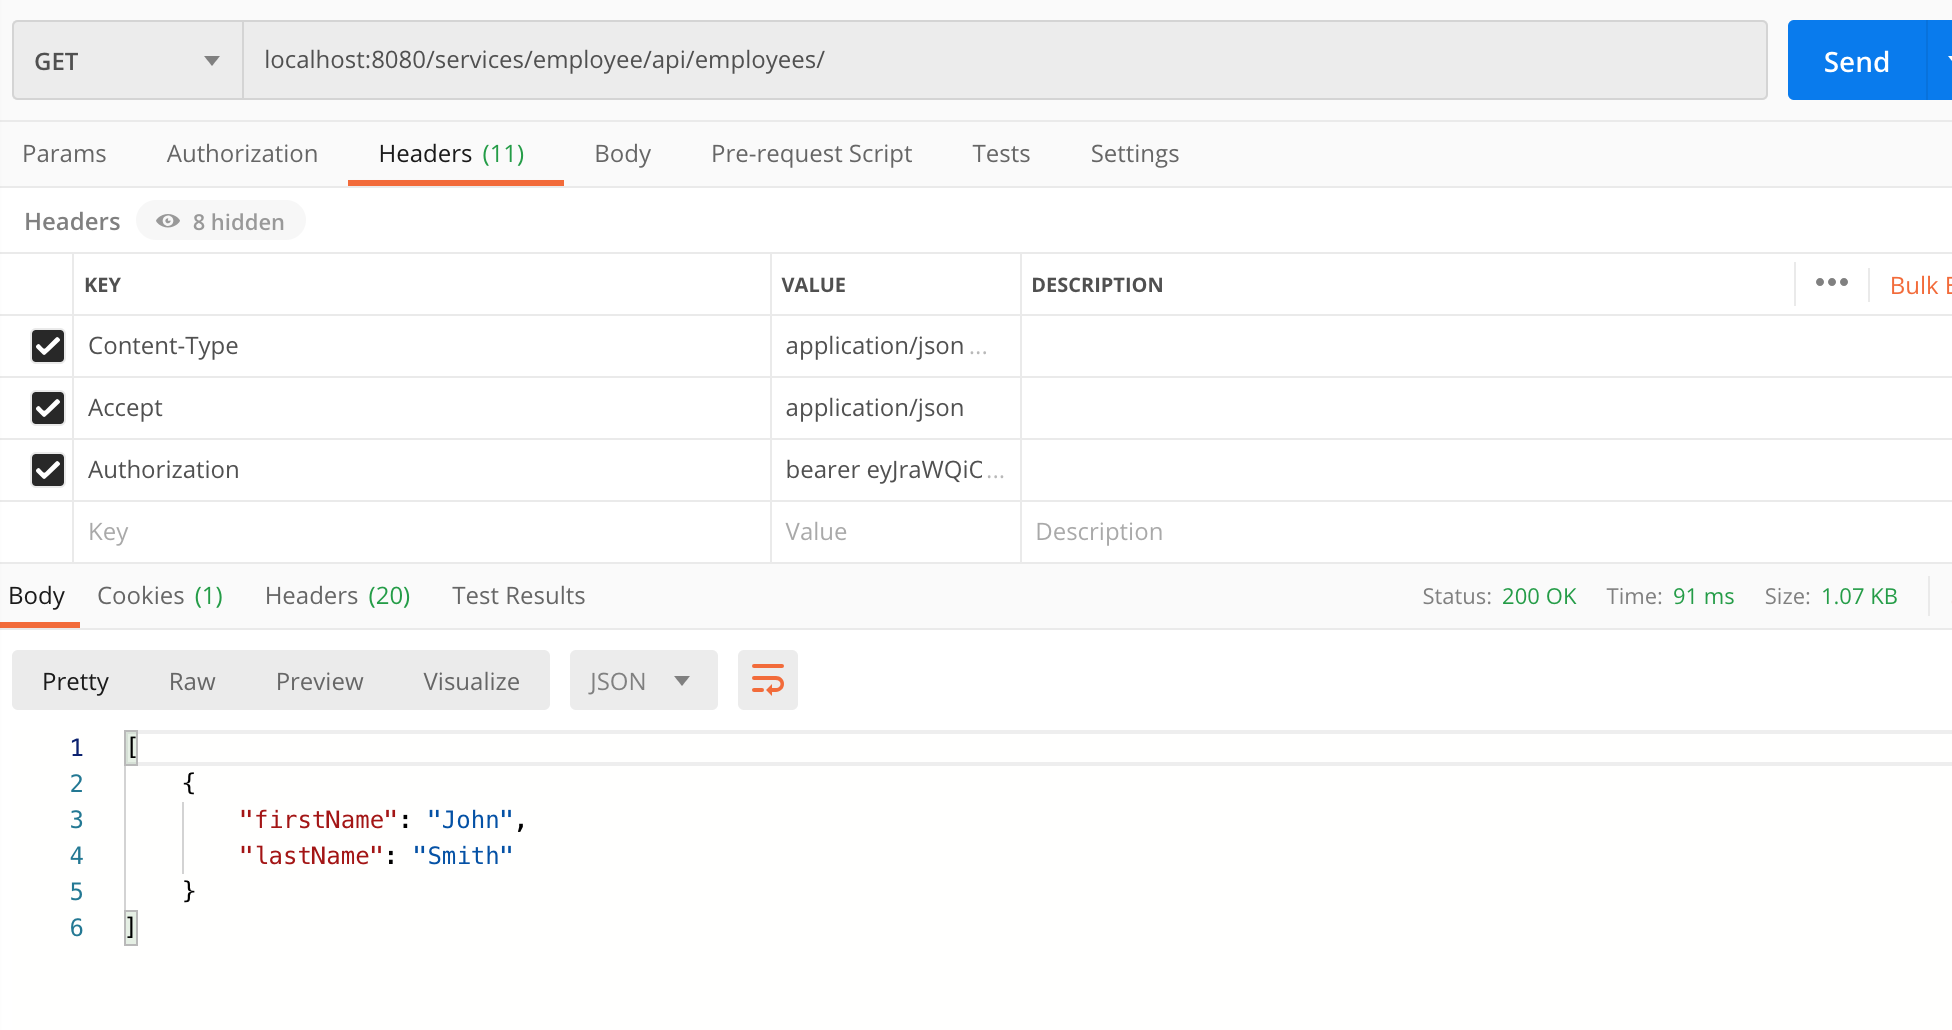
And for a system without ROLE_ADMIN:
We now have a fully functional API Gateway where we can provide System users with specific role based access that works as a first class citizen within the Spring ecosystem. You can find the source code for everything in this blog here.

Comments