
Snowflake: Building a CI/CD Framework with Git Integration


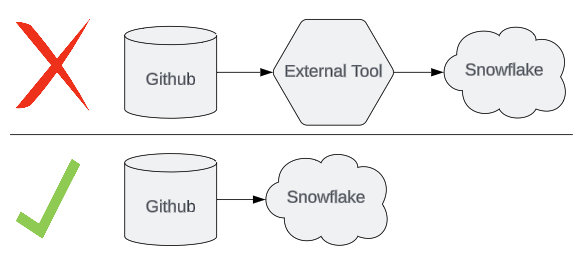
Snowflake’s Git Integration features - now in public preview - allow customers to eliminate dependencies on third-party tools and develop their CI/CD framework directly inside of their Snowflake environment.
Snowflake’s Git Integration Features
Snowflake’s Git Integration features allow customers to synchronize their remotely hosted repositories (currently Github, GitLab, Azure DevOps, and BitBucket are supported) with their Snowflake account via a special type of object called a Repository Stage. This stage object acts as a local clone inside of Snowflake, allowing users to access all of their branches, tags, and files without needing to navigate away from their Snowflake environment. Furthermore, this grants users the ability to schedule and deploy code releases directly from within their Snowflake environment.
How does it work?
The process of integrating GitHub repositories with Snowflake is straightforward enough. Users simply create a special type of stage object called a Repository Stage, which acts as a clone of a remote repository. Once created, users can navigate branches and directories with the LIST command, or execute the code stored within the files using the EXECUTE IMMEDIATE FROM command. In the current iteration of this feature, pushing commits from Snowflake back into the source repository is not supported.
The only prerequisites for creating a Git Repository Stage are a source repository and an API Integration object.
Step 1: Create an API Integration object:
CREATE OR REPLACE API INTEGRATION GIT_INTEGRATIONAPI_PROVIDER = git_https_apiAPI_ALLOWED_PREFIXES = (‘https://github.com/adammtobin’)ENABLED = TRUEStep 2: Create a GIT Repository Stage with the API Integration above:
CREATE OR REPLACE GIT REPOSITORY ATOBIN_GIT_REPOAPI_INTEGRATION = GIT_INTEGRATIONORIGIN = ‘https://github.com/adammtobin/snowflakedemos’Step 3: Use the LIST command to view files in the repository, or the EXECUTE IMMEDIATE FROM command to execute the code within a file.
LIST @ATOBIN_GIT_REPO/branches/main/
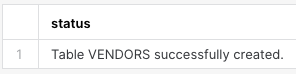
EXECUTE IMMEDIATE FROM @ATOBIN_GIT_REPO/branches/main/gitint/vendors_table.sql
Note - these stage objects do not automatically refresh inside of Snowflake. They act as a clone of the source repository, so users must still pull code changes by executing the FETCH command to pull the latest updates - ALTER GIT REPOSITORY ATOBIN_GIT_REPO FETCH;
CI/CD with Git Integration.
It is critical to have a standardized process in place for deploying code changes to any higher environment. As it is nearly impossible to force compliance via a manual deployment strategy, teams often turn to third-party tools such as Jenkins for their CI/CD pipelines. These tools help ensure that all code changes go through the same checks every time and that a log is kept any time new code is released.
While the built-in features of said tools are one main reason customers utilize them, another is the simple fact that no realistic alternatives exist - until now. Git Integration Stages provide customers with the option to create their own CI/CD framework directly from Snowflake, eliminating the need to rely on external tools to deliver their code in a standardized way.
Building your CI/CD Framework in Snowflake.
For our basic framework, we will utilize the following objects:
- A GitHub repository.
- A Git Repository Stage object.
- A deployment file.
- One table and one sequence object for logging purposes.
- A procedure to pull the latest updates and deploy files marked for release.
We will first create a ‘deploy.sql’ file inside of our GitHub repository that specifies which files will be deployed into our Snowflake environment. We will then create a table and sequence object for logging purposes. Finally, we will create a procedure that executes the statements contained within each file listed in our ‘deploy.sql’ file.
For our example, we have two files marked for release which contain DDL for two new tables; items_table.sql and market_table.sql.
Step 1: Create the ‘deploy.sql’ file within Github.
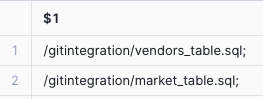
First, we create our deploy.sql file inside our GitHub repository. This file lists two files to be deployed in our upcoming release. Once created, the contents of ‘deploy.sql’ can be queried from Snowflake.
SELECT $1 from @atobin_git_repository/branches/main/gitint/deploy.sql
Step 2: Create the sequence object and logging table.
Next, we will create one sequence and one table object for logging purposes.
– DDL for the Sequence objectCREATE OR REPLACE SEQUENCE COMMON.RELEASE_SEQ START = 1 INCREMENT = 1 ORDER; – DDL for the logging table:CREATE OR REPLACE TABLE COMMON.RELEASE_LOG(RELEASE_NO INT NOT NULL,RELEASE_TITLE VARCHAR(250),FILE_NAME VARCHAR(500),RELEASED_BY VARCHAR(100),RELEASE_TIMESTAMP TIMESTAMP);Step 3: Create the release procedure to deploy the code and log entries.
Finally, we create our procedure. The procedure will pull the latest updates from our GitHub repository, execute the contents of each file listed in our ‘deploy.sql’ file, and make entries into our logging table to document when the file was deployed.
CREATE OR REPLACE PROCEDURE COMMON.RELEASE_PROC(RELEASE_TITLE VARCHAR(500))RETURNS VARCHAR(200)LANGUAGE JAVASCRIPTEXECUTE AS CALLER AS$$try{ // Fetch the latest updates from Githubsnowflake.execute({sqlText: " ALTER GIT REPOSITORY ATOBIN_GIT_REPO FETCH;"}); // Generate a new number from our sequence to associate with the release.release_no = snowflake.execute({sqlText: "select common.release_seq.nextval;"});release_no.next();release_no = release_no.getColumnValue(1); // Retrieve a list of files to be deployed in this release.deploy_files = snowflake.execute({sqlText: "Select $1 from @ATOBIN_GIT_REPO/branches/main/gitint/deploy.sql"}); file_counter = deploy_files.getRowCount(); // If files are listed, deploy the code and make an entry into the log table.if (file_counter == 0){ result = "No files specified for release";}else{ for (i=0; i < file_counter; i++) { deploy_files.next();deploy_file = deploy_files.getColumnValue(1); //{Placeholder for testing logic} snowflake.execute({sqlText: `execute immediate from @atobin_git_repo/branches/main${deploy_file}`}); snowflake.execute({sqlText: `insert into COMMON.RELEASE_LOG(RELEASE_NO, RELEASE_TITLE, FILE_NAME, RELEASED_BY, RELEASE_TIMESTAMP) values(${release_no}, '${RELEASE_TITLE}', '${deploy_file}', current_user(), current_timestamp())`}); }}result = "Success";}catch (err){ result = err.message; }return result;$$; With our setup complete, we are ready to execute the procedure:
CALL COMMON.RELEASE_PROC(‘test’);Result:
After calling our procedure, we can see that our two files marked for release have been successfully deployed and both tables have been created.
SELECT * FROM COMMON.RELEASE_LOG WHERE RELEASE_NO = 5;
SELECT TABLE_NAME, CREATED FROM INFORMATION_SCHEMA.TABLES;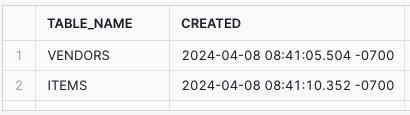
Final Notes
This framework showcases the potential of Snowflake’s new Git Integration features and provides a solid foundation for users to develop their own CI/CD pipelines without relying on third-party tools. Note that the procedure created above does not include any testing or troubleshooting features outside of the generic error message produced if it were to fail. As this logic can be highly specific to your architecture - or become extensive in nature - it has been omitted from the scope of this article. I’ll leave that part up to you, but feel free to reach out on one of the channels below if you have any questions!


Comments