


"Just stick it in an S3 bucket."
It is a line I have heard countless times. While it is true that AWS's S3 service is a convenient and easy-to-use storage solution, its initial simplicity belies a wide array of configuration options and possibilities that often get overlooked.
This post is the first of an ongoing series about S3 at Amazon Web Services. Today we will introduce the very basics of the service. Subsequent posts will dive deeper into various aspects of S3 that will touch on considerations such as cost management, security, performance, lifecycle management, and more.
In the end, I hope you will see how the trusty and ubiquitous S3 bucket, while initially simple, gives you plenty of possibilities - and things to think about! - as you add them to your solution.
What is S3?
S3 was the very first service launched as part of Amazon Web Services in March 2006. S3 stands for Simple Storage Service, and at first blush, it is just that - a simple storage service. You can think of it as a "giant disk drive in the sky." S3 provides storage for objects and files in the cloud and makes interacting with them accessible through a web interface. At a minimum, if you have an internet connection, you can access the stuff you have stored in S3 from anywhere in the world.
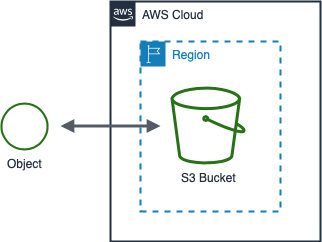
Buckets and Objects
Buckets are storage containers for your objects. A bucket is the highest level of organization within S3 and is a convenient boundary for billing aggregation and access control. You can choose a single AWS Region for any bucket you create. Within that region, S3 will replicate your objects across multiple datacenters to ensure durability and reliability.
Objects are your data. These can be documents, photos, videos, or whatever - S3 does not care. Every object contains your bits of data along with a bunch of metadata (information about your data). We will examine that metadata below and in subsequent posts. One critical piece of metadata is your object's key.
The object key is the unique identifier of your object in the bucket. You can almost think of it as the path to a file on your machine. While S3 does not have the concept of folders, you can choose keys for your objects as if it does. For example, I could create an object with a key of photos/2021/02/cheese.jpg. The key suggests a structure to my files, with photos from February 2021 all having a key that starts with photos/2021/02/.
Working with S3
Let us move on from the background information and begin working with S3. I have included some code snippets below, but if you'd like to follow along on your computer, I have a GitHub repository that contains accompanying scripts for this post. We will start by creating a bucket.
Creating a bucket
Creating an empty S3 bucket, whether using code or the AWS console, is a super quick process. You only need two pieces of information - what you want to name the bucket and the AWS region where you want it to reside.
The name you choose must be globally unique within AWS; something like photos is probably already taken. Millions of bucket naming conventions are out there, but my best practice is to use my company name (or abbreviation), bucket name, and region separated by dashes. For this blog series, I will use ttb as an abbreviation for The Trusty Bucket. Today, my bucket will contain photos of sandwiches, and I will store it in the us-east-2 (Ohio, USA) region. As such, my bucket name will be ttb-sandwiches-us-east-2. Why use the region in the bucket name? I will explain in another post.
import boto3

BUCKET_NAME = 'ttb-sandwiches-us-east-2'
BUCKET_REGION = 'us-east-2'

client = boto3.client('s3')

# Create the bucket
response = client.create_bucket(
    Bucket=BUCKET_NAME,
    CreateBucketConfiguration={
        'LocationConstraint':BUCKET_REGION
    }
)

Checking out the bucket settings
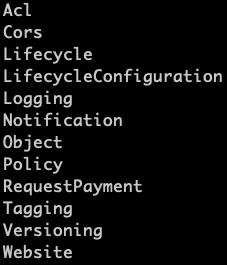
Now that we have a bucket, we can check out its settings. Our bucket has the least amount of configuration possible; we are using all of the defaults.
The script below will list all of the topic areas for bucket configuration. There are a lot of them! Within each topic area, there are many options we can configure.
import boto3

BUCKET_NAME = 'ttb-sandwiches-us-east-2'

# Get the bucket resource
s3 = boto3.resource('s3')
bucket = s3.Bucket(name=BUCKET_NAME)

# List all of the subresources for the bucket
for resource in bucket.get_available_subresources():
    print(resource)
Uploading our data
An empty bucket is not very useful. We need to put some data in it! I always tell people that you could put a ham sandwich in S3, so I have photos of three delicious sandwiches that we can upload.
Below I use the S3 API to upload my files to the root of my bucket - meaning that their keys are simply the file's name.
import boto3

BUCKET_NAME = 'ttb-sandwiches-us-east-2'
SANDWICHES = ['ham', 'pbj', 'bacon']

s3 = boto3.resource('s3')

# Upload the sandwich files to the bucket
for file in SANDWICHES:
    s3.meta.client.upload_file(f"objects/{file}.jpeg",
                               BUCKET_NAME,
                               f"{file}.jpeg")
We can see the AWS S3 console results, which now shows each of our files at the root of the bucket.

Checking out our objects
Like our bucket, each object has a wide array of metadata and settings. For now, we will list these by running the script below.
import boto3

BUCKET_NAME = 'ttb-sandwiches-us-east-2'
SANDWICHES = ['ham', 'pbj', 'bacon']

s3 = boto3.resource('s3')

# Get the bucket object
key = f"{SANDWICHES[0]}.jpeg"
img = s3.Object(BUCKET_NAME, key)

# List the attributes and actions for the object
for attr in dir(img):
    if not attr.startswith("_"):
        print(attr)
Each item on this list is either an action we can take on the object or an attribute we can get or set.

Deleting our bucket and objects
The last thing we will do is clean up our bucket and objects. Deleting a bucket with the default settings is as simple as creating one, with the caveat, before we can delete the bucket, it must not contain any data.
There are several ways to empty a bucket, but it is simplest to do it in one API call since we only have three files. This script deletes our sandwich photos and then finally deletes our bucket.
import boto3

BUCKET_NAME = 'ttb-sandwiches-us-east-2'
BUCKET_REGION = 'us-east-2'
SANDWICHES = ['ham', 'pbj', 'bacon']

s3 = boto3.resource('s3')
bucket = s3.Bucket(name=BUCKET_NAME)

# Remove the images from the bucket
print('Emptying bucket', BUCKET_NAME)
response = bucket.delete_objects(
    Delete={
        'Objects': [
            { 'Key': f"{SANDWICHES[0]}.jpeg" },
            { 'Key': f"{SANDWICHES[1]}.jpeg" },
            { 'Key': f"{SANDWICHES[2]}.jpeg" }
        ]
    }
)

# Delete the bucket
bucket.delete()
Wrapping Up
So far, so simple? I hope you enjoyed this quick summary of S3 and some of the basics of working with AWS's storage solution. Each subsequent post in this series will introduce another layer of functionality in S3. Please come back for the next post on sharing your S3 data with the world.
Cover photo by Courtney Moore on Unsplash
Sources
- Amazon Simple Storage Service User Guide
- Amazon S3 Product Information
- Simple Storage Service - Basics (free e-course)
- Coursera AWS S3 Basics (free hands-on project)


Comments