

This article is not about the latest experiment in the space industry. It is just a teaser about an idea that popped in my mind a few months ago and is the basis for a small tool I have been writing since that moment.
The idea is very simple. On one hand, thanks to the Cloud Providers, it is now very easy to host both a web site and some REST services and to benefit from managed services like Databases. On the other hand, JavaScript frameworks like Angular, React or Ember...

...(hence the guinea pig!) provide great interactions directly in the browser and rely on REST services for handling the communication with the back-end.
Focusing on Ember, its embedded addon Ember Data is able to completely manage an application model including the relationships and to take care of the interaction with the backend server, relying on the JSON API specification. This decoupling between the model stored in the browser and the one on the back-end system is definitely something that pushed me to use this (excellent) framework rather than one of its competitor.
Quick architectural description
Having all that in mind, my idea was to build some kind of JHipster framework, dedicated to the Cloud (starting with AWS), completely built on JavaScript (both for the client part which is pretty standard and for the server part using a serverless lambda architecture) and that greatly optimized development.
This solution should be available in three modes :
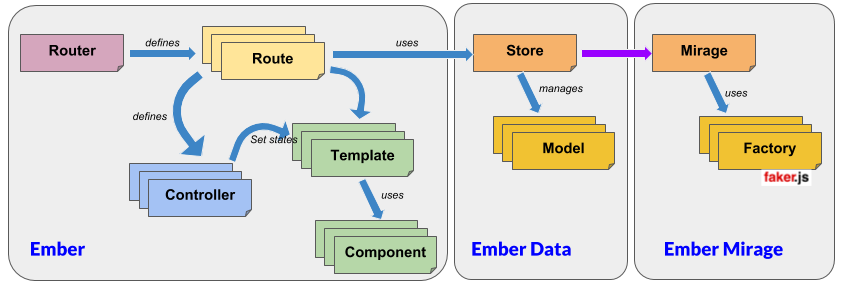
- The Developer mode needs no Internet connection and looks like the standard way of building an Ember CLI application. However it adds a new key feature: the possibility to import a JDL file describing the application object model, directly creating both the different entities and their smart mocked implementations through the use of Ember CLI Mirage and Faker.js. Quoting Ember CLI Mirage documentation, this mode allows the developer to share a functional prototype of his app that runs entirely in the client - before writing a single line of your API. The following diagram illustrate the way everything works together using the different concepts proposed by Ember:
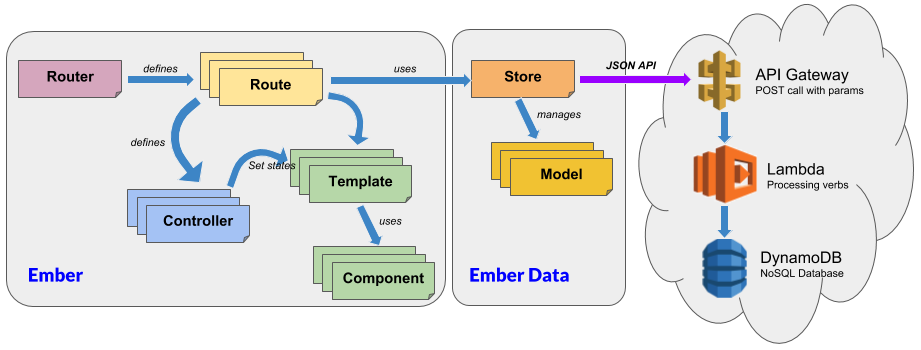
- The Integration mode uses the proxy feature of Ember to rely on a Cloud back-end persisting data in DynamoDB. To do that, it benefits from the fact that Ember Data heavily relies on the JSON API specification. The cloud part of the framework therefore has the goal of setting up this Cloud infrastructure, thanks to the API Gateway delivering REST services with the right semantics and transferring the payload of the message to a lambda function interacting with a Dynamo database. This mode is great for thoroughly testing the application before complete deployment to the Cloud. The following diagram illustrate this behaviour and the way Mirage has been substituted to the real back-end:
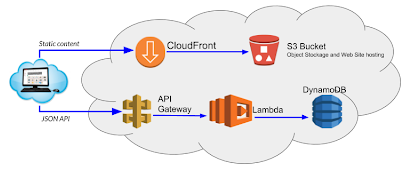
- The production mode just pushes the web resources to a S3 bucket exposed through CloudFront. The application can then be accessed all over the world!
In a future post, I will show a way to also integrate Cognito to set up some authentication and authorization directly on the Cloud.
Let's demonstrate!
Let's now set up a complete example and a full workflow going from development to 'production'. The term 'production' is surrounded by quotes because the implementation that I have done is just a Proof of Concept. A production-ready implementation would deserve much more reflection and work…
Setting up the development environment
The story begins by starting a standard Ember.js application with Ember CLI. To proceed, you should already have Node.js and Ember CLI installed on your computer. Then you just type the usual:
ember new guineapig_inthecloud --no-welcome
The no_welcome option is just there to get rid of the welcome screen set by default for an Ember application.
To complete this installation, you just need to install my add-on ember-aws-ehipster by typing:
cd guineapig_inthecloud
ember install ember-aws-ehipster
This add-on will install several other useful add-ons (listed in the page https://gitlab.ippon.fr/bpinel/ember-aws-ehipster/wikis/ember-included-add-ons) and add an Ember blueprint for automatically generating model objects, mock data and administration pages from a descriptive file. This file is simply the one you get when designing a model through JDL-Studio from JHipster. Here is the one we will use in this example :
entity User {
 login String required minlength(4),
 passwordHash String required minlength(8),
 firstName String required minlength(3) maxlength(50),
 lastName String,
 email String,
 imageUrl String,
 activated Boolean,
 createdBy String,
 createdDate LocalDate,
 lastModifiedBy String,
 lastModifiedDate Instant
}

entity Authority {
 name String required maxlength(30)
}

entity Todo {
  title String required,
  completed Boolean
}

relationship ManyToMany {
	User{user(login)} to Authority{authority(name)}
}

relationship OneToMany {
 	User{user(login)} to Todo{todo}
}
Note that Authority and User objects are just taken from the JHipster model and can be represented by the following diagram: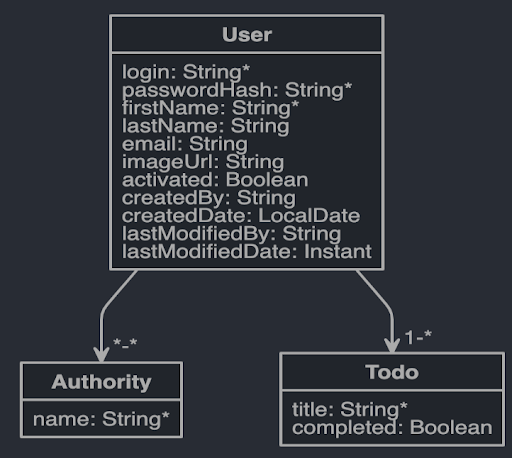
Just store the previous object model into a file named todo.jh inside the guineapig_inthecloud directory and play the following command:
ember g jdl-importer todo.jh
This blueprint will simply generate all the object available in the JDL model, the factories for generating sample mock data and the pages to manage them. So starting the server with:
ember s
and going to http://localhost:4200/entity-factory/todo you should have this management page dedicated to the todo object:
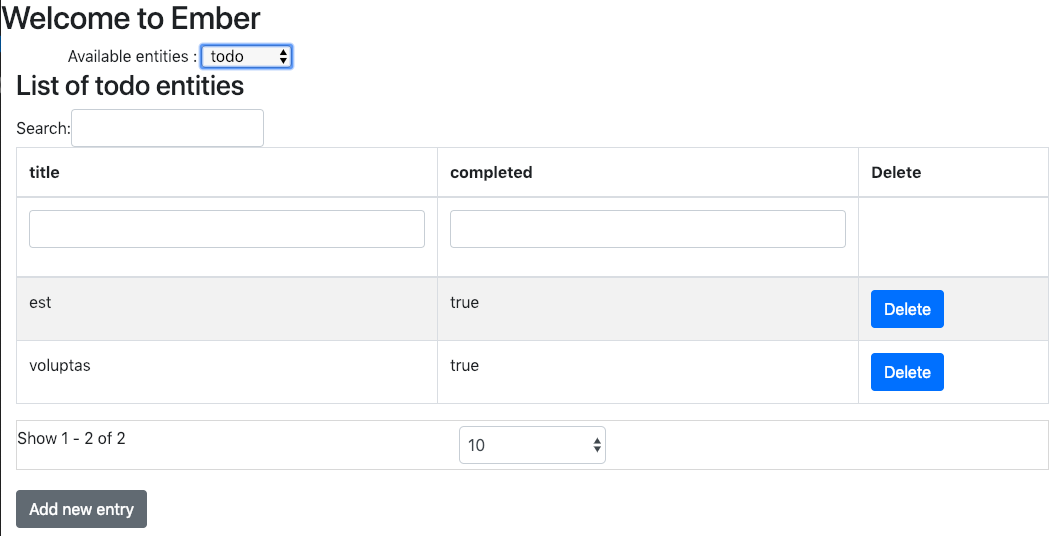
Of course, these management pages are very poor, but it's up to you to build a beautiful and powerful application using the model you have just defined. As a demo, you can have a look at the Todo application provided in the tests/dummy directory of the addon (available at https://gitlab.ippon.fr/bpinel/ember-aws-ehipster/tree/master/tests/dummy).
All that is great, but for the moment, there is neither Cloud nor Serverless features in this preliminary set-up. Be patient because everything is already nearly available for the client part!
The road to a cloud back-end
A few details on the back-end infrastructure
As already stated before, Ember Data encapsulates communication with the back-end, providing methods for dealing with persistence. Here is an extract of these methods and their default translation on the back-end:
| Method | HTTP Verb | Request example \ (for object Blog and id 123) |
| findRecord | GET | /blogs/123 |
| findRecord | GET | /blogs |
| createRecord | POST | /blogs |
| push | PUT | /blogs/123 |
| deleteRecord | DELETE | /blogs/123 |
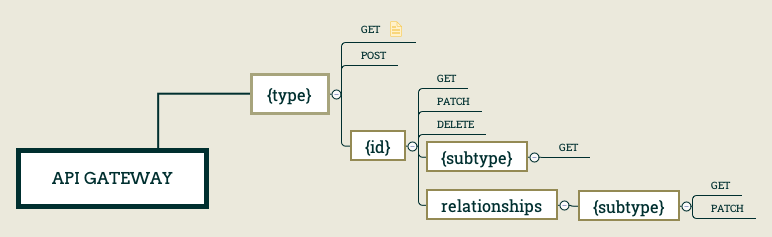
To be more accurate, the default implementation of Ember Data is based on the JSON API Specification. This specification clearly details both the different endpoints and the content of the messages that are generated, especially for the relationships between objects.
A JSON API compliant back-end should implement the HTTP vocabulary as depicted below :
To achieve the implementation of this backend, we will rely mainly on three AWS services :
- A new API declared in the API Gateway that support the awaited REST semantic,
- A Lambda function written on Javascript and running on Node.js 8.1, systematically called by the API and in charge of the logical processing of incoming parameters and also of the handling of potential relationships
- A DynamoDB table, in charge of persisting all the processed objects independently of their content.
This main infrastructure for the backend is completed by the following elements:
- Three S3 buckets:
- The first one (lambda-jsonapi-code-bucket) is simply used for provisioning the lambda code at its creation time,
- The other two (ember-aws-ehipster-staging and ember-aws-ehipster-production) will be used later to store the 'staging' and 'production' versions of the application.
- An IAM role (lambda_jsonapi) allowing the lambda function to get access to the DynamoDB database,
- Two entries in CloudFront corresponding respectively to the buckets of 'staging' and 'production'
Building the backend infrastructure in AWS
Rather than going through a step-by-step construction of this infrastructure thanks to the AWS Web console, I have privilege an automated approach based on terraform scripts. To my mind, Terraform scripts are definitely easier to write and to maintain than their CloudFormation counterparts. All necessary files are available in the cloud directory of the gitlab project: https://gitlab.ippon.fr/bpinel/ember-aws-ehipster/tree/master/cloud that you should download on your local computer.
Once this is done, provisioning the whole platform is as simple as running the following terraform command:
terraform init
terraform apply
As already stated before, the terraform scripts create the following resources :
- 3 S3 buckets, one for storing the lambda code (named lambda-jsonapi-code-bucket) and the two other for receiving the 'staging' and 'production' version of the application (respectively named ember-aws-ehipster-staging and ember-aws-ehipster-production)
- 1 IAM role named lambda_jsonapi for giving access to the DynamoDB database to the lambda function
- 1 API gateway named JsonApiRestGateway providing a subset of the JSON API specification
- 1 lambda function named lambda-jsonapi dealing with the
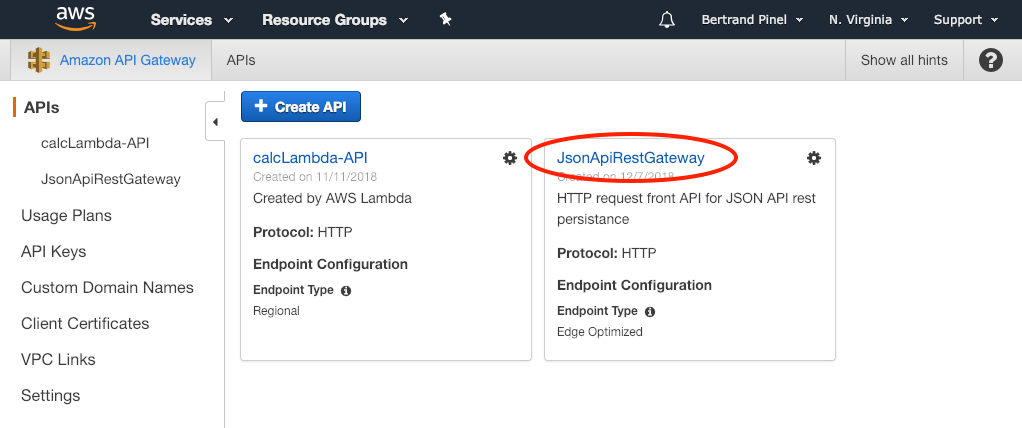
Going to your AWS console, on the API Gateway page, you should get a new JsonApiRestGatewayAPI:
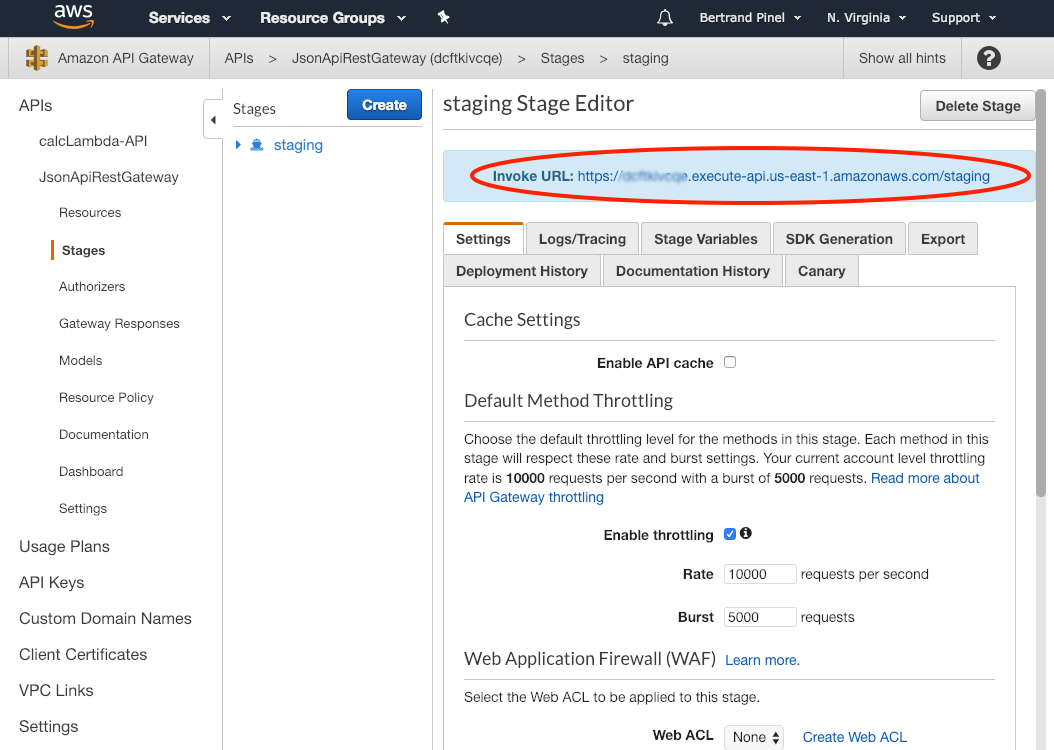
Clicking on this API and going to its Staging, you should find a 'staging' deployment. You should grab here its Invoke URL:
As a matter of fact, you need to tell your Ember application to use this URL as the Gateway for all calls done though Ember Data. Everything happens in the file_ config/environment.js_ in the self explanatory lines:
 if (environment === 'production') {
    // here you can enable a production-specific feature
    ENV.gatewayURL = 'https://xxxxxxxxxxx.execute-api.us-east-1.amazonaws.com/staging';
    //ENV.gatewayURL = process.env.STAGING_GATEWAY_URL;
    console.log("Setting staging gatewayURL to "+ENV.gatewayURL);
  }
  if (environment === 'staging') {
    // here you can enable a staging-specific feature
    ENV.gatewayURL = 'https://xxxxxxxxxxx.execute-api.us-east-1.amazonaws.com/staging';
    //ENV.gatewayURL = process.env.PRODUCTION_GATEWAY_URL;
    console.log("Setting production gatewayURL to "+ENV.gatewayURL);
  }
A little test before going further
To verify that the cloud infrastructure is properly provisioned, you can open the API Gateway Web console, look for the newly created JsonApiRestGateway API –– specifically, the GET method for /{type} –– and click on the Test button:
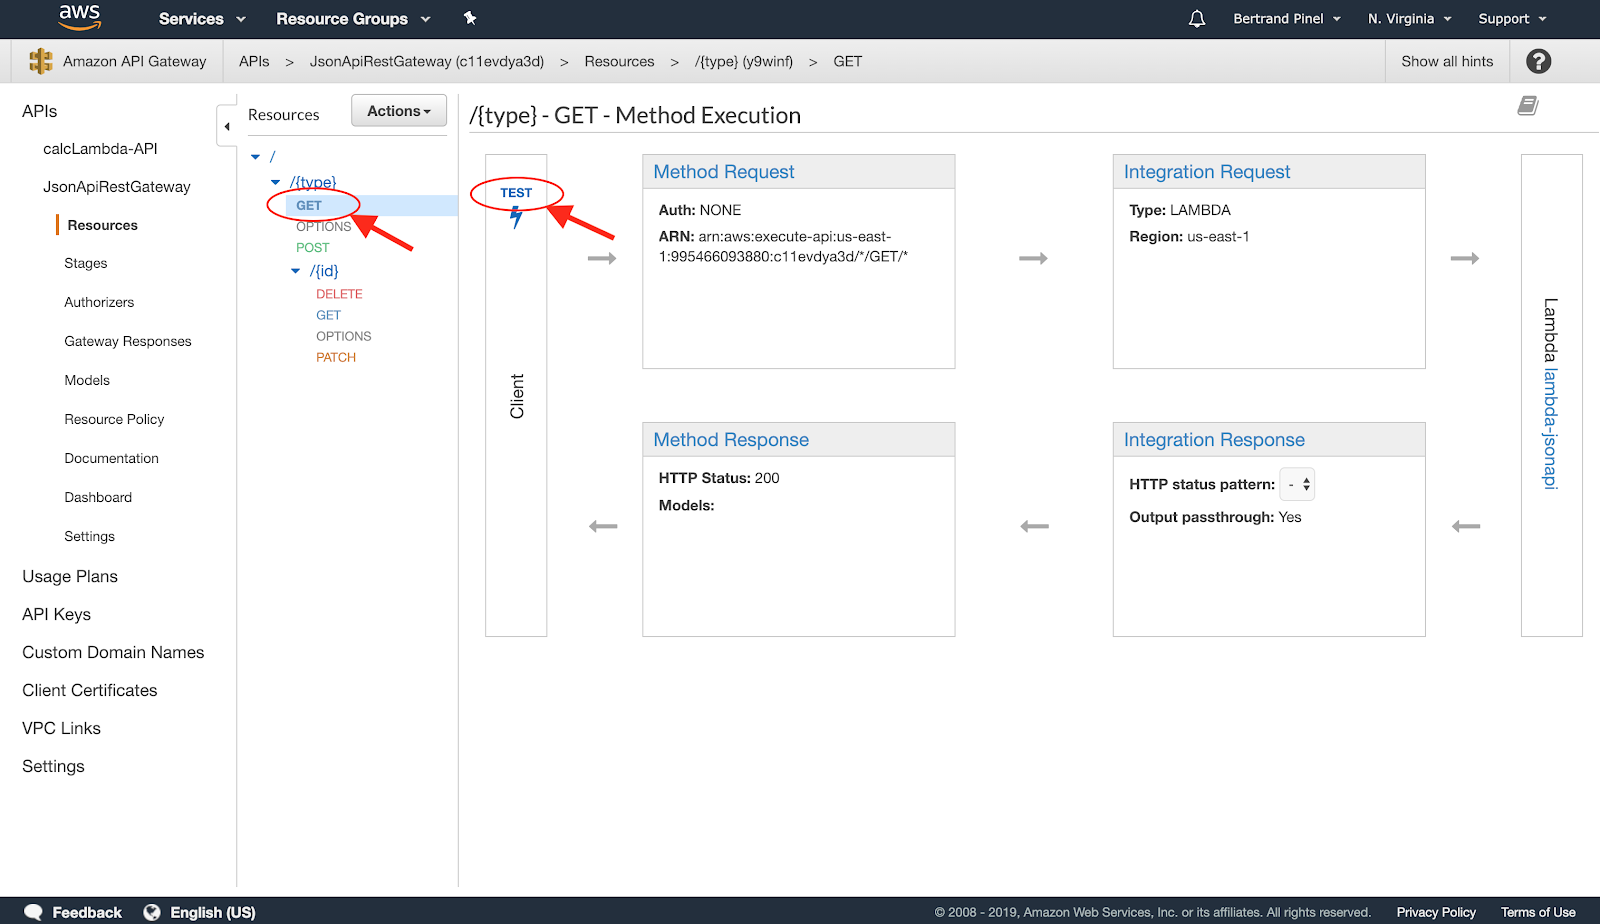
On the following screen, you just have to provide a value to the {type} field (no matter the value) and launch the test:
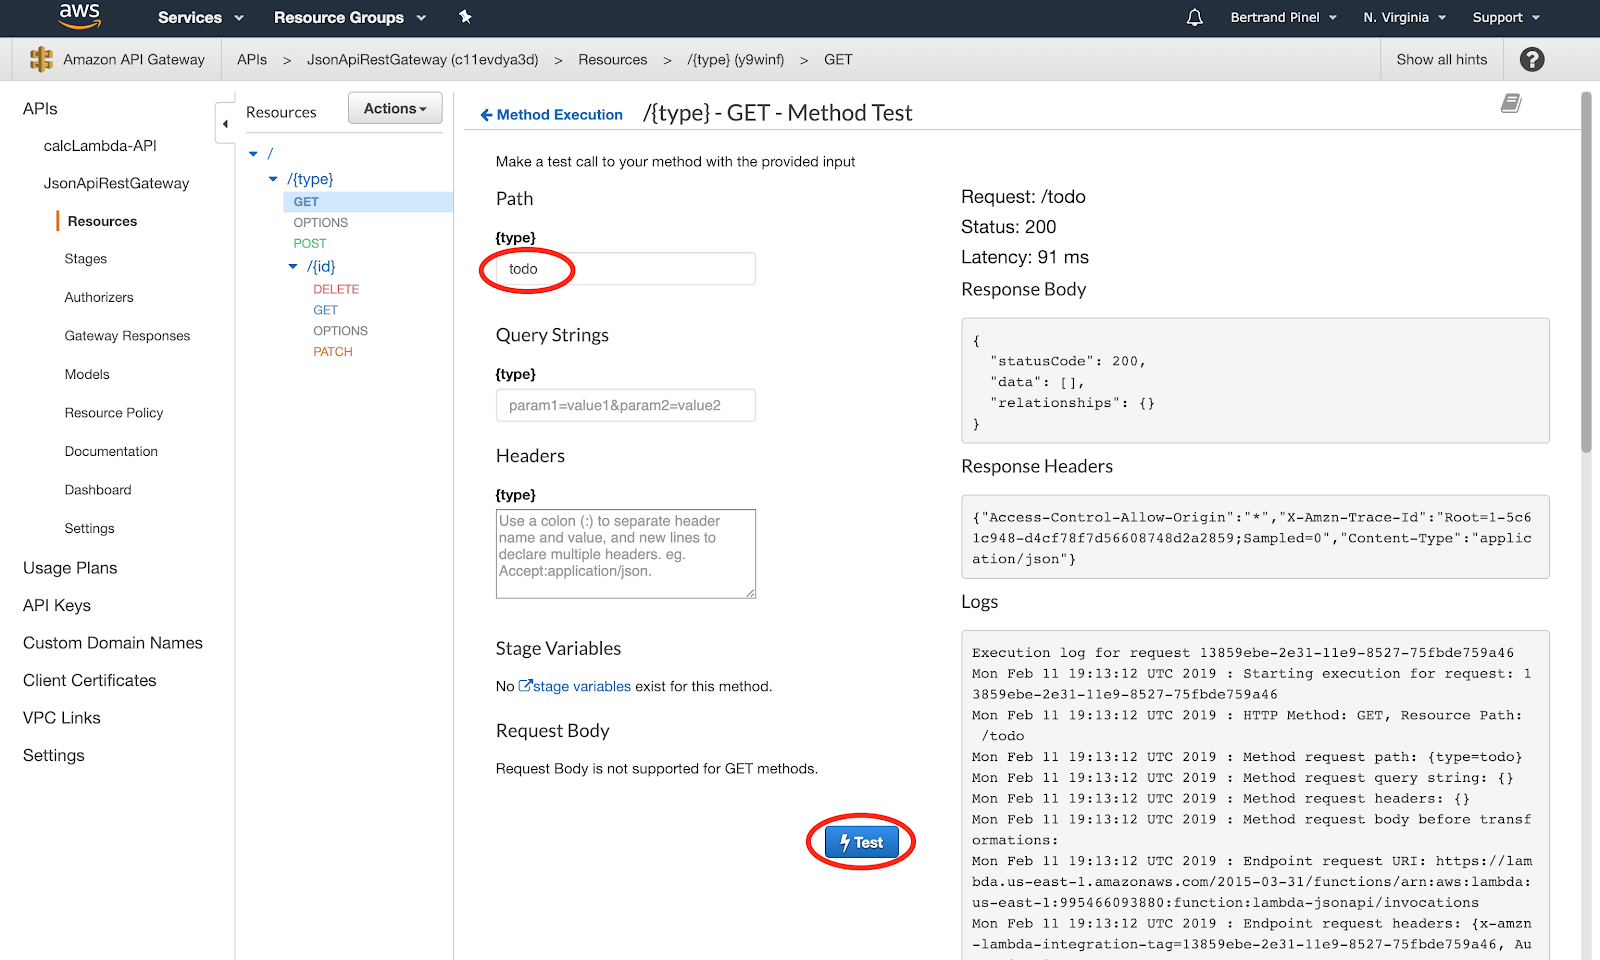
You should receive a 200 status code and a response like the following one:
{
  "statusCode": 200,
  "data": [],
  "relationships": {}
}
This response is OK and just tells you that no data of the given type has been found in the database.
Going back to the Ember Application
Now, everything is ready for the magic part. Just start your ember server, this time specifying a proxy with the newly created API Gateway :
ember s --proxy <API Gateway Invoke URL>
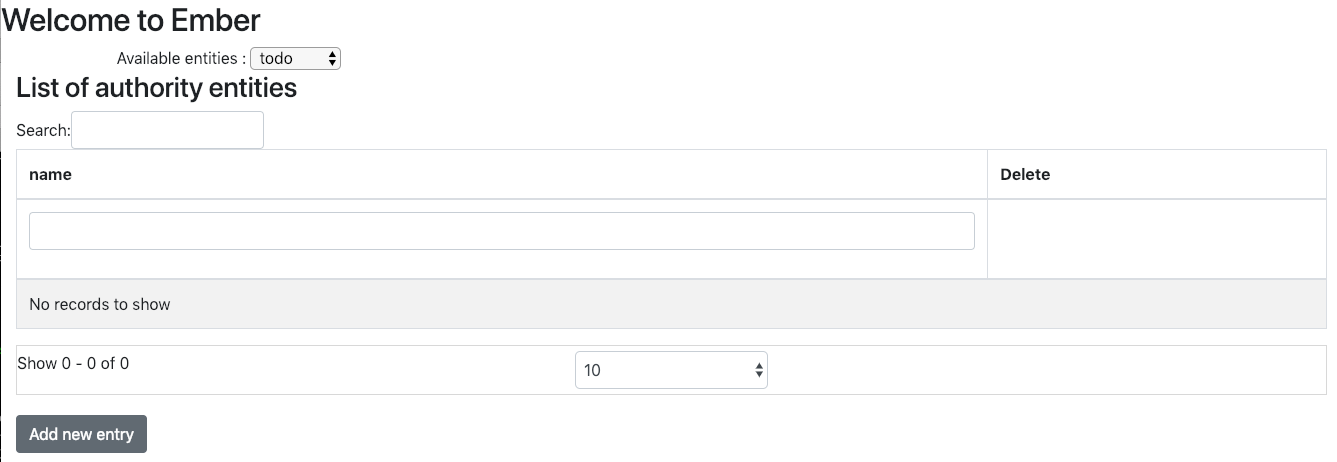
Going back to one of the management page, like for instance http://localhost:4200/entity-factory/authority, you should get an empty table. This is completely normal since your DynamoDB is also empty.
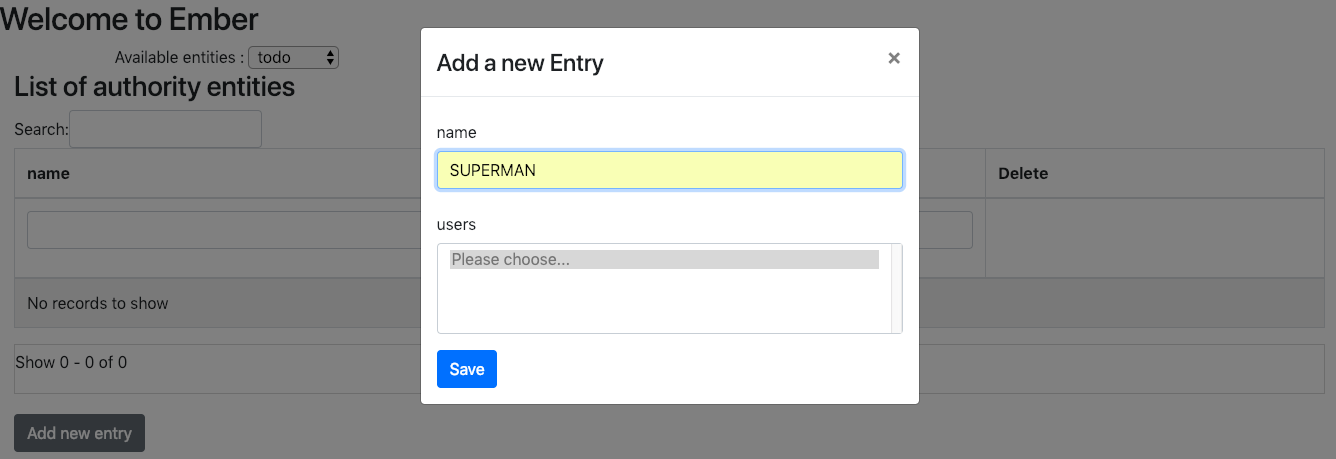
By clicking on the 'Add new entry' button, you will be able to add a new 'Authority':
And now, going back to your DynamoDB Web console, you should find your newly created entity:
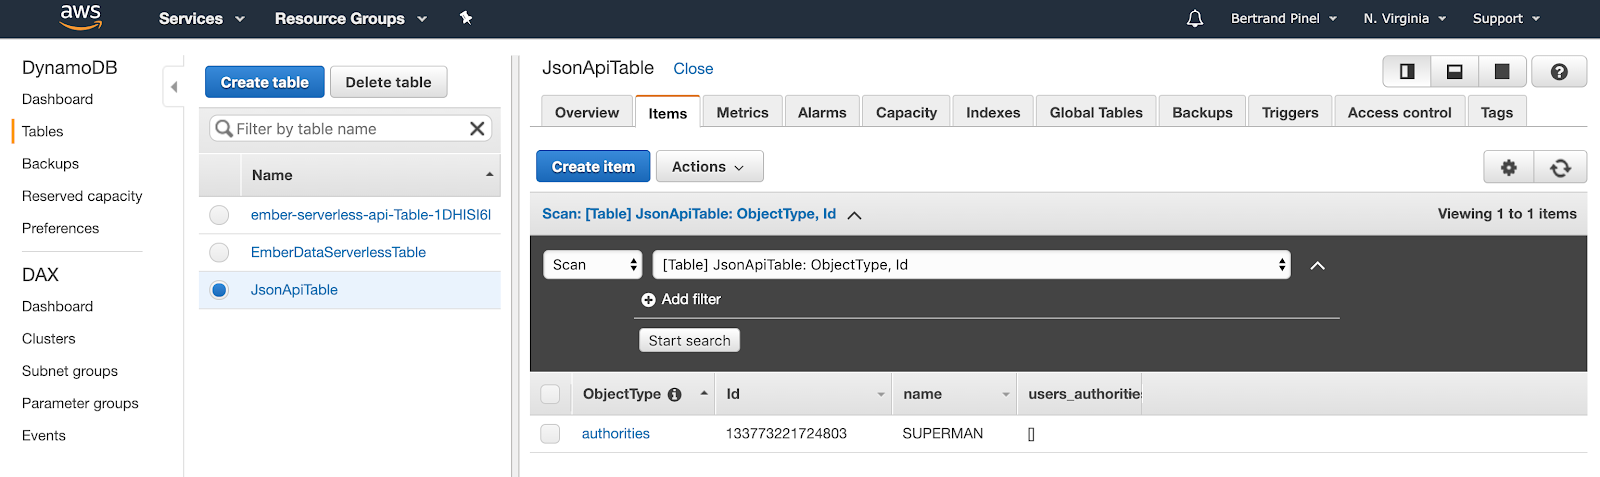
You can also go the other way round, creating a new entity with the AWS console and getting it back in your Ember application!
Hosting everything in the Cloud
To simplify the deployment process, we again rely on some Ember addons.
The first one is some kind of generic backbone for implementing deployment pipelines. It is installed through the command:
ember install ember-cli-deploy
As shown in the output of the command, this addon does nothing in itself and is waiting for complementary addons:
ember-cli-deploy needs plugins to actually do the deployment work.
See http://ember-cli.github.io/ember-cli-deploy/docs/v0.1.0-beta/quick-start/
to learn how to install plugins and see what plugins are available.
Installed addon package.
Let's install the one for AWS:
ember install ember-cli-deploy-aws-pack
In fact, this addon is called a plugin package as it installs the following list of addons:
- Ember-cli-deploy-build: builds the web application (in a similar way as an ember build would do) in the directory tmp/deploy-dist
- ember-cli-deploy-s3: Main S3 add-on for the web application. It relies on the configuration declared in
config/deploy.js(see below) to proceed to the selective uploading of files - ember-cli-deploy-revision-data: Ensure the generation of a unique identifier for each application version. We will see later how this add-on allows us to rollback to a previously deployed on S3 application
- ember-cli-deploy-display-revisions: Display the identifier of the application revision
- ember-cli-deploy-manifest: Take advantage of a
manifest.txtlisting all the files embedded in the compiled application, this add-on allows smart deployment, minimizing the exchanges - ember-cli-deploy-gzip: Ensure the compression of the files after the build
- ember-cli-deploy-cloudfront: Invalidate a file (here 'index.html') at the CloudFront level during redeployment
The configuration of the S3 bucket and access to AWS account is located in config/deploy.js file.
The deploy.js file makes an extensive use of the "process.env.*" mechanism relying on the underlying variables defined in .env files. The .env files can themselves be separated by targeted environment. If you want to get more information on how this is working, you can refer to the page http://ember-cli-deploy.com/docs/v1.0.x/using-env-for-secrets/.
In our case, we will define 3 .env files (one global, one for the staging environment and the latest for the production environment) like the following ones :
# .env
AWS_KEY='XXXXXXXXXXXXXXXXXXXX'
AWS_SECRET='XxXxxxxXXXXXX/XxxxXXXxx/xxxXXX'
AWS_REGION='us-east-1'
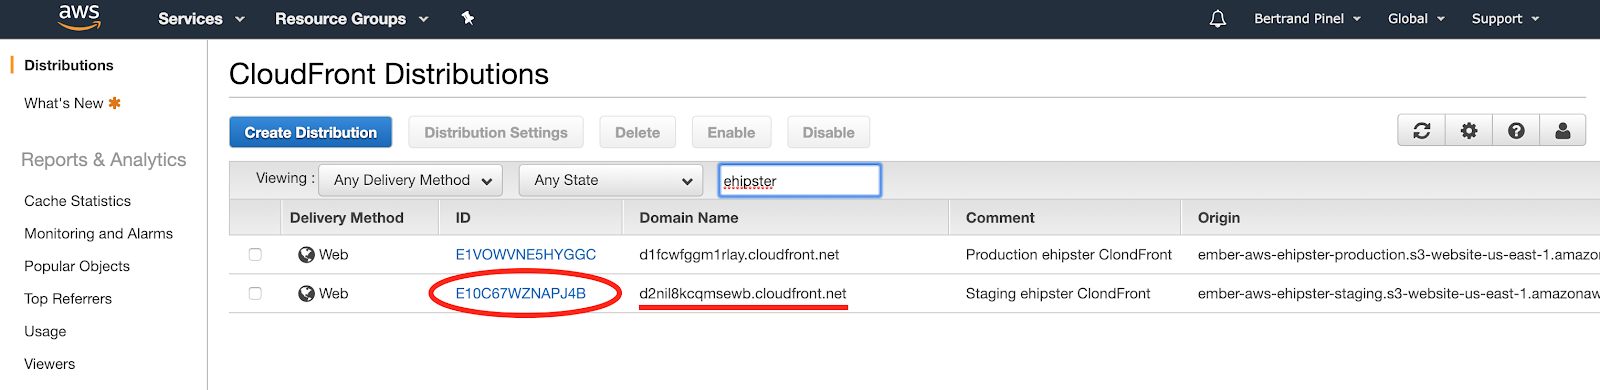
For the other two files, you have to collect in the CloudFront Web console, the distribution identifier for each target environment and paste them in the corresponding .env file:
(Please note that this console also give you the URL exposed at CloudFront level that you will need later on)
# .env.staging
STAGING_REGION='us-east-1'
STAGING_BUCKET='ember-aws-ehipster-staging'
STAGING_DISTRIBUTION='E10C67WZNAPJ4B'
# .env.production
PRODUCTION_REGION='us-east-1'
PRODUCTION_BUCKET='ember-aws-ehipster-production'
PRODUCTION_DISTRIBUTION='E1VOWVNE5HYGGC'
The final deployment on the AWS S3 buckets is them simply done through the following command (here for the staging environment):
ember deploy staging --verbose
The --verbose can be skipped but show you the different processing on the files, the optimizations done and the copy to S3 bucket.
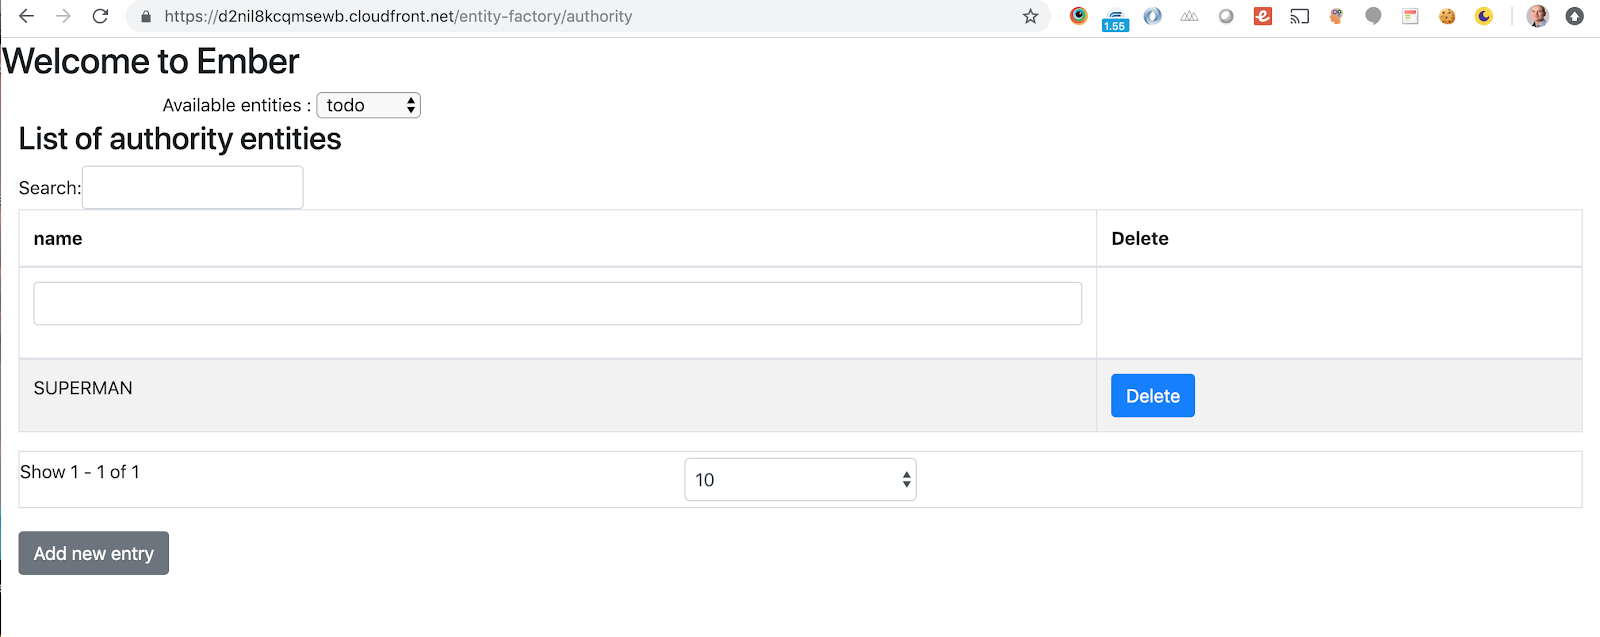
You can them use your application directly on the Cloud while using the URL exposed by CloudFront:
As a temporary conclusion...
The framework used here is definitely still experimental and not completely mature.
However, it can be used to build simple applications very quickly, giving the developer both a complete and efficient development environment with test data allowing them to demonstrate immediately their work, and a way to push the application on the AWS Cloud, using a serveless feature for the back-end.
Web Serverless has never been so simple !


Comments