
I assume you already have a Remote Server up and Running with Docker installed, or Docker installed locally. If you do not have Docker running, you can find the installation instructions here. I am also going to assume that you have kept your code up to date in the GitHub repository that we set up in part 1 and have been following along until now. What we will learn how to do:
- Write a Jenkinsfile
- Connect GitHub to Jenkins
- Create a Build Pipeline
Create a Jenkinsfile
When we attach our GitHub repository to Jenkins, we will be able to tell it to look in our repository for instructions on how to build our code. Those instructions live in a file named Jenkinsfile. In the top level project directory sample-python-project, create a file called Jenkinsfile.
touch Jenkinsfile
Now we will populate it with our pipeline build instructions. There are lots of different options and formats here, but we are going to keep it as simple as possible. Open up the Jenkinsfile in your favorite text editor and write the following code.
pipeline {
    agent { label "built-in" }
    stages {
        stage('build') {
            steps {
                sh "bash build.sh"
            }
        }
    }
}
The code here is fairly straightforward to read. If you were to find this file in the interwebs and attempted to read it, you might come to these conclusions. This is a pipeline file for Jenkins. It consists of one stage named build, which runs one step. The step is simply a shell command to run our build.sh file. The build.sh file we created in part 3, will now be used inside of our Jenkins runner. A Jenkins runner is just a Linux VM.
Install Jenkins Plugins
GitHub Plugin
Let's setup Jenkins to be able to pull our source code. I will be using the GitHub plugin, because my source code is stored on GitHub. Navigate to the left side bar and click on manage jenkins. Next, click on manage plugins. Search for GitHub and install the GitHub plugin. Before you click install, we have one more plugin.
Pipeline Plugin
When Jenkins pulls our source code, we want to be able to tell it to look for our Jenkinsfile. This will allow us to update our build pipeline in our source code, without having to edit the jenkins job. Search for Pipeline in the plugin manager. Now you are ready to press install.
Create the Jenkins Job
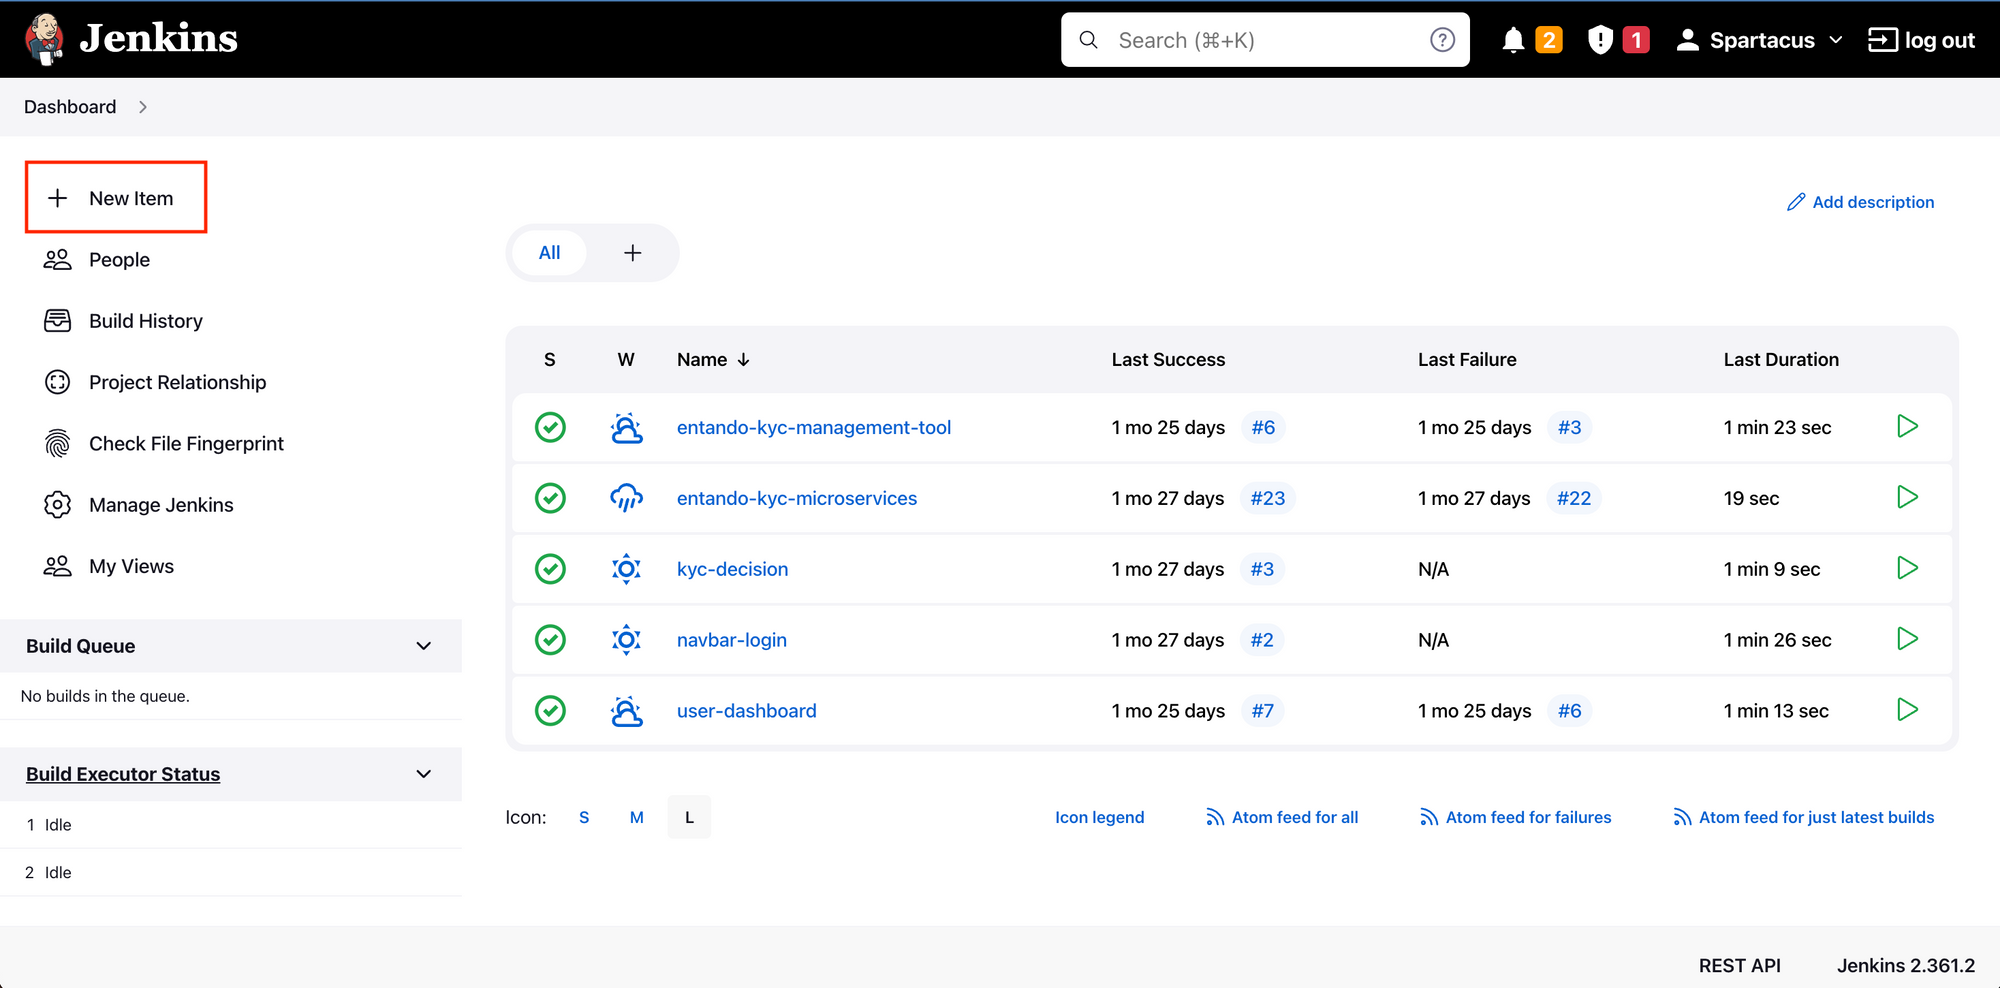
To create a Jenkins Job, click the New Item button on the left side bar. You should see the option Pipeline. If you do not see this option, you may need to restart Jenkins.
Once you have named your job and gotten into the configuration screen, you will see there are many fields and options. For Description, I wrote...
Build our sample-python-project.
Beneath the description are some checkboxes. The one we are interested in is GitHub project. Click the box and populate your GitHub url for the sample-python-project repository. You can skip the build triggers section for now, but this is where you would come if you wanted to trigger a build via some type of automated action.

Pipeline setup
Further down you will see a section called Pipeline. Select the option under Definition that says Pipeline script from SCM. SCM just means source control management. This is telling Jenkins that we want it to use our Jenkins file in our GitHub Project Repo to control the build.
Choose Git under SCM, fill out your Repository URL, skip the Credential section, because this is a public repo, and then specify the branch to build. Branch is typically */master or */main. Leave the rest of the options as they are and press save.
Run the Build Job
Now that you have created your Jenkins job, which is a pipeline job, we are ready to run it! Navigate back to the main dashboard and click on your Jenkins Job. On the Job screen, you will see some options on the left. Click Build Now. Further down on the left side bar, you should see your job pop up in the queue. If you click on the job, you can navigate to the Console Output screen. This will show you the stdout of your build job.
If the job passes, you will see Finished: SUCCESS at the bottom of the console output. Chances are, you may need to iterate over you build script and Jenkins setup a few times before you get a successful build. Let's look at some troubleshooting steps.
Build Environment
Jenkins runs in a linux vm. It can be ran directly on a machine or inside a dockerfile. Because of this reason, it is constrained by the machine it is running on. During the build process, you may have gotten an error that Python3 was not installed. In order to get around this, we need to add python to the build machine.
If you are using Docker, then update your dockerfile to include an installation step, such as this.
FROM jenkins/jenkins:lts-jdk11
USER root
RUN apt-get update && apt-get install -y python3 && apt-get install -y python3-venv
USER jenkins
This Dockerfile adds a few needed dependencies to the docker image. Running docker build on this file and then using it as your Jenkins instance should get rid of any dependency issues you have. Note: I had to downgrade my sample-python-project to python 3.9 in order to build this on my debian machine, as Python 3.10 is a bit of a pain to install.
If you are using Jenkins directly on a virtual machine, you can simply ssh into that machine and install what ever needed dependencies you have.
Download the Built Binary
Once your Jenkins job has completed, you may be wondering, where is my Binary? The simple way to get your file off the Jenkins Build machine and onto your local machine, is by using the Jenkins UI.
If you are still on the console output screen, then you are already half way there. Navigate to the Workspaces folder on the left side bar. You should see a workspace directory in the center of the screen. If you click on the path, you should now see a familiar site, our project directory. If you simply click on simple_api, it will initiate a file download in your browser. There are better ways to make this happen however.
More Automation
You could improve this process by adding a post build step to your pipeline file. This post-build step could send the artifact to an S3 bucket or move it to a more accessible folder on the build machine. If this binary is part of a more extensive build process, you may need to fire off some alerts or initiate a different build pipeline in your post-build step that uses the artifact as part of the whole. The possibilities are truly endless.
If you are having difficulty getting this process up and running, I have included an ansible playbook here to help get you started. This playbook is how I deployed my very own Jenkins instance on my own VM. It requires that you have ansible installed, and access to a remote virtual machine.
Ansible Playbook for ready to go Jenkins.
Ansible is a suite of software tools that enables infrastructure as code. It is open-source and the suite includes software provisioning, configuration management, and application deployment functionality.
First, create a folder called ansible (outside of your sample-python-project) and cd into it. Then create a folder called roles and cd into it. Download the Caddy-Ansible role from GitHub, and then go back to the ansible directory...
mkdir ansible
cd ansible
mkdir roles
cd roles
git clone https://GitHub.com/caddy-ansible/caddy-ansible
cd ..
Next let's create our server inventory file. Replace example.com with your server address.
touch hosts
echo "example.com" > hosts
Finally, create the ansible playbook. I named mine jenkins.yml. Make sure to replace example.com with your server name. Also, be sure that the Dockerfile from above is inside the ansible directory.
# jenkins.yml
---
- hosts: all
  remote_user: ""
  become: yes
  roles:
    - role: caddy-ansible
      caddy_setcap: true
      caddy_systemd_capabilities_enabled: true
      caddy_systemd_capabilities: "CAP_NET_BIND_SERVICE"
      caddy_config: |
        example.com {
            reverse_proxy :8080
        }
  tasks:

  ## Setup Group and User
  - name: create docker group
    become: true
    group:
      name: docker
      state: present
  - name: add user to group
    become: true
    user:
      name: ""
      groups: docker
      append: true

  ## Setup Docker
  - name: install packages required by docker
    become: true
    apt:
      update_cache: yes
      state: latest
      name:
      - apt-transport-https
      - ca-certificates
      - curl
      - gpg-agent
      - software-properties-common

  - name: add docker GPG key
    become: true
    apt_key:
      url: https://download.docker.com/linux/debian/gpg
      state: present

  - name: add docker apt repo
    become: true
    apt_repository:
      repo: deb https://download.docker.com/linux/debian bullseye stable
      state: present

  - name: install docker
    become: true
    apt:
      update_cache: yes
      state: latest
      name:
      - docker-ce
      - docker-ce-cli
      - containerd.io

  ## Setup Ansible to Control Docker

  - name: install python dependencies
    become: true
    apt:
      update_cache: yes
      state: latest
      name: python3-pip

  - name: install 'Docker SDK for Python'
    pip:
      name: docker

  ## Build Docker Image
  - name: create build directory
    file:
      path: /root/jenkins-dockerfile
      state: directory
      owner: root
      group: root
      mode: '0755'
  - name: copy Dockerfile
    copy:
      src: ./Dockerfile
      dest: /root/jenkins-dockerfile/Dockerfile
      owner: root
      group: root
      mode: '0644'
  - name: build container image
    docker_image:
      name: jenkins_with_python
      source: build
      build:
        path: /root/jenkins-dockerfile
      state: present

  ## Start Jenkins
  - name: Start Jenkins
    docker_container:
      name: jenkins
      image: jenkins_with_python
      state: started
      ports:
       - "8080:8080"
       - "50000:50000"
      volumes:
       - jenkins_home:/var/jenkins_home
Run this playbook by typing: ansible-playbook -i hosts jenkins.yml --extra-vars "ansible_user=". Be sure to put your username that you use to SSH with into the your_vm_user placeholder spot (without the doulbe curly braces). For more information on ansible, visit there awsome documentation.
The End
If you made it all the way to the end of this series, then you have just finished a massive journey through a ton of awesome tech and tools. In this series, we covered the hows and why's of:
- Creating a Python virtual environment in part 1.
- Using Python Modules and Packages in part 2.
- Building a Single File Binary in part 3.
- Running your Program as a Linux Service using Systemd in part 4.
- Automating your Build Process with Jenkins in part 5.
If you are a Software Engineer or a DevOps Engineer and want to implement some of these practices in your organization, Ippon Technologies can help! Contact sales@ipponusa.com with any questions.

Comments