

Introduction
This is an introduction for users unfamiliar with applied Continuous Integration (CI). You may have read articles like Aaron’s article on Continuous Delivery. If not, please take a look at it as there is some great information there. The purpose of this article is to give you an understanding of how Continuous Integration and Delivery works with JHipster. With the right backing infrastructure, you can use this in your own development shop on a daily basis.
Why JHipster?
JHipster is an enterprise developer’s best friend. It’s like pair programming with the industry’s experts on modern Java web applications.
JHipster is a Yeoman application generator that walks you through adding features (such as search, testing frameworks, and internationalization) to a Spring Boot-based web application back-end with an Angular front-end. It has functionality called sub-generators that allow you to augment deeper functionality, such as adding entities and adding new features to your web application.
By far one of the biggest benefits of using JHipster (even if you don’t use it in a production environment) is by generating a working application and seeing how the latest technologies work as a best practice. If nothing else, you can see the Spring Framework at it’s best, as well as how a well-written Angular application works.
Benefits of CI
Integration
Anybody who has deployed software to a production environment has run into the issue of surprises happening as soon as you go to deploy software, usually at 2 AM on a weekday night. Even if the deployment goes well, you may not run into application issues until users have a chance to break the system during peak loads later on in the day. Instead of doing a build only when moving to a new environment, the concept of continuous integration means you are continuously doing builds and running tests.
Quality
There’s a great article from the fine folks at SonarQube as to why it helps to deal with code quality issues sooner rather than later: Fixing the Water Leak. Essentially the concept is that by regularly checking for quality with every build, you can mitigate issues of staring down a mountain of technical debt once your project is complete. It’s much easier to keep a house clean when you clean up as you go along and make the mess as opposed to waiting until you end up on an episode of Hoarders.
Deployment
Typically, at the end of this process you end up with a build artifact, be it an executable JAR, WAR, or website. At this point, you can choose to deploy the artifact to one of many environments, such as development or test. Depending on your continuous integration tool you may just need to deploy a certain part of your application and not the entire thing.
This could be new front-end code or a new version of a microservice. You can use the features of your continuous integration tool to strategically deploy parts of your application so that it’s in front of people who are responsible for quality sooner.
Let’s do this!
Install JHipster and create an application
This is a multi-step process but once you’ve completed this initial installation only upgrades of the generator are needed (which the JHipster generator will inform you how to do). Follow the instructions at https://jhipster.github.io/installation. Because JHipster is an opinionated framework I will be opinionated and recommend you try the “Local installation with Yarn” instructions.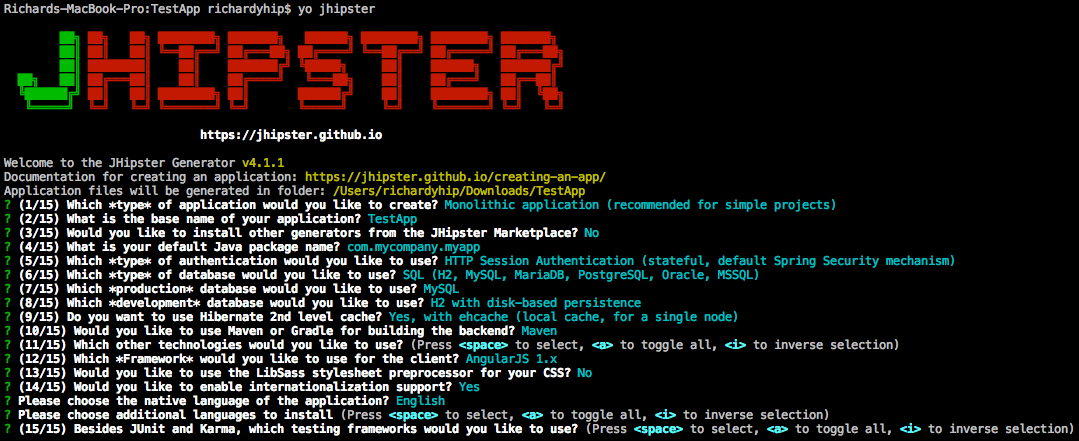
When you’re done with that, go ahead and create an application. That page lists the instructions at the top and lists the detailed questions the generator asks along with detailed instructions below it. Go ahead and create a monolithic app for the purposes of this tutorial.
You will have to create a Jenkinsfile as a part of this. Have no fear; JHipster can create this for you. Run yo jhipster:ci-cd and then answer the questions:
For detailed information about the questions asked and the responses please visit https://jhipster.github.io/setting-up-ci/.
This creates an initial Jenkinsfile which describes your Jenkins Pipeline. This is what is known as “pipeline-as-code”. You get the benefits of using a version control system to track the steps that you use to describe your build. It makes the build process a repeatable part of your workflow as opposed to a specific script run in a black box in some other part of the company or within an opaque application.
Download and start SonarQube
You can download one of the most popular code quality tools, SonarQube, from here: https://www.sonarqube.org/downloads/. Unzip the ZIP file to wherever you’d like and access the subdirectory under the “bin” folder that corresponds to your operating system. For Mac OS or Linux operating systems make sure the sonar.sh file is executable and go ahead and run it: ./sonar.sh start. You can then go to http://localhost:9000 and log in with the default credentials.
Download and install Jenkins
You can find the latest version of Jenkins at http://mirrors.jenkins.io/war-stable/latest/jenkins.war. Download that and run Jenkins by running java -jar jenkins.war. Go to http://localhost:8080 and follow the steps to setup the application and install other files. Finally, log into the app using the default credentials.
You need to make sure Jenkins can use SonarQube. To do this go to the top Jenkins menu ► Manage Jenkins ► Configure System. Go to the section called "SonarQube servers" and click on the "Add SonarQube" button and fill out the information in the field as below. You only need to give it a name (this can be anything and we need to refer to it later in the Jenkinsfile) and the server address. You can use http://localhost:9000 if you installed SonarQube locally. For the version, select the appropriate version: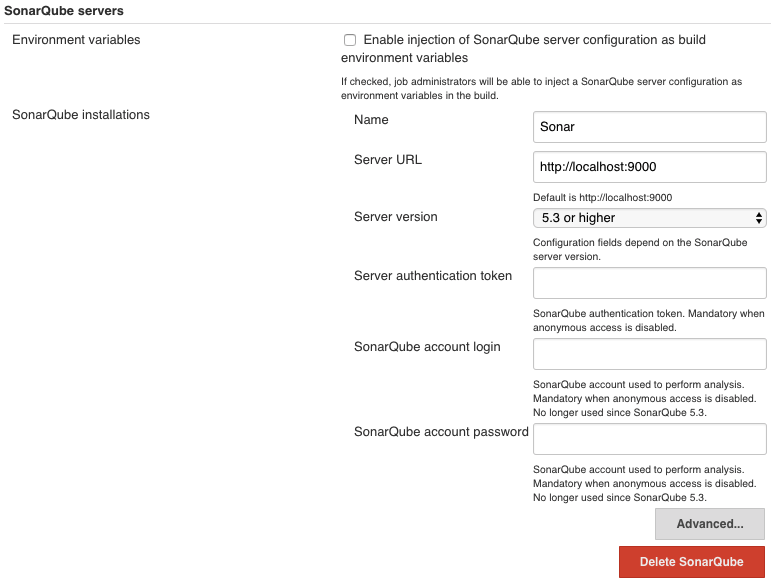
Create a Git repo and push to GitHub
Assuming you’re using GitHub, GitLab, or Bitbucket, if you have your Jenkinsfile checked in at the root of your project, Jenkins will pull that down and use that to execute stages of the pipeline.
If you created a JHipster project in the step above and used the CI sub-generator, you are ready to go. You still need to create a repository and push it to a remote repository. You can follow the instructions here to do that: https://help.github.com/articles/adding-an-existing-project-to-github-using-the-command-line/. This is largely the same for the other hosted Git providers.
Create a new pipeline in Jenkins
Review the instructions here: https://jhipster.github.io/setting-up-ci-jenkins2/. Since we’re not using Docker to run Jenkins, skip to the section called “Create a new job.” After that, run the job and you have just set up a full-fledged Continuous Integration pipeline! Let’s review the parts of the pipeline:
| Stage | Description |
|---|---|
| checkout | Checks out the source code from the source code repository you mentioned in the Jenkins build configuration |
| check java | This verifies that there is version of Java installed on the system running the build |
| clean | Runs the Maven clean goal on the checked out code via the Maven wrapper |
| install tools | Installs the Node runtime and Yarn build tool |
| install yarn | Runs Yarn to build your front-end app |
| backend tests | Runs unit tests for the back-end |
| frontend tests | Runs Karma tests on the front-end |
| packaging | Builds a WAR from the code |
| quality analysis | Runs quality checks on the code |
Note that these steps are run in sequential order from the top of the table to the bottom of the table. If any stage of the build fails, the entire pipeline is considered failed and no subsequent stages are run.
Here is what the pipeline looks like in Jenkins after you execute a pipeline build: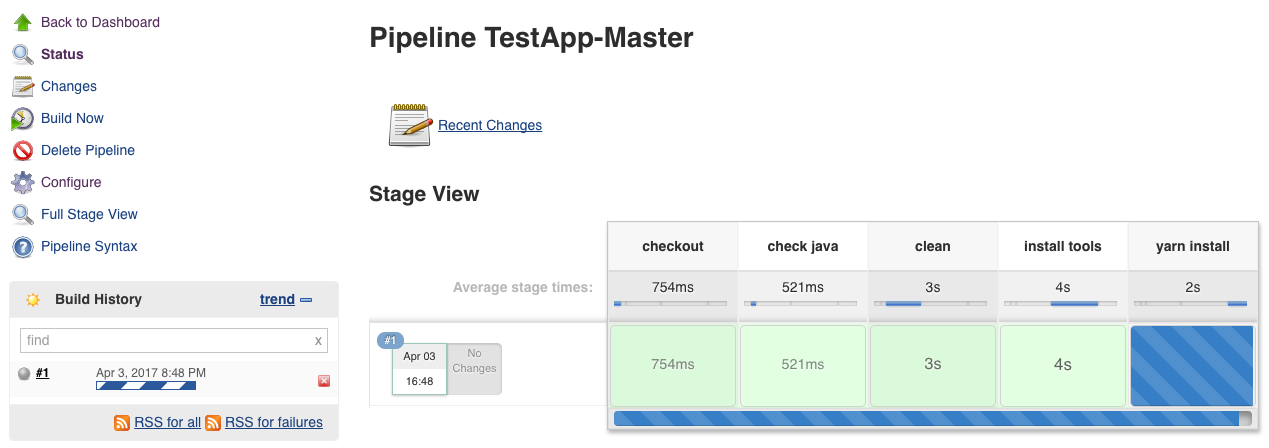
And here is what the completed build looks like in Jenkins: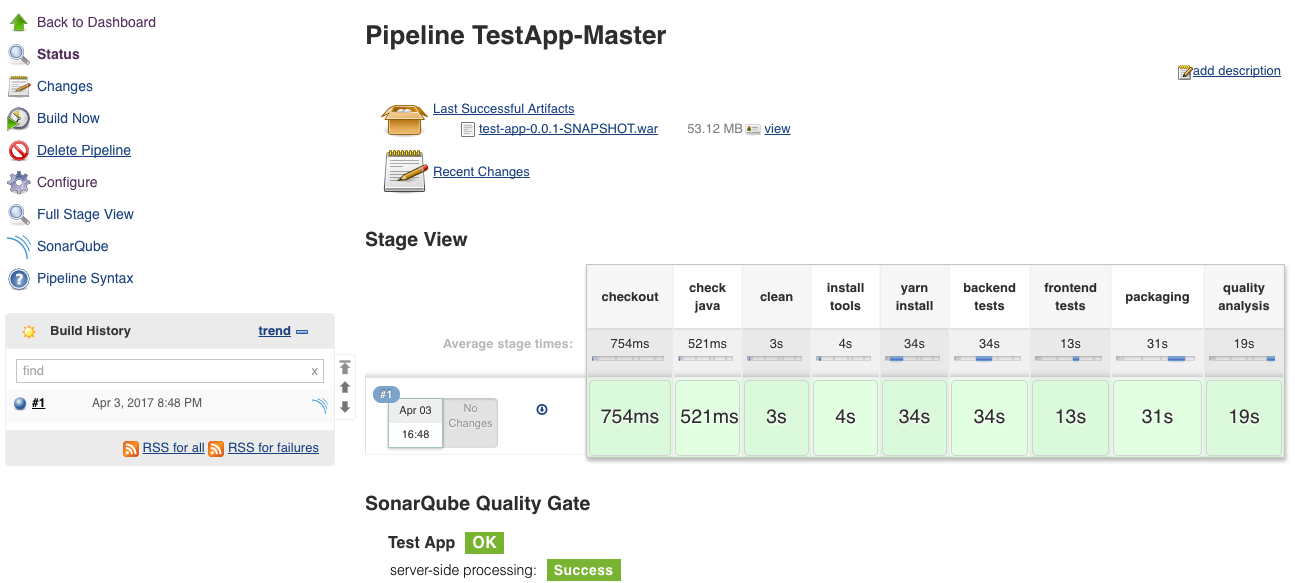
Notice the blue icon in the left-hand side next to the build: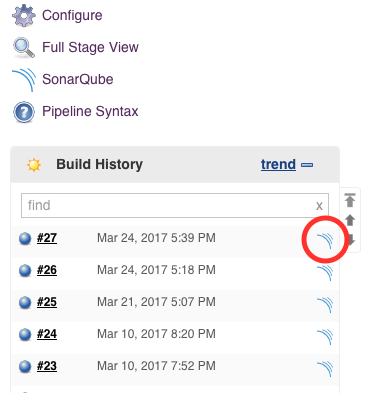
That's a link to the SonarQube report. Click on that and you can see the report for the build: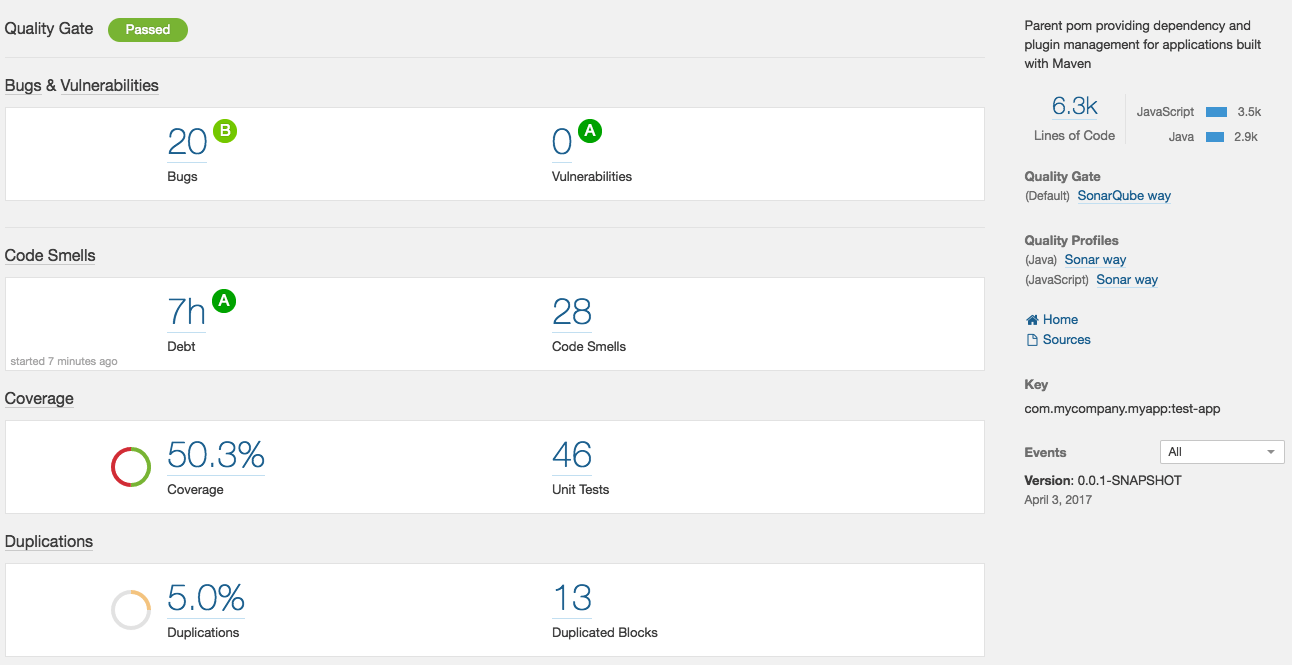
Next steps
Publishing to an artifact repository
If you have a Nexus Repository at your organization, you can install the Nexus Jenkins Plugin. This enables you to create a pipeline stage to publish the artifact created in the packaging stage to your repository for use in deployment. Other tools in your continuous deployment toolchain can now pick up the WAR that was stored in Nexus and deploy it however you please.
Multibranch pipeline
This feature of Jenkins allows you to run a pipeline for each branch in your source code repository that has a Jenkinsfile in each branch. Check out this link for more information: https://jenkins.io/doc/book/pipeline/multibranch/.
Quality gates
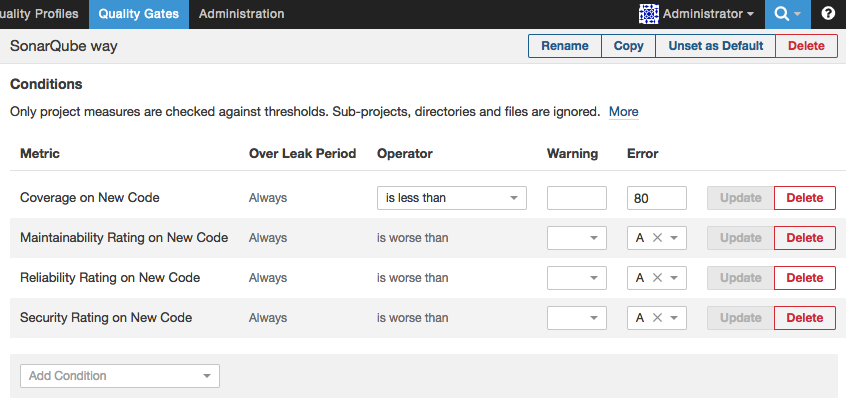
An important feature of SonarQube is the ability to fail a build if it doesn’t meet a given quality threshold. This is important if you have contractual obligations or if you just want to run a well-managed engineering organization. There are many checks you can use (e.g. unit test code coverage or classes covered by unit tests). See the following link on how to customize your quality profiles in SonarQube: https://docs.sonarqube.org/display/SONAR/Quality+Profiles.
Running everything in Docker
I was experimenting with this and it works very well. I wanted to make sure that the reader of this blog is able to execute this tutorial with as little complexity as possible. Docker adds more complexity but the payoffs are numerous. If you would like to try to set this up on your own, check out the Docker Hub links to the tools mentioned above:
Chat integration
I’ve probably done my fair share of annoying coworkers with this one. You can install a Jenkins plugin that allows you to send messages to a Slack group and channel with whatever messaging and color you want as well as information about the Jenkins build (including a link to it). I set it up to send messages when major stages successfully completed but you can definitely customize it to what you need.
Open Web Application Security Project (OWASP) integration
This is something I came across recently. You can use the OWASP Dependency Check Jenkins plugin to scan your app for known vulnerabilities. Check here for more information: https://wiki.jenkins-ci.org/display/JENKINS/OWASP+Dependency-Check+Plugin.
What did you just learn?
You just learned how to:
- Install and setup JHipster
- Install and setup Jenkins
- Install and setup SonarQube
- Create a new JHipster application
- Run a Continuous Integration build pipeline
That’s a lot of stuff. If you have any questions or comments please leave a note below.
If something in this article piqued your interest and you would like more information on JHipster or the services we offer at Ippon USA we’d love to hear from you! Please contact us at contact@ippon.tech with your questions and inquiries.

Comments